In 2024 and beyond, engineering teams face a unique convergence of pressures: faster release cycles, distributed workforces, increasingly complex tech stacks, and the rapid adoption of AI-assisted coding tools like GitHub Copilot. Amid this complexity, the tech lead has emerged as the critical role that bridges high-level engineering strategy with day-to-day delivery outcomes. Without effective technical leadership, even the most talented development teams struggle to ship quality software consistently.
This article focuses on the practical responsibilities of a technical lead within Scrum, Kanban, and SAFe-style agile environments. We’re writing from the perspective of Typo, an engineering analytics platform that works closely with VPs of Engineering, Directors, and Engineering Managers who rely on Tech Leads to translate strategy and data into working software. Our goal is to give you a concrete responsibility map for the tech lead role, along with examples of how to measure impact using engineering metrics like DORA, PR analytics, and cycle time.
Here’s what we’ll cover in this guide:
A technical lead is a senior software engineer who is accountable for the technical direction, code quality, and mentoring within their team—while still actively writing code themselves. Unlike a pure manager or architect who operates at a distance, the Tech Lead stays embedded in the codebase, participating in code reviews, pairing with developers, and making hands-on technical decisions daily.
While the Technical Lead role is not explicitly defined in Scrum, it is commonly found in many software teams. The shift from roles to accountabilities in Scrum has allowed for the integration of Technical Leads without formal recognition in the Scrum Guide.
It’s important to recognize that “Tech Lead” is a role, not necessarily a job title. In many organizations, a Staff Engineer, Principal Engineer, or even a Senior Engineer may act as the TL for a squad or pod. The responsibilities remain consistent regardless of what appears on the org chart.
How this role fits into common agile frameworks varies slightly:
Let’s be explicit about what a Tech Lead is not:
Typical characteristics of a Tech Lead include:

Tech Leads must balance hands-on engineering—often spending 40-60% of their time writing code—with technical decision-making, risk management, and quality stewardship. This section breaks down the core technical responsibilities that define the role.
Key responsibilities of a Technical Lead include defining the technical direction, ensuring code quality, removing technical blockers, and mentoring developers. Technical Leads define the technical approach, select tools/frameworks, and enforce engineering standards for maintainable code. They are responsible for establishing coding standards and leading code review processes to maintain a healthy codebase. The Tech Lead is responsible for guiding architectural decisions and championing quality within the team.
Architecture and Design
The tech lead is responsible for shaping and communicating the team’s architecture, ensuring it aligns with broader platform direction and meets non-functional requirements around performance, security, and scalability. This doesn’t mean dictating every design decision from above. In self organizing teams, architecture should emerge from collective input, with the TL facilitating discussions and providing architectural direction when the team needs guidance.
For example, consider a team migrating from a monolith to a modular services architecture over 2023-2025. The Tech Lead would define the migration strategy, establish boundaries between services, create patterns for inter-service communication, and mentor developers through the transition—all while ensuring the entire team understands the rationale and can contribute to design decisions.
Technical Decision-Making
Tech Leads own or convene decisions on frameworks, libraries, patterns, and infrastructure choices. Rather than making these calls unilaterally, effective TLs use lightweight documentation like Architecture Decision Records (ADRs) to capture context, options considered, and rationale. This creates transparency and helps developers understand why certain technical decisions were made.
The TL acts as a feasibility expert, helping the product owner understand what’s technically possible within constraints. When a new feature request arrives, the Tech Lead can quickly assess complexity, identify risks, and suggest alternatives that achieve the same business outcome with less technical implementation effort.
Code Quality and Standards
A great tech lead sets and evolves coding standards, code review guidelines, branching strategies, and testing practices for the team. This includes defining minimum test coverage requirements, establishing CI rules that prevent broken builds from merging, and creating review checklists that ensure consistent code quality across the codebase.
Modern Tech Leads increasingly integrate AI code review tools into their workflows. Platforms like Typo can track code health over time, helping TLs identify trends in code quality, spot hotspots where defects cluster, and ensure that experienced developers and newcomers alike maintain consistent standards.
Technical Debt Management
Technical debt accumulates in every codebase. The Tech Lead’s job is to identify, quantify, and prioritize this debt in the product backlog, then negotiate with the product owner for consistent investment in paying it down. Many mature teams dedicate 10-20% of sprint capacity to technical debt reduction, infrastructure improvements, and automation.
Without a TL advocating for this work, technical debt tends to accumulate until it significantly slows feature development. The Tech Lead translates technical concerns into business terms that stakeholders can understand—explaining, for example, that addressing authentication debt now will reduce security incident risk and cut feature development time by 30% in Q3.
Security and Reliability
Tech Leads partner with SRE and Security teams to ensure secure-by-default patterns, resilient architectures, and alignment with operational SLIs and SLOs. They’re responsible for ensuring the team understands security best practices, that code reviews include security considerations, and that architectural choices support reliability goals.
This responsibility extends to incident response. When production issues occur, the Tech Lead often helps identify the root cause, coordinates the technical response, and ensures the team conducts blameless postmortems that lead to genuine improvements rather than blame.
Tech Leads are critical to turning product intent into working software within short iterations without burning out the team. While the development process can feel chaotic without clear technical guidance, a skilled TL creates the structure and clarity that enables consistent delivery.
Partnering with Product Owners / Product Managers
The Tech Lead works closely with the product owner during backlog refinement, helping to slice user stories into deliverable chunks, estimate technical complexity, and surface dependencies and risks early. When the Product Owner proposes a feature, the TL can quickly assess whether it’s feasible, identify technical prerequisites, and suggest acceptance criteria that ensure the implementation meets both business and technical requirements.
This partnership is collaborative, not adversarial. The Product Owner owns what gets built and in what priority; the Tech Lead ensures the team understands how to build it sustainably. Neither can write user stories effectively without input from the other.
Working with Scrum Masters / Agile Coaches
The scrum master role focuses on optimizing process and removing organizational impediments. The Tech Lead, by contrast, optimizes technical flow and removes engineering blockers. These responsibilities complement each other without overlapping.
In practice, this means the TL and Scrum Master collaborate during ceremonies. In sprint planning, the TL helps the team break down work technically while the Scrum Master ensures the process runs smoothly. In retrospectives, both surface different types of impediments—the Scrum Master might identify communication breakdowns while the Tech Lead highlights flaky tests slowing the agile process.
Sprint and Iteration Planning
The Tech Lead helps the team break down initiatives into deliverable slices, set realistic commitments based on team velocity, and avoid overcommitting. This requires understanding both the technical work involved and the team’s historical performance.
Effective TLs push back when plans are unrealistic. If leadership wants to hit an aggressive sprint goal, the Tech Lead can present data showing that the team’s average velocity makes the commitment unlikely, then propose alternatives that balance ambition with sustainability.
Cross-Functional Collaboration
Modern software development requires collaboration across disciplines. The Tech Lead coordinates with the UX designer on technical constraints that affect interface decisions, works with Data teams on analytics integration, partners with Security on compliance requirements, and collaborates with Operations on deployment and monitoring.
For example, launching a new AI-based recommendation engine might involve the TL coordinating across multiple teams: working with Data Science on model integration, Platform on infrastructure scaling, Security on data privacy requirements, and Product on feature rollout strategy.
Stakeholder Communication
Tech Leads translate technical trade-offs into business language for engineering managers, product leaders, and sometimes customers. When a deadline is at risk, the TL can explain why in terms stakeholders understand—not “we have flaky integration tests” but “our current automation gaps mean we need an extra week to ship with confidence.”
This communication responsibility becomes especially critical under tight deadlines. The TL serves as a bridge between the team’s technical reality and stakeholder expectations, ensuring both sides have accurate information to make good decisions.
Effective Tech Leads are multipliers. Their main leverage comes from improving the whole team’s capability, not just their own individual contributor output. A TL who ships great code but doesn’t elevate team members is only half-effective.
Mentoring and Skill Development
Tech Leads provide structured mentorship for junior and mid-level developers on the team. This includes pair programming sessions on complex problems, design review discussions that teach architectural thinking, and creating learning plans for skill gaps the team needs to close.
Mentoring isn’t just about technical skills. TLs also help developers understand how to scope work effectively, how to communicate technical concepts to non-technical stakeholders, and how to navigate ambiguity in requirements.
Feedback and Coaching
Great TLs give actionable feedback constantly—on pull requests, design documents, incident postmortems, and day-to-day interactions. The goal is continuous improvement, not criticism. Feedback should be specific (“this function could be extracted for reusability”) rather than vague (“this code needs work”).
An agile coach might help with broader process improvements, but the Tech Lead provides the technical coaching that helps individual developers grow their engineering skills. This includes answering questions thoughtfully, explaining the “why” behind recommendations, and celebrating when team members demonstrate growth.
Enabling Ownership and Autonomy
A new tech lead often makes the mistake of trying to own too much personally. Mature TLs delegate ownership of components or features to other developers, empowering them to make decisions and learn from the results. The TL’s job is to create guardrails and provide guidance, not to become a gatekeeper for every change.
This means resisting the urge to be the hero coder who solves every hard problem. Instead, the TL should ask: “Who on the team could grow by owning this challenge?” and then provide the support they need to succeed.
Psychological Safety and Culture
The Tech Lead models the culture they want to create. This includes leading blameless postmortems where the focus is on systemic improvements rather than individual blame, maintaining a respectful tone in code reviews, and ensuring all team members feel included in technical discussions.
When a junior developer makes a mistake that causes an incident, the TL’s response sets the tone for the entire team. A blame-focused response creates fear; a learning-focused response creates safety. The best TLs use failures as opportunities to improve both systems and skills.
Team Health Signals
Modern Tech Leads use engineering intelligence tools to monitor signals that indicate team well-being. Metrics like PR review wait time, cycle time, interruption frequency, and on-call burden serve as proxies for how the team is actually doing.
Platforms like Typo can surface these signals automatically, helping TLs identify when a team builds toward burnout before it becomes a crisis. If one developer’s review wait times spike, it might indicate they’re overloaded. If cycle time increases across the board, it might signal technical debt or process problems slowing everyone down.
Modern Tech Leads increasingly rely on metrics to steer continuous improvement. This isn’t about micromanagement—it’s about having objective data to inform decisions, spot problems early, and demonstrate impact over time.
The shift toward data-driven technical leadership reflects a broader trend in engineering. Just as product teams use analytics to understand user behavior, engineering teams can use delivery and quality metrics to understand their own performance and identify opportunities for improvement.
Flow and Delivery Metrics
DORA metrics have become the standard for measuring software delivery performance:
Beyond DORA, classic SDLC metrics like cycle time (from work started to work completed), work-in-progress limits, and throughput help TLs understand where work gets stuck and how to improve flow.
Code-Level Metrics
Tech Leads should monitor practical signals that indicate code health:
These metrics help TLs make informed decisions about where to invest in code quality improvements. If one module shows high defect density and frequent changes, it’s a candidate for dedicated refactoring efforts.
Developer Experience Metrics
Engineering output depends on developer well-being. TLs should track:
These qualitative and quantitative signals help TLs understand friction in the development process that pure output metrics might miss.
How Typo Supports Tech Leads
Typo consolidates data from GitHub, GitLab, Jira, CI/CD pipelines, and AI coding tools to give Tech Leads real-time visibility into bottlenecks, quality issues, and the impact of changes. Instead of manually correlating data across tools, TLs can see the complete picture in one place.
Specific use cases include:
Data-Informed Coaching
Armed with these insights, Tech Leads can make 1:1s and retrospectives more productive. Instead of relying on gut feel, they can point to specific data: “Our cycle time increased 40% last sprint—let’s dig into why” or “PR review latency has dropped since we added a second reviewer—great job, team.”
This data-informed approach focuses conversations on systemic fixes—process, tooling, patterns—rather than blaming individuals. The goal is always continuous improvement, not surveillance.
Every Tech Lead wrestles with the classic tension: code enough to stay credible and informed, but lead enough to unblock and grow the team. There’s no universal formula, but there are patterns that help.
Time Allocation
Most Tech Leads find a 50/50 split between coding and leadership activities works as a baseline. In practice, this balance shifts constantly:
The key is intentionality. TLs should consciously decide where to invest time each week rather than just reacting to whatever’s urgent.
Avoiding Bottlenecks
Anti-patterns to watch for:
Healthy patterns include enabling multiple reviewers with merge authority, documenting decisions so other developers understand the rationale, and deliberately building shared ownership of complex systems.
Choosing What to Code
Not all coding work is equal for a Tech Lead. Prioritize:
Delegate straightforward tasks that provide good growth opportunities for other developers. The goal is maximum leverage, not maximum personal output.
Communication Rhythms
Daily and weekly practices help TLs stay connected without micromanaging:
These rhythms create structure without requiring the TL to be in every conversation.
Personal Sustainability
Learn how DORA metrics can help improve software delivery performance and efficiency.
Tech Leads wear many hats, and it’s easy to burn out. Protect yourself by:
A burned-out TL can’t effectively lead. Sustainable pace matters for the person in the role, not just the team they lead.
The Tech Lead role looks different at a 10-person startup versus a 500-person engineering organization. Understanding how responsibilities evolve helps TLs grow their careers and helps leaders build effective high performing teams at scale.
From Single-Team TL to Area/Tribe Lead
As organizations grow, some Tech Leads transition from leading a single squad to coordinating multiple teams. This shift involves:
For example, a TL who led a single payments team might become a “Technical Area Lead” responsible for the entire payments domain, coordinating three squads with their own TLs.
Interaction with Staff/Principal Engineers
In larger organizations, Staff and Principal Engineers define cross-team architecture and long-term technical vision. Tech Leads collaborate with these senior ICs, implementing their guidance within their teams while providing ground-level feedback on what’s working and what isn’t.
This relationship should be collaborative, not hierarchical. The Staff Engineer brings breadth of vision; the Tech Lead brings depth of context about their specific team and domain.
Governance and Standards: Learn how integrating development tools can support governance and enforce engineering standards across your team.
As organizations scale, governance structures emerge to maintain consistency:
Tech Leads participate in and contribute to these forums, representing their team’s perspective while aligning with broader organizational direction.
Hiring and Onboarding
Tech Leads typically get involved in hiring:
Once new engineers join, the TL leads their technical onboarding—introducing them to the tech stack, codebase conventions, development practices, and ongoing projects.
Measuring Maturity
TLs can track improvement over quarters using engineering analytics. Trend lines for cycle time, defect rate, and deployment frequency show whether leadership decisions are paying off. If cycle time drops 25% over two quarters after implementing PR size limits, that’s concrete evidence of effective technical leadership.
For example, when spinning up a new AI feature squad in 2025, an organization might assign an experienced TL, then track metrics from day one to measure how quickly the team reaches productive velocity compared to previous team launches.
Tech Leads need clear visibility into delivery, quality, and developer experience to make better decisions. Without data, they’re operating on intuition and incomplete information. Typo provides the view that transforms guesswork into confident leadership.
SDLC Visibility
Typo connects Git, CI, and issue trackers to give Tech Leads end-to-end visibility from ticket to deployment. You can see where work is stuck—whether it’s waiting for code review, blocked by failed tests, or sitting in a deployment queue. This visibility helps TLs intervene early before small delays become major blockers.
AI Code Impact and Code Reviews
As teams adopt AI coding tools like Copilot, questions arise about impact on quality. Typo can highlight how AI-generated code affects defects, review time, and rework rates. This helps TLs tune their team’s practices—perhaps AI-generated code needs additional review scrutiny, or perhaps it’s actually reducing defects in certain areas.
Delivery Forecasting
Stop promising dates based on optimism. Typo’s delivery signals help Tech Leads provide more reliable timelines to Product and Leadership based on historical performance data. When asked “when will this epic ship?”, you can answer with confidence rooted in your team’s actual velocity.
Developer Experience Insights
Developer surveys and behavioral signals help TLs understand burnout risks, onboarding friction, and process pain points. If new engineers are taking twice as long as expected to reach full productivity, that’s a signal to invest in better documentation or mentoring practices.
If you’re a Tech Lead or engineering leader looking to improve your team’s delivery speed and quality, Typo can give you the visibility you need. Start a free trial to see how engineering analytics can amplify your technical leadership—or book a demo to explore how Typo fits your team’s specific needs.
The tech lead role sits at the intersection of deep technical expertise and team leadership. In agile environments, this means balancing hands-on engineering with mentoring, architecture with collaboration, and personal contribution with team multiplication.
With clear responsibilities, the right practices, and data-driven visibility into delivery and quality, Tech Leads become the force multipliers that turn engineering strategy into shipped software. The teams that invest in strong technical leadership—and give their TLs the tools to see what’s actually happening—consistently outperform those that don’t.

A few years back, Agile was born out of a need to break free from rigid, waterfall-style development. It promises faster delivery, happier teams, and better products. However, for many organizations, Agile looks more like a checklist than a mindset.
With AI, remote teams, and DevOps integrations becoming the norm, the classic Agile playbook needs a modern update.
Agile methodologies have been continuously evolving. Since its inception, Agile has seen a remarkable transformation and has seen widespread adoption among organizations. This is because it breaks down the rigidity of traditional approaches and helps teams to deal with complexities and rapid changes effectively.
However, many organizations are still facing significant challenges in their agile journey. Due to a rise in distributed teams, organizations find it difficult to shift, as Agile was primarily built for in-person teams. It is also seen that organizational culture and regulatory requirements may conflict with Agile values, which is causing hesitation among tech leaders.
Agile is equated to simply moving fast or doing more in less time. But this isn’t correct. Going forward with this superficial concept leads to focusing on terminologies without a genuine mindset change, further resulting in poor outcomes and disengaged teams. Teams must understand that Agile isn’t just a set of processes or checklists. They must understand the core concept and intent behind the practice.
Resistance comes from fear of the unknown, loss of control, and negative past experiences. However, Agile isn’t only a process change. It is also a cultural shift, i.e., how organizations think and operate. When organizations resist change, this leads to incomplete adoption of Agile practices, resulting in poor engagement and negative product quality. To overcome this, organizations must openly communicate, provide consistent training, and cultivate trust and psychological safety.
A key mistake organizations make is relating Agile to abandoning planning and structure. Adopting Agile practices encourages flexibility, but it also values clear goals and measurable milestones to guide progress. Without these, teams lose direction and miss deadlines, resulting in chaos among them.
Rigidly following Scrum ceremonies, obsessing over metrics, or prioritizing tools over the people using them can backfire. When every task becomes a checkbox, it stifles creativity and collaboration. True Agile adoption means valuing individuals, team well-being, and cross-functional collaboration over strict adherence to tools and processes.
Hybrid Agile frameworks combine Agile with complementary methods to offer a flexible and structured approach. Two of them are Scrumban and SAFe.
ScrumBan blends Scrum’s structured sprints with Kanban's visual workflow to manage unpredictable workload and address stakeholder needs. This framework is highly flexible, which allows teams to adjust their processes and workflows based on real-time feedback and changing priorities.
SAFe is suited for large organizations to coordinate multiple teams. Teams are organized into ARTs, which are long-lived teams of Agile teams that plan, commit, and execute together. It supports regular retrospectives and inspect-and-adapt cycles to improve processes and respond to change.
Integrating Agile with DevOps practices enables frequent, reliable releases. While Agile provides the framework for iterative, customer-focused development, DevOps supplies the automation and operational discipline needed to deliver those iterations quickly. This helps deliver high-quality software to end users and supports rapid response to customer feedback. It also breaks down silos between development and operations to foster better teamwork and freeing them to focus on innovation and value-adding activities.
Traditional Agile practices were designed for software development, where work is predictable and requirements are clear. However, with ever-evolving tech, there is a rise in AI/ML projects that are highly iterative and experimental. Fostering a culture where decisions are based on data and experimental results and automating model validation, data quality checks, and performance monitoring helps AI/ML and data teams work more efficiently. Customizing Agile practices to support experimentation and flexibility allows these teams to deliver innovative solutions.
In modern Agile, teams must shift from output to outcome metrics. While output metrics focus on hitting velocity or story point targets, outcome metrics aim to deliver real value based on user behaviour, business impact, or customer success. These metrics bridge the gap between product strategy and Agile delivery. It fosters innovation as Agile teams explore diverse solutions to achieve goals and encourage thinking critically about priorities and making data-informed decisions.
Slack is an instant messaging tool that enables software development teams to organize their conversation into specific topics or team channels. This allows for more effective communication and supports sync and async conversations. Slack can be seamlessly integrated with over 2600 popular collaboration and productivity tools.
JIRA is a leading collaboration tool for software development teams that supports Scrum and Kanban boards. It allows them to plan, track, and manage their project efficiently. It provides issue tracking, sprint planning, and custom workflows to suit your development process.
ClickUp is an all-in-one platform that provides task tracking, documentation, agile boards, and plotting projects and tasks visually. It helps structure the work hierarchy, i.e., breaking down into spaces, folders, lists, and tasks. ClickUp can also be integrated with third-party applications, including Slack, Google Calendar, and Hubspot.
Zoho Projects is a popular project management tool that allows developers to create, assign, track tasks, and time spent on them. It also provides insights into project efforts and resource allocations. It can also be integrated with Zoho’s other services, such as Zoho Books and Zoho’s Finance Suite, as well as third-party apps like MS Office, Zapier, and Google Drive.
GitHub Actions is an automation platform that enables teams to automate software development workflows directly within GitHub repositories. It is primarily used for CI/CD workflows that allow developers to automatically build, test, and deploy code. It also helps create custom workflows using YAML files to automate a wide range of tasks.
Circle CI is a leading cloud native CI/CD platform that allows developers to rapidly build, test, and deploy applications at scale. It offers built-in security and compliance tools. Circle CI can be seamlessly integrated with third-party applications like GitHub, GitLab, Slack, Docker and Terraform.
Selenium is a popular test automation tool for web browsers. It supports multiple programming languages such as Python, JavaScript (Node.js), Ruby, and C#. It provides end-to-end test automation and can be integrated with various frameworks such as Cucumber to implement Behaviour-driven development.
Katalon is a no-code, low-code, and code-based test automation tool. It generates test reporting and tracks test execution results with built-in reporting capabilities. It also provides a detailed solution for end-to-end testing of mobile and web applications. Katalon can be integrated with popular CI/CD tools like Jenkins, Azure DevOps, and GitHub Actions.
Typo is a well-known engineering analytics platform that helps software teams gain visibility into SDLC, identify bottlenecks, and automate workflows. It connects engineering data with business goals and uses AI to provide insights into developer workload and identify areas for improvement. Typo can be integrated with various applications such as GitHub, GitLab, JIRA, Jenkins, and Slack.
Agile, at its heart, is all about learning, adapting, and delivering value. Modern software development doesn’t need a new methodology. It needs a more honest, adaptable version of what we already have. That means adapting the framework to the real world: remote teams, fast-changing requirements, and evolving technologies.
After all, real agile happens when teams shift from checking boxes to creating value.

For developers working in Windows environments, Git Bash offers a powerful bridge between the Unix command line world and Windows operating systems. This guide will walk you through essential Git Bash commands, practical workflows, and time-saving techniques that will transform how you interact with your code repositories.
Git Bash serves as a command-line terminal for Windows users that combines Git functionality with the Unix Bash shell environment. Unlike the standard Windows Command Prompt, Git Bash provides access to both Git commands and Unix utilities, creating a consistent environment across different operating systems.
At its core, Git Bash offers:
For Windows developers, Git Bash eliminates the barrier between operating systems, providing the same powerful command-line tools that macOS and Linux users enjoy. Rather than switching contexts between different command interfaces, Git Bash creates a unified experience.
Before diving into commands, let's ensure your Git Bash environment is properly configured.
When using Git for the first time, set up your identity:
# Set your username
git config --global user.name "Your Name"

# Set your email
git config --global user.email "youremail@example.com"

# Verify your settings
git config --list
Make Git Bash your own with these customizations:
# Enable colorful output
git config --global color.ui auto

# Set your preferred text editor
git config --global core.editor "code --wait"  # For VS Code
For a more informative prompt, create or edit your .bash_profile file to show your current branch:
# Add this to your .bash_profile
parse_git_branch() {
    git branch 2> /dev/null | sed -e '/^[^*]/d' -e 's/* \(.*\)/(\1)/'
}
export PS1="\[\033[36m\]\u\[\033[m\]@\[\033[32m\]\h:\[\033[33;1m\]\w\[\033[m\]\[\033[32m\]\$(parse_git_branch)\[\033[m\]$ "
Git Bash's power begins with basic file system navigation and management.
# Show current directory
pwd

# List files and directories
ls
ls -la  # Show hidden files and details

# Change directory
cd project-folder
cd ..   # Go up one level
cd ~    # Go to home directory
cd /c/  # Access C: drive
# Create a new directory
mkdir new-project

# Create a new file
touch README.md

# Copy files
cp original.txt copy.txt
cp -r source-folder/ destination-folder/  # Copy directory

# Move or rename files
mv oldname.txt newname.txt
mv file.txt /path/to/destination/

# Delete files and directories
rm unwanted.txt
rm -rf old-directory/  # Be careful with this!
# View file content
cat config.json

# View file with pagination
less large-file.log

# Search for text in files
grep "function" *.js
grep -r "TODO" .  # Search recursively in current directory
These commands form the foundation of Git operations in your daily workflow.
# Initialize a new repository
git init

# Clone an existing repository
git clone https://github.com/username/repository.git

# Clone to a specific folder
git clone https://github.com/username/repository.git custom-folder-name
# Check repository status
git status

# Add files to staging area
git add filename.txt       # Add specific file
git add .                  # Add all changes
git add *.js               # Add all JavaScript files
git add src/               # Add entire directory

# Commit changes
git commit -m "Add user authentication feature"

# Amend the last commit
git commit --amend -m "Updated message"
# View commit history
git log

# Compact view of history
git log --oneline

# Graph view with branches
git log --graph --oneline --decorate

# View changes in a commit
git show commit-hash

# View changes between commits
git diff commit1..commit2
Branching is where Git's power truly shines, allowing parallel development streams.
# List all branches
git branch               # Local branches
git branch -r            # Remote branches
git branch -a            # All branches

# Create a new branch
git branch feature-login

# Create and switch to a new branch
git checkout -b feature-payment

# Switch branches
git checkout main

# Rename a branch
git branch -m old-name new-name

# Delete a branch
git branch -d feature-complete
git branch -D feature-broken  # Force delete
# Merge a branch into current branch
git merge feature-complete

# Merge with no fast-forward (creates a merge commit)
git merge --no-ff feature-login

# Rebase current branch onto another
git rebase main

# Interactive rebase to clean up commits
git rebase -i HEAD~5
Connect your local work with remote repositories for collaboration.
# List remote repositories
git remote -v

# Add a remote
git remote add origin https://github.com/username/repo.git

# Change remote URL
git remote set-url origin https://github.com/username/new-repo.git

# Remove a remote
git remote remove upstream
# Download changes without merging
git fetch origin

# Download and merge changes
git pull origin main

# Upload local changes
git push origin feature-branch

# Set up branch tracking
git branch --set-upstream-to=origin/main main
Save precious keystrokes with Git aliases and Bash shortcuts.
Add these to your .gitconfig file:
[alias]
    # Status, add, and commit shortcuts
    s = status
    a = add
    aa = add --all
    c = commit -m
    ca = commit --amend

    # Branch operations
    b = branch
    co = checkout
    cob = checkout -b

    # History viewing
    l = log --oneline --graph --decorate --all
    ld = log --pretty=format:"%C(yellow)%h%Cred%d\\ %Creset%s%Cblue\\ [%cn]" --decorate

    # Useful combinations
    save = !git add --all && git commit -m 'SAVEPOINT'
    undo = reset HEAD~1 --mixed
    wipe = !git add --all && git commit -qm 'WIPE SAVEPOINT' && git reset HEAD~1 --hard
Add these to your .bash_profile or .bashrc:
# Quick status check
alias gs='git status'

# Branch management
alias gb='git branch'
alias gba='git branch -a'
alias gbd='git branch -d'

# Checkout shortcuts
alias gco='git checkout'
alias gcb='git checkout -b'
alias gcm='git checkout main'

# Pull and push simplified
alias gpl='git pull'
alias gps='git push'
alias gpom='git push origin main'

# Log visualization
alias glog='git log --oneline --graph --decorate'
alias gloga='git log --oneline --graph --decorate --all'
Level up your Git Bash skills with these powerful techniques.
# Save changes temporarily
git stash

# Save with a description
git stash push -m "Work in progress for feature X"

# List all stashes
git stash list

# Apply most recent stash
git stash apply

# Apply specific stash
git stash apply stash@{2}

# Apply and remove from stash list
git stash pop

# Remove a stash
git stash drop stash@{0}

# Clear all stashes
git stash clear
# Search commit messages
git log --grep="bug fix"

# Find who changed a line
git blame filename.js

# Find when a function was added/removed
git log -L :functionName:filename.js

# Find branches containing a commit
git branch --contains commit-hash

# Find all commits that modified a file
git log -- filename.txt
# Cherry-pick a commit
git cherry-pick commit-hash

# Revert a commit
git revert commit-hash

# Interactive rebase for cleanup
git rebase -i HEAD~5

# View reflog (history of HEAD changes)
git reflog

# Reset to a previous state
git reset --soft HEAD~3  # Keep changes staged
git reset --mixed HEAD~3  # Keep changes unstaged
git reset --hard HEAD~3 # Discard changes (careful!)Git Bash excels at solving common Git predicaments.
# Forgot to add a file to commit
git add forgotten-file.txt
git commit --amend --no-edit

# Committed to wrong branch
git branch correct-branch  # Create the right branch
git reset HEAD~ --soft     # Undo the commit but keep changes
git stash                  # Stash the changes
git checkout correct-branch
git stash pop              # Apply changes to correct branch
git add .                  # Stage changes
git commit -m "Commit message"  # Commit to correct branch
# When merge conflict occurs
git status  # Check which files have conflicts

# After manually resolving conflicts
git add resolved-file.txt
git commit  # Completes the merge
For more complex conflicts:
# Use merge tool
git mergetool

# Abort a problematic merge
git merge --abort
# Find deleted commits with reflog
git reflog

# Restore lost commit
git checkout commit-hash

# Create branch from detached HEAD
git checkout -b recovery-branch
While graphical Git clients are convenient, Git Bash provides superior capabilities in several scenarios:
Scenario: Cleanup branches after sprint completion
GUI approach: Manually select and delete each branch - tedious and error-prone.
Git Bash solution:
# Delete all local branches that have been merged to main
git checkout main
git branch --merged | grep -v "main" | xargs git branch -d
Scenario: Find who introduced a bug and when
GUI approach: Scroll through commit history hoping to spot the culprit.
Git Bash solution:
# Find when a line was changed
git blame -L15,25 problematic-file.js

# Find commits mentioning the feature
git log --grep="feature name"

# Find commits that changed specific functions
git log -p -S "functionName"
Scenario: Standardize commit formatting for team
GUI approach: Distribute written guidelines and hope team follows them.
Git Bash solution:
# Set up a commit template
git config --global commit.template ~/.gitmessage

# Create ~/.gitmessage with your template
# Then add a pre-commit hook to enforce standards
These examples demonstrate how Git Bash can handle complex scenarios more efficiently than GUI tools, especially for batch operations, deep repository analysis, and customized workflows.
Git Bash provides a Unix-like shell environment on Windows, including Bash commands (like grep, ls, and cd) that work differently from their CMD equivalents. It also comes pre-loaded with Git commands and supports Unix-style paths using forward slashes, making it more consistent with macOS and Linux environments.
While GUI clients are user-friendly, Git Bash offers powerful capabilities for complex operations, scripting, and automation that most GUIs can't match. Even if you primarily use a GUI, learning Git Bash gives you a fallback for situations where the GUI is insufficient or unavailable.
Windows: Download Git for Windows from git-scm.com, which includes Git Bash.
macOS: Git Bash isn't necessary since macOS already has a Unix-based Terminal. Install Git via Homebrew with brew install git.
Linux: Similarly, Linux distributions have native Bash terminals. Install Git with your package manager (e.g., apt-get install git for Ubuntu).
No! Git Bash provides a full Bash shell environment. You can use it for any command-line tasks, including file management, text processing, and running scripts—even in projects that don't use Git.
Set up credential storage with:
# Cache credentials for 15 minutes
git config --global credential.helper cache

# Store credentials permanently
git config --global credential.helper store

# Use Windows credential manager
git config --global credential.helper wincred
Yes, you can set up SSH keys for different accounts and create a config file to specify which key to use for which repository. This allows you to manage multiple accounts without constant credential switching.
By mastering Git Bash commands, you'll gain powerful tools that extend far beyond basic version control. The command line gives you precision, automation, and deep insight into your repositories that point-and-click interfaces simply can't match. Start with the basics, gradually incorporate more advanced commands, and soon you'll find Git Bash becoming an indispensable part of your development workflow.
Whether you're resolving complex merge conflicts, automating repetitive tasks, or diving deep into your project's history, Git Bash provides the tools you need to work efficiently and effectively. Embrace the command line, and watch your productivity soar.

Code rot, also known as software rot, refers to the gradual deterioration of code quality over time. Software rot, also known as code rot or software decay, refers to the gradual deterioration of software quality over time. This guide is for software developers, engineering managers, and technical leads interested in understanding and preventing code rot. Understanding code rot is essential for maintaining software quality, reducing costs, and ensuring long-term project success.
Another way to describe this gradual decline is 'software entropy,' which refers to the increasing disorder and complexity in a codebase over time, making software harder to maintain and more prone to errors.
Code rot and technical debt represent different aspects of software degradation. Technical debt is a deliberate choice to take shortcuts in development, while code rot is passive deterioration that occurs over time. The term was more common in the early days of software engineering but is now often grouped under technical debt. Software decay and software degradation are alternative terms used to describe the overall decline in software quality and maintainability over time.
Research Gate has found that maintenance consumes 40-80% of a software project’s total cost, much of it due to code rot.
In this guide, we’ll explore what code rot is, its types, causes, symptoms, consequences, and how to prevent it.
Code rot occurs when software degrades over time through a slow decay or gradual decay process, sometimes referred to as bit rot, that impacts software quality and maintainability. This happens due to accumulating inefficiencies and poor design decisions. If you don’t update the code often, you might also be prone to it. As code rot progresses, software becomes increasingly fragile, difficult to maintain, and more prone to bugs or defects. If not addressed, code may become more error-prone, harder to maintain, or even fail, leading to significant risks for the organization. As a result of these inefficiencies, developers face increased bugs, longer development cycles, and higher maintenance costs. Legacy systems are especially susceptible to code rot due to outdated dependencies and poor coding practices, making the slow deterioration of software a significant concern.
Let’s say you’re building an eCommerce platform where each update introduces duplicate logic. This will create an unstructured and tangled codebase, which is a form of active code rot.
The same platform also has a legacy API integration. If this legacy code is unused but still exists in the codebase, it becomes unused code that can lead to dormant rot. Over time, this neglected code can experience structural decay, resulting in unnecessary dependencies and increased maintenance overhead.
Note that both types increase technical debt, slowing down future development.
The uncomfortable truth is that even your best code is actively decaying right now. This gradual decline in code quality is often referred to as software erosion. Your development practices are probably accelerating its demise. As more code is added to a system, the complexity and risk of code rot increase, making maintenance more challenging.
Tracking software metrics—such as cycle time, code churn, and cyclomatic complexity—can help identify the accumulation of technical debt and early signs of code rot. Accumulated technical debt, caused by quick fixes, poor coding practices, and outdated dependencies, is a major contributor to code rot.
Code maintenance is the primary defense against software rot and gradual decay.
Code that isn’t actively maintained tends to decay. When regular upkeep is neglected, maintenance debt accumulates—this is a form of technical debt that builds up over time and makes future development more difficult and costly. Unpatched dependencies, minor bugs, or problematic sections that aren’t refactored — these small inefficiencies compound into major problems. Proactive code maintenance, which includes regular updates and refactoring, is a key strategy to prevent maintenance debt from hindering progress. Unmaintained code becomes outdated and difficult to work with. Proactive code maintenance involves a combination of manual testing, automated testing, and static analysis tools to ensure ongoing code health.
Without proper documentation, developers struggle to understand original design decisions. Over time, outdated or missing documentation leads to incorrect assumptions and unnecessary workarounds. This lack of context results in code that becomes increasingly fragile and difficult to modify.
Quick fixes and rushed implementations create technical debt (also known as tech debt). While shortcuts may be necessary in the short term, they result in complex, fragile code that requires increasing effort to maintain. If left unaddressed, technical debt compounds, making future development error-prone.
A best practice to manage code rot and tech debt is incremental refactoring—dedicating roughly 10–20% of each sprint to maintenance and refactoring efforts. This approach helps teams systematically reduce accumulated issues and improve code quality over time.
A lack of uniform coding practices leads to a patchwork of different styles, patterns, and architectures. Neglecting the overall structure of the codebase during updates and fixes can increase complexity and technical debt, accelerating code rot. This inconsistency makes the codebase harder to read and debug, which increases the risk of defects.
Adapting code to new business requirements without refactoring leads to convoluted logic. Changing user requirements often drive the need for building features and frequent modifications, which can accelerate code rot if not managed properly. Instead of restructuring for maintainability, developers often bolt on new functionality, which brings unnecessary complexity. Over time, this results in an unmanageable codebase.
The rise of AI-generated code is transforming the software development landscape, enabling teams to build features faster and automate repetitive tasks. However, while these tools can boost productivity, they also introduce new challenges that can accelerate code rot if not managed carefully.
AI-generated code often prioritizes speed over code quality, which can lead to subtle bugs, inconsistent patterns, and a lack of adherence to standardized coding guidelines. As a result, teams may find themselves dealing with increased code duplication and reduced code reuse, both of which contribute to a code base that is harder to maintain and scale.
Another risk is that AI-generated code can make the code base worse by introducing fragments of logic that are difficult to understand or integrate with existing code. This can lead to a fragmented development process, where developers spend more time deciphering unfamiliar code and less time on meaningful improvements. Over time, these issues compound, accelerating software rot and increasing the hidden costs of maintenance.
To prevent code rot in the age of AI, it’s essential to continuously monitor the impact of AI-generated code on your codebase. Leveraging automated code reviews, static analysis tools, and engineering analytics platforms like Typo can help teams identify code duplication, enforce coding standards, and ensure that new code—whether written by humans or AI—meets the highest standards of code quality. By staying vigilant, teams can harness the benefits of AI without sacrificing the long-term health of their software.
If your development team is constantly struggling with unexpected bugs, slow feature development, or unclear logic, your code might be rotting.
Recognizing these early signs of code rot is crucial to prevent long-term damage and maintain a healthy codebase.
Code rot does not happen overnight—it develops gradually as these symptoms accumulate.
Additionally, AI-generated code can increase duplication by 8x and reduce code reuse, making it even harder to maintain a healthy codebase.
Code rot doesn’t just make development frustrating—it has tangible consequences that affect software quality, system reliability, and development efficiency, ultimately impacting productivity, costs, and business performance.
As code rot progresses, software becomes harder to maintain, more fragile, and increasingly prone to bugs or defects, especially when proper practices like testing and refactoring are neglected. The pace of automated code generation often outstrips governance and review capacity, amplifying long-term maintenance risk.
Left unchecked, it can even lead to system failures and overall software degradation. Here’s how code rot impacts different aspects of software development:
As code becomes more difficult to modify, even small changes require more effort. Ongoing bug fixes and the accumulation of maintenance debt contribute significantly to rising maintenance costs. Developers spend more time debugging and troubleshooting rather than building new features. Over time, maintenance costs can surpass the original development costs.
A messy, inconsistent codebase forces developers to work around issues instead of solving problems efficiently. Poorly structured code increases cognitive load, leading to slower progress and higher turnover rates in development teams. Fostering a culture of knowledge sharing and continuous learning helps maintain productivity and code quality by encouraging collaboration, documentation, and ongoing skill development among developers.
Unstable, outdated, or overly complex code increases the risk of crashes, data corruption, and security vulnerabilities. Outdated dependencies, old code, and structural decay are major contributors to system failures, as they can introduce technical debt, maintenance difficulties, and compatibility issues. A single unpatched dependency or fragile module can bring down an entire application.
With a decaying codebase, adding new functionality becomes a challenge. When building features under tight deadlines, teams often make quick fixes or skip best practices, which can lead to active rot—ongoing deterioration of code that is actively maintained. This not only slows down feature delivery but also forces developers to navigate and untangle existing complexities, making it harder to stay agile. It only increases software delivery risks.
Code rot can lead to performance issues and inconsistent behavior in production. When a codebase is not adapted to a changing environment or evolving user requirements, user experience can quickly deteriorate. Users may experience slower load times, unresponsive interfaces, or frequent crashes, all of which negatively impact customer satisfaction and retention. Unlike outdated programs that rely on obsolete hardware or libraries, modern systems are designed to be more resilient to code rot by supporting ongoing updates and maintenance. Ignoring code rot directly impacts business success.
A forked online forum—essentially a customized offshoot of an open-source platform—can be a powerful way to tailor community features to your organization’s unique needs. However, while forking code offers flexibility and control, it also introduces significant risks that can accelerate code rot and increase technical debt if not managed carefully.
When a team forks an online forum, they inherit the entire source code of the original project. Over time, as the upstream project evolves with new features, bug fixes, and security patches, the forked version can quickly fall out of sync. This divergence makes it harder to integrate critical updates, leading to outdated dependencies and potential security vulnerabilities—classic symptoms of software rot.
The more customizations and quick fixes are layered onto the forked codebase, the more difficult it becomes to merge upstream changes. This not only accelerates code rot but also compounds technical debt, as the team must now maintain both their unique modifications and the underlying platform. The result is a fragile, messy codebase that demands increasing maintenance effort and can slow down future development.
To prevent a forked online forum from becoming a source of software rot, it’s essential to establish a disciplined development process. Regularly review and merge upstream updates, document all custom changes, and use automated tools to monitor code quality. By proactively managing your fork, you can leverage the benefits of customization without sacrificing long-term software quality or incurring hidden maintenance costs.
Code rot is inevitable, but it can be managed and reversed with proactive strategies. Systematic refactoring, gradual improvement, and continuous monitoring are essential for maintaining code quality and preventing code rot over time. Addressing it requires a combination of better coding practices. Here’s how to fix code rot effectively:
By implementing these strategies, teams can reduce code rot and maintain a scalable and sustainable codebase.
Code rot is an unavoidable challenge, but proactive maintenance, refactoring, and standardization can keep it under control. Ignoring it leads to higher costs, slower development, and poor user experience.
To effectively track and prevent code rot, you can use engineering analytics platforms like Typo, which provide insights into code quality and team productivity.

Speed matters in software development. Top-performing teams ship code in just two days, while many others lag at seven. The average cycle time for top-performing teams is about 2 days, with the median for most teams being about 3.5 days.
Agile development is a methodology that top-performing teams use to achieve shorter cycle times and improve efficiency. Agile methodologies such as Scrum facilitate effective planning and management of software development workflows.
Software cycle time directly impacts product delivery and customer satisfaction—and it’s equally essential for your team’s confidence. Reducing cycle time leads to faster time to market and delivery.
CTOs and engineering leaders can’t reduce cycle time just by working faster. They must optimize processes, identify and eliminate bottlenecks, and consistently deliver value, resulting in happier customers due to quicker value delivery. Identifying bottlenecks is the first step to faster cycle times.
In this post, we’ll break down the key strategies to reduce cycle time.
Software cycle time measures how long it takes for code to go from the first commit to production.
It tracks the time a pull request (PR) spends in various stages of the pipeline, helping teams identify and address workflow inefficiencies. Teams often measure cycle time by tracking the duration of these phases to pinpoint bottlenecks and optimize their workflow.

Cycle time consists of four key components, which represent distinct phases of the development process:
To optimize efficiency, teams often calculate cycle time by analyzing the start and end times of these phases.
Software cycle time is a critical part of DORA metrics, complimenting others like deployment frequency, lead time for changes, and MTTR.
While deployment frequency indicates how often new code is released, cycle time provides insights into the efficiency of the development process itself. Teams can track cycle time for user stories as well as code changes to further improve delivery speed and workflow efficiency.
Understanding and optimising software cycle time is crucial for several reasons: Many teams encounter cycle time challenges, such as complex pull requests and inefficient process steps, which can hinder rapid delivery and overall efficiency.
First, a shorter cycle time means faster delivery of features and bug fixes to users, which can lead to higher customer satisfaction. Additionally, reducing cycle times is essential for business success, as it enables organizations to respond quickly to market changes and customer needs.
Second, tracking cycle time provides valuable insights into the efficiency of your development process. Most teams experience longer cycle times compared to top performers, often due to process inefficiencies or unnecessary steps that slow down workflows.
Finally, by continuously monitoring and improving cycle time, teams can identify bottlenecks and streamline their workflows. Achieving shorter cycle times not only increases responsiveness and efficiency but also boosts team morale and productivity.
Cycle time reflects how efficiently engineering teams work. For example, there are brands that reduce their PR cycle time with automated code reviews and parallel test execution, allowing teams to spend less time on manual tasks. This change allows developers to focus more on feature development rather than waiting for feedback, resulting in faster, higher-quality code delivery. Minimizing wait times during code reviews and approvals is crucial for maintaining workflow efficiency. Additionally, breaking work into smaller chunks can further improve efficiency by making planning and handling interruptions easier. A well-structured planning process is important for anticipating potential delays and enabling smoother project execution. Adopting microservices architecture allows independent teams to work in parallel, reducing overall cycle time for larger projects. Making process improvements a regular practice helps ensure ongoing efficiency gains.
Reducing cycle time accelerates product delivery, and adopting continuous delivery practices enables teams to deploy updates more rapidly and reliably. Remember Amazon’s “two-pizza teams” model? It emphasizes small, independent teams with streamlined processes, focusing on high-priority features to enable them to deploy code thousands of times a day. This agility helps Amazon quickly respond to customer needs, implement new features, and outpace competitors. These strategies lead to faster cycle times and improved responsiveness to market changes. Reducing cycle time is synonymous with increasing throughput and profits.
The ability to ship high-quality software quickly can set a company apart from competitors. Faster delivery means quicker innovation and better customer satisfaction. For example, Netflix’s use of chaos engineering and Service-Level Prioritized Load Shedding has allowed it to continuously improve its streaming service, roll out updates seamlessly, and maintain its market leadership in the streaming industry—all without sacrificing quality. By controlling work-in-progress and prioritizing effectively, Netflix ensures a steady flow of updates and improvements.
Cycle time is one aspect that engineering teams cannot overlook — apart from all the technical reasons, it also has psychological impact. If Cycle time is high, the productivity level further drops because of demotivation and procrastination. Other teams may struggle to keep up due to less optimized workflows and challenges in cross-team collaboration. Excessive or poorly managed hand offs between teams can introduce delays and bottlenecks, so it is essential to streamline these transitions to achieve optimal cycle times. Asynchronous communication can lead to delays in projects due to time zone differences, further complicating cross-team collaboration. Fewer hand-offs mean less time wasted waiting or explaining things, which directly contributes to reducing delays and improving efficiency.
Measuring cycle time serves as a foundational cornerstone in optimizing production processes and software development lifecycles across modern engineering environments. By systematically tracking the temporal duration required to complete specific tasks, user stories, or feature implementations from initial conception through final deployment, development teams acquire real-time analytical insights into their operational workflow efficiency and performance metrics. Understanding how much time is spent on each step is crucial for identifying bottlenecks and optimizing the workflow. This comprehensive monitoring approach enables organizations to identify critical bottlenecks, eliminate unnecessary delays, and strategically prioritize high-impact tasks that directly influence customer demand satisfaction and overall organizational productivity enhancement.
Effective cycle time measurement methodology involves the consistent and systematic recording of duration metrics across each distinct phase within the development lifecycle continuum, encompassing everything from the initial code commit through production deployment and user delivery. This data-driven approach empowers development teams to identify repetitive operational tasks, eliminate redundant procedural steps, and pinpoint inefficiencies that systematically impede progress velocity, thereby facilitating the implementation of targeted cycle time reduction strategies and optimization frameworks. Through regular measurement protocols and comprehensive review of cycle time analytics—including average cycle time calculations, cycle time distribution patterns, and variance analysis—teams can make informed, data-driven decisions to streamline their development processes, enhance operational efficiency, and accelerate value delivery to end-users while maintaining quality standards and reliability benchmarks.
Leveraging comprehensive metrics analysis within software development workflows, cycle time and lead time represent distinct yet interconnected performance indicators that significantly impact the overall Software Development Life Cycle (SDLC) efficiency. Cycle time encompasses the streamlined duration required for development teams to execute and deliver a specific task or user story, commencing from the precise moment when active development work initiates until the completion of deliverables. This completion marks the delivery of the finished product to the client or end-user. In contrast, lead time measures the comprehensive end-to-end timeline spanning from the initial moment when customers or stakeholders submit feature requests (or when tickets are generated within the system) through to the final delivery of the optimized, production-ready solution.
Understanding these critical performance differentiators proves essential for development teams aiming to enhance operational efficiency and achieve optimal customer satisfaction outcomes. Streamlining lead time directly translates to accelerated feature delivery and issue resolution for end-users, while optimizing cycle time enables development teams to operate with enhanced efficiency throughout the entire development workflow. By implementing comprehensive tracking mechanisms for both metrics, teams can systematically identify bottlenecks and performance gaps—whether occurring during the planning phases, active development cycles, or deployment processes—and execute targeted improvement strategies to optimize the entire pipeline from initial request through to production release.
Leveraging cycle time calculations comprises a straightforward yet transformative methodology for driving continuous optimization within project management and software development ecosystems. The foundational cycle time algorithmic framework, commonly referred to as the cycle time formula, plays a crucial role in measuring process efficiency and optimizing productivity. The cycle time formula is as follows:
Cycle Time = End Time – Start Time
To illustrate this computational approach, consider a scenario where a developer initiates task execution at 9:00 am and achieves completion at 5:00 pm—the resulting cycle time metric for that particular deliverable spans 8 hours. To facilitate accurate cycle time analytics, development teams must establish comprehensive definitional boundaries for initiation and completion checkpoints across each designated task or user story iteration—encompassing elements such as the inaugural commit timestamp through the precise moment when code integration reaches production deployment.
Development organizations can harness sophisticated project management platforms, advanced time tracking solutions, or comprehensive manual logging mechanisms to capture these critical temporal data points. By systematically analyzing cycle time metrics across diverse task portfolios and project deliverables, teams can identify operational patterns, illuminate optimization opportunities, and implement strategic modifications to streamline cycle time performance. Consistently reviewing these analytical insights empowers teams to enhance workflow efficiency, minimize operational idle periods, and accelerate value delivery through optimized development processes.
Implementing comprehensive cycle time analytics represents a sophisticated methodology for engineering teams to visualize their production workflows and drive systematic performance optimization. An enterprise-grade cycle time reporting framework aggregates multidimensional temporal data capturing task progression velocities through each developmental phase, subsequently leveraging advanced analytical algorithms to surface trending patterns, identify process bottlenecks, and uncover strategic opportunities for cycle time reduction across the software delivery pipeline.
A robust cycle time analytics implementation encompasses critical performance indicators including mean cycle time calculations, statistical distribution analysis of task completion intervals, and temporal variance tracking across designated reporting periods. Engineering teams can leverage sophisticated visualization tools, real-time dashboards, and interactive analytical interfaces to transform raw performance data into actionable intelligence for stakeholder consumption. The analytical framework should systematically identify specific process stages experiencing elevated latency and provide data-driven recommendations—such as optimizing queue management protocols, streamlining inter-team handoff procedures, or implementing dynamic resource allocation strategies—to enable teams to systematically reduce cycle times and enhance overall operational efficiency.
Through consistent implementation and iterative analysis of cycle time reporting mechanisms, development teams acquire deep insights into their workflow optimization patterns, enabling evidence-based decision-making processes that significantly enhance productivity metrics, streamline end-to-end production workflows, and ultimately deliver superior quality deliverables to end-user consumers with reduced time-to-market intervals.
Reducing cycle time is easier said than done. Teams often face cycle time challenges due to several factors that affect efficiency and workflow.
Reducing software cycle time requires a combination of technical improvements, process optimizations, and cultural shifts. Reducing cycle times is crucial for improving business performance, meeting customer demands faster, and gaining a competitive advantage. Here are six actionable strategies to implement today:
Establish clear SLAs for review timelines—e.g., 48 hours for initial feedback. Use tools like GitHub's code owners to automatically assign reviewers based on file ownership. Implement peer programming for critical features to accelerate feedback loops. Introduce a "reviewer rotation" system to distribute the workload evenly across the team and prevent bottlenecks. Establishing clear expectations for PR pickup times can also improve team collaboration by ensuring that tasks are addressed promptly and efficiently.
Identify repetitive tasks such as testing, integration, and deployment. And then implement CI/CD pipelines to automate these processes. You can also use test parallelization to speed up execution and set up automatic triggers for deployments to staging and production environments. Ensure robust rollback mechanisms are in place to reduce the risk of deployment failures.
Break down silos by encouraging cross-functional collaboration between developers, QA, and operations. Adopt DevOps principles and use tools like Slack for real-time communication and Jira for task tracking. Schedule regular cross-team sync-ups, and document shared knowledge in Confluence to avoid communication gaps. Establish a "Definition of Ready" and "Definition of Done" to align expectations across teams.
Schedule dedicated time each sprint to address technical debt. One amazing cycle time reduction strategy is to categorise debt into critical, moderate, and low-priority issues and then focus first on high-impact areas that slow down development. Implement a policy where no new feature work is done without addressing related legacy code issues.
Track cycle time by analysing PR stages—coding, pickup, review, and merge. Use tools like Typo to visualise bottlenecks and benchmark team performance. Establish a regular cadence to review these engineering metrics and correlate them with other DORA metrics to understand their impact on overall delivery performance. If review time consistently exceeds targets, consider adding more reviewers or refining the review process.
A cluttered backlog leads to confusion and context switching. Use prioritization frameworks like MoSCoW or RICE to focus on high-impact tasks. Ensure stories are clear, with well-defined acceptance criteria. Regularly groom the backlog to remove outdated items and reassess priorities. You can also introduce a “just-in-time” backlog refinement process to prepare stories only when they're close to implementation. Regular retrospectives can help teams learn from past experiences and improve their cycle time by identifying what worked well and what needs adjustment.
Implementing continuous improvement methodologies has become a cornerstone strategy for development teams pursuing systematic cycle time optimization and enhanced operational efficiency throughout the entire Software Development Life Cycle (SDLC) and production deployment pipeline. Continuous improvement transcends conventional one-time optimization initiatives—it represents a comprehensive, ongoing commitment to iteratively analyzing workflow patterns, identifying performance bottlenecks through data-driven assessment, and implementing targeted process adjustments that generate quantifiable performance metrics and measurable productivity gains. By establishing a mature continuous improvement culture within development organizations, teams can systematically eliminate non-value-added activities, reduce operational waste through lean methodologies, and ensure consistent value stream delivery to end-users while maintaining optimal throughput rates.
A fundamental optimization strategy within this comprehensive approach involves implementing task prioritization frameworks coupled with stringent Work in Progress (WIP) limitation policies. By strategically constraining concurrent task execution volumes, development teams can significantly minimize context switching overhead—a critical performance bottleneck that consistently introduces delays and operational inefficiency across development workflows. WIP limitation strategies help maintain steady-state production flow characteristics and ensure that each development task receives adequate cognitive resources and technical attention to progress efficiently through the entire development lifecycle pipeline. Additionally, reducing context switching enables team members to achieve deeper focus states on specific technical challenges, resulting in superior code quality output, reduced defect injection rates, and accelerated cycle time performance across sprint iterations.
Leveraging real-time analytics platforms and advanced data analysis methodologies serves as another fundamental pillar of continuous improvement implementation. By implementing comprehensive cycle time measurement systems and monitoring workflow telemetry data through sophisticated dashboards, development teams can rapidly identify emerging trends, detect recurring bottleneck patterns, and make evidence-based strategic decisions about optimal resource allocation and process improvement focus areas. This data-driven optimization approach enables teams to dynamically adapt their development processes in direct response to evolving customer requirements and shifting business objectives, ultimately achieving enhanced customer satisfaction metrics and establishing a more competitive market position through superior delivery capabilities.
Continuous improvement empowers development organizations to proactively identify and remediate operational inefficiencies, optimize their production cycle performance characteristics, and consistently deliver superior results with each development iteration cycle. By implementing incremental process adjustments through controlled experimentation and systematically evaluating their impact through quantitative metrics analysis, teams can achieve substantial cycle time reduction targets and drive sustained improvement across all critical aspects of software development operations and production deployment processes.
Agile development methodologies comprise a sophisticated framework for optimizing cycle durations and enhancing overall productivity metrics within software development ecosystems. By leveraging agile principles, development teams can decompose complex software projects into granular, manageable components, facilitating accelerated delivery mechanisms and establishing more frequent feedback loops. This iterative paradigm ensures that value propositions are delivered to end-users with enhanced velocity and consistency, while simultaneously enabling development teams to adapt to evolving requirements and shifting organizational priorities.
One of the fundamental strengths of agile development methodologies lies in their emphasis on continuous delivery frameworks and rapid feedback mechanisms. By implementing practices such as pull request workflows and comprehensive code review processes, development teams can identify potential issues at early stages, streamline the development lifecycle, and maintain stringent quality assurance standards. Automated testing frameworks like Selenium improve code quality by catching issues early in the development cycle. Automated testing frameworks further accelerate the development process by minimizing manual intervention requirements and ensuring that newly integrated code undergoes thorough validation procedures before deployment to production environments.
Agile methodologies also emphasize collaborative frameworks and transparency protocols, encouraging development teams to establish cohesive working relationships and facilitate real-time visibility into project progress metrics. Technological tools that provide comprehensive visibility into the development lifecycle—such as analytical dashboards and performance monitoring platforms—enable teams to identify process bottlenecks, track cycle duration metrics, and implement data-driven optimization strategies for workflow enhancement. This commitment to continuous improvement methodologies ensures that development teams consistently pursue opportunities to minimize cycle durations and optimize overall productivity outcomes.
By adopting agile development practices, software teams can demonstrate enhanced responsiveness to customer requirements, accelerate feature delivery timelines, and maintain competitive advantages within market ecosystems. The strategic combination of granular work increments, frequent feedback integration, and sustained commitment to ongoing process optimization establishes agile development as a powerful methodology for reducing cycle durations and achieving superior outcomes in software development initiatives.
Reducing software cycle time requires the right set of tools to streamline development workflows, automate processes, and provide actionable insights.
Here's how key tools contribute to cycle time optimization:
GitHub and GitLab simplify version control, enabling teams to track code changes, collaborate efficiently, and manage pull requests. Features like branch protection rules, code owners, and merge request automation reduce delays in code reviews. Integrated CI/CD pipelines further streamline code integration and testing. Automation strategies in software development include using CI/CD tools like Jenkins for builds and deployments and version control systems like GitHub or GitLab. SonarQube and SonarLint are tools used for continuous code quality management and real-time error analysis, ensuring that code meets quality standards throughout the development process.
These CI/CD tools automate build, test, and deployment processes, reducing manual intervention, ensuring faster feedback loops and more effective software delivery. Parallel execution, pipeline caching, and pre-configured environments significantly cut down build times and prevent bottlenecks. Using CI to automatically do releases is crucial for delivery, as it ensures a seamless and efficient deployment process. Docker, a containerization platform, ensures application consistency across different environments, further enhancing the reliability of automated deployments.
Typo provides in-depth insights into cycle time by analyzing Git data across stages like coding, pickup, review, and merge. It highlights bottlenecks, tracks team performance, and offers actionable recommendations for process improvement. By visualizing trends and measuring PR cycle times, Typo helps engineering leaders make data-driven decisions and continuously optimize development workflows. Cycle time reflects the actual time your team spends on a task, making it simple and clear to communicate.

In your next development project, if you do not want to feel that this is taking forever, follow these best practices:
Reducing software cycle time is critical for both engineering efficiency and business success. It directly impacts product delivery speed, market responsiveness, and overall team performance.
Engineering leaders should continuously evaluate processes, implement automation tools, and track cycle time metrics to streamline workflows and maintain a competitive edge.
And it all starts with accurate measurement of software cycle time.

Professional service organizations within software companies maintain a delivery success rate hovering in the 70% range.
This percentage looks good. However, it hides significant inefficiencies given the substantial resources invested in modern software delivery lifecycles.
Even after investing extensive capital, talent, and time into development cycles, missing targets on every third of projects should not be acceptable.
After all, there’s a direct correlation between delivery effectiveness and organizational profitability.
To achieve better outcomes, it is essential to understand and optimize the entire software delivery process, ensuring efficiency, transparency, and collaboration across teams. Automation and modern practices help streamline processes, reducing bottlenecks and improving efficiency throughout the workflow. Continuous Integration (CI) automates the integration of code changes into a shared repository multiple times a day, enabling teams to detect and address issues early. Continuous Improvement emphasizes learning from metrics, past experiences, and near misses to improve work throughput and software reliability. Using retrospectives or the improvement kata model, teams can identify areas for enhancement and implement changes that lead to better outcomes. Feedback loops are crucial in enabling teams to identify issues early, improve software quality, and facilitate rapid delivery by shortening the cycle of feedback and supporting iterative learning. Frequent feedback also helps validate assumptions and hypotheses made during the software development process, ensuring that the team remains aligned with project goals and user needs.
Working in smaller batches lowers the effort spent on code integration and reduces the risk of introducing significant issues. Containerization technologies like Docker encapsulate applications and their dependencies into isolated, portable containers, further simplifying integration and deployment processes. This approach ensures consistency across environments and reduces the likelihood of errors during deployment.
However, the complexity of modern software development - with its complex dependencies and quality demands - makes consistent on-time, on-budget delivery persistently challenging.
This reality makes it critical to master effective software delivery. Improving software delivery performance by monitoring key metrics such as deployment frequency, lead time, and failure rates can drive organizational success.
The Software Delivery Lifecycle (SDLC), also known as the software development lifecycle, is a structured sequence of stages that guides software from initial concept to deployment and maintenance.
Consider Netflix’s continuous evolution: when transitioning from DVD rentals to streaming, they iteratively developed, tested, and refined their platform. All this while maintaining uninterrupted service to millions of users. The SDLC guides the delivery of software applications from concept to deployment, ensuring a systematic approach to quality and efficiency.
A typical SDLC is a structured development process with six phases:
Each phase builds upon the previous, creating a continuous loop of improvement.
Modern approaches often adopt Agile methodologies, which enable rapid iterations and frequent releases. Feedback loops are integral to Agile and CI/CD practices, allowing teams to learn iteratively, identify issues early, and respond quickly to user needs. Frequent feedback ensures that software development remains user-centered, tailoring products to meet evolving needs and preferences. These approaches are based on key principles such as transparency and continuous improvement. Agile methodologies encourage breaking down larger projects into smaller, manageable tasks or user stories. Modern practices like continuous deployment further enable rapid and reliable delivery to production environments. Agile encourages cross-functional teams, and DevOps extends this collaboration beyond development to operations, security, and other specialized roles. This also allows organizations to respond quickly to market demands while maintaining high-quality standards.
Streamlined software delivery leverages foundational principles that transform teams' capabilities toward enhanced efficiency, reliability, and continuous value optimization. Transparency revolutionizes stakeholder engagement, reshaping how developers, business leaders, and project teams gain comprehensive visibility into objectives, progress trajectories, and emerging challenges. This dynamic communication approach eliminates misunderstandings and aligns diverse stakeholders toward unified strategic goals.
Predictability serves as a transformative cornerstone, enabling teams to optimize release schedules and consistently deliver software solutions within projected timelines. By implementing robust processes and establishing realistic performance benchmarks, organizations can eliminate unexpected disruptions and enhance stakeholder confidence while building sustainable customer relationships.
Quality optimization is strategically integrated throughout the entire software development lifecycle, ensuring that every phase—from initial planning to final deployment—prioritizes the delivery of superior software solutions. This encompasses comprehensive testing protocols, rigorous code review processes, and adherence to industry best practices, all of which systematically prevent defects and maintain optimal performance standards. Standardizing the code review process ensures consistent quality and reduces lead times, enabling teams to deliver reliable software more efficiently.
Continuous improvement drives ongoing optimization of delivery methodologies and workflows. By systematically analyzing outcomes, leveraging stakeholder feedback, and implementing strategic incremental enhancements, teams can revolutionize their operational processes and adapt to evolving market requirements. Embracing these transformative principles empowers organizations to optimize their software delivery capabilities, deliver exceptional products rapidly, and maintain competitive advantages in today's dynamic digital landscape.
Software delivery models function as comprehensive frameworks that orchestrate organizations through the intricate journey of software development and deployment processes. These models establish the sequential flow of activities, define critical roles, and embed industry-proven best practices essential for delivering exceptional software solutions efficiently and with unwavering reliability. By establishing a detailed roadmap that spans from initial conceptualization through deployment and ongoing maintenance operations, software delivery models enable development teams to synchronize their collaborative efforts, optimize delivery workflows, and ensure customer satisfaction remains the paramount objective throughout the entire development lifecycle.
Selecting the optimal software delivery model proves crucial for maximizing software delivery efficiency and effectiveness. Whether organizations embrace traditional methodologies like the Waterfall model or adopt cutting-edge approaches such as Agile frameworks, DevOps practices, or Continuous Delivery pipelines, each model delivers distinctive advantages for managing architectural complexity, accelerating time-to-market velocity, and maintaining rigorous quality benchmarks. For instance, Agile software delivery methodologies emphasize iterative development cycles and continuous feedback mechanisms, empowering development teams to adapt dynamically to evolving requirements while delivering functional software increments at a sustainable development pace that prevents team burnout and technical debt accumulation.
Robust software development and delivery operations depend heavily on industry best practices seamlessly integrated within these delivery models, including continuous integration workflows, automated testing suites, comprehensive code review processes, and infrastructure as code implementations. These strategic practices not only enhance delivery frequency and deployment velocity but also significantly minimize the risk of production defects, security vulnerabilities, and technical debt accumulation that can compromise long-term system maintainability. By thoroughly understanding and strategically implementing the most appropriate software delivery model for their organizational context, teams can optimize their entire delivery pipeline architecture, strengthen collaboration between development and operations teams, and consistently deliver software products that meet or surpass customer expectations while maintaining competitive market positioning.
In summary, developing a comprehensive understanding of software delivery models empowers development teams to make data-driven decisions, streamline operational processes, and achieve consistent, high-quality software delivery outcomes—ultimately driving both organizational performance metrics and customer satisfaction levels while positioning the organization for sustained competitive advantage in rapidly evolving technology markets.
Even the best of software delivery processes can have leakages in terms of engineering resource allocation and technical management. Understanding the key aspects that influence software delivery performance—such as speed, stability, and reliability—is crucial for success. Vague, incomplete, or frequently changing requirements waste everyone's time and resources, leading to precious time spent clarifying, reworking, or even building a feature that may miss the mark or get scrapped altogether.
Before implementing best practices, it is important to track the four key metrics defined by DORA metrics. These metrics provide a standardized way to measure and improve software delivery performance. DORA metrics provide a holistic view into the entire software development lifecycle (SDLC), offering insights into both throughput and stability. High-performing teams increase throughput while improving stability, as indicated by DORA metrics.
By applying these software delivery best practices, you can achieve effectiveness:
Effective project management requires systematic control over development workflows while maintaining strategic alignment with business objectives. Scope creep can negatively impact the whole team, leading to disengagement and overwhelming all members involved in the project.
Modern software delivery requires precise distribution of resources, timelines, and deliverables.
Here’s what you should implement:
Quality assurance integration throughout the SDLC significantly reduces defect discovery costs.
Early detection and prevention strategies prove more effective than late-stage fixes. This ensures that your time is used for maximum potential helping you achieve engineering efficiency.
Some ways to set up robust a QA process:
Efficient collaboration accelerates software delivery cycles while reducing communication overhead. Agile teams, composed of cross-functional members, facilitate collaboration and rapid delivery by leveraging their diverse skills and working closely together. When all roles involved in software delivery and operations work together, they can streamline the needs of individual specialists. Creating a high trust and low blame culture makes it easier for everyone involved in software delivery to find ways to improve the process, tools, and outcomes, fostering an environment of continuous learning and innovation.
There are tools and practices available that facilitate seamless information flow across teams. It’s important to encourage developers to participate actively in collaborative practices, fostering a culture of ownership and continuous improvement. Establishing feedback loops within teams is essential, as they help identify issues early and support continuous improvement by enabling iterative learning and rapid response to challenges.
Here’s how you can ensure the collaboration is effective in your engineering team:
Security integration throughout development prevents vulnerabilities and ensures compliance. Instead of fixing for breaches, it’s more effective to take preventive measures. Automating secure coding standard checks, static and dynamic analysis, vulnerability assessments, and security testing reduces the risk of breaches. Implementing effective multi-cloud strategies can help address security, compliance, and vendor lock-in challenges by providing flexibility and reducing risk across cloud environments.
To implement strong security measures:
Scalable architectures directly impact software delivery effectiveness by enabling seamless growth and consistent performance even when the load increases.
Strategic implementation of scalable processes removes bottlenecks and supports rapid deployment cycles.
Here’s how you can build scalability into your processes:
CI/CD automation streamlines the deployment pipeline, which is an automated, staged process that transforms source code into production-ready software. Automation tools play a crucial role in streamlining the CI/CD process by handling build automation, deployment automation, environment setup, and monitoring. These practices help streamline processes by reducing bottlenecks and improving efficiency in software delivery. Integration with version control systems ensures consistent code quality and deployment readiness. Continuous deployment enables rapid and reliable releases by automating frequent software delivery to production environments. Minimizing manual intervention in the deployment pipeline leads to more reliable releases, reducing human error and ensuring high-quality, stable software updates. This means there are fewer delays and more effective software delivery.
Effective software delivery requires precise measurement through carefully selected metrics. These metrics provide actionable insights for process optimization and delivery enhancement. Tracking these metrics is essential for improving software delivery performance and can help organizations accelerate time to market by identifying bottlenecks and enabling faster, more reliable releases. Collecting and analyzing metrics, logs, and analytics data helps track key performance indicators (KPIs) and identify areas for improvement, ensuring that teams can make data-driven decisions to enhance their workflows and outcomes.
Here are some metrics to keep an eye on:
These metrics provide quantitative insights into delivery pipeline efficiency and help identify areas for continuous improvement. Maintaining a sustainable speed in software delivery is crucial to avoid burnout and ensure ongoing productivity over the long term. Adopting a sustainable pace helps balance speed with quality, supporting long-term team health and consistent delivery outcomes.
Continuous improvement comprises the foundational methodology that drives optimal software delivery performance across modern development ecosystems. This systematic approach facilitates comprehensive assessment protocols that enable development teams to regularly evaluate their delivery pipeline architectures, aggregate stakeholder feedback mechanisms, and implement strategic modifications that optimize operational outcomes. By establishing a culture of iterative enhancement, organizations can systematically identify performance bottlenecks, eliminate workflow inefficiencies, and elevate the overall quality metrics of their software products through data-driven optimization techniques.
This cyclical methodology involves leveraging stakeholder input aggregation systems, analyzing delivery pipeline performance metrics through comprehensive monitoring tools, and experimenting with emerging technologies and best practices frameworks. Each improvement iteration brings development teams closer to achieving unprecedented efficiency levels, enabling them to deliver high-quality software solutions with enhanced consistency while maintaining rapid response capabilities to evolving customer requirements and market dynamics.
Continuous improvement also facilitates innovation acceleration, as development teams are encouraged to explore novel methodological approaches and extract valuable insights from both successful implementations and failure scenarios. By embedding continuous improvement protocols into the fundamental architecture of software delivery workflows, organizations ensure their delivery processes remain agile, highly effective, and capable of meeting the demanding requirements of dynamic market conditions and technological advancements.
In today's highly competitive technological landscape, accelerating time to market represents a fundamental strategic imperative for software delivery teams operating within complex, multi-faceted development environments. The capability to deliver innovative features and critical updates with unprecedented velocity can fundamentally distinguish market leaders from organizations that lag behind in the rapidly evolving digital ecosystem. Streamlining software delivery processes emerges as the cornerstone of this transformation—this comprehensive approach encompasses reducing lead times through systematic optimization, increasing deployment frequency via automated orchestration, and ensuring that software products reach end-users with enhanced speed and reliability through advanced delivery mechanisms.
Adopting agile methodologies enables development teams to operate within short, iterative cycles that facilitate the delivery of working software incrementally while gathering valuable feedback early in the development lifecycle. Automation serves as a vital catalyst in this transformation; by implementing sophisticated automated testing frameworks and deployment orchestration through continuous integration and continuous delivery pipelines, teams can systematically eliminate manual bottlenecks, reduce human error, and ensure reliable, repeatable releases that maintain consistency across diverse deployment environments. These AI-driven automation tools analyze deployment patterns, predict potential failures, and optimize resource allocation to enhance overall pipeline efficiency.
Leveraging cloud-based infrastructure architectures further accelerates deployment capabilities, enabling rapid horizontal and vertical scaling while providing flexible resource allocation that adapts to dynamic workload demands. By focusing on continuous improvement methodologies and sustainable speed optimization strategies, organizations can consistently deliver high-quality software products that meet stringent performance criteria, drive exceptional customer satisfaction through enhanced user experiences, and maintain a robust competitive position in the market through technological excellence and operational efficiency.
Adopting a DevOps methodology fundamentally transforms software delivery mechanisms and establishes unprecedented collaboration paradigms between development and operations teams. DevOps dismantles conventional organizational boundaries, cultivating a comprehensive shared accountability framework where all team members actively contribute to architectural design, iterative development, systematic testing, and production deployment of software solutions. This transformative approach leverages advanced automation technologies that orchestrate continuous integration and continuous delivery pipelines, substantially reducing manual intervention requirements while dramatically increasing deployment frequency and operational efficiency.
This collaborative methodology leverages sophisticated automation frameworks that streamline continuous integration and continuous delivery workflows, significantly minimizing manual intervention dependencies and accelerating deployment cycles. DevOps methodologies promote continuous learning paradigms, enabling development teams to rapidly adapt to emerging technological challenges and innovative solutions. Machine learning algorithms and AI-driven tools analyze deployment patterns, predict potential bottlenecks, and automatically optimize resource allocation across development lifecycles, ensuring seamless integration between traditionally siloed operational domains.
Through implementing comprehensive DevOps strategies, organizations achieve substantial improvements in software product quality and system reliability, accelerate delivery timelines, and demonstrate enhanced responsiveness to evolving customer requirements and market demands. The outcome generates a high-performance operational environment where development and operations teams collaborate synergistically to deliver superior-quality software solutions rapidly and consistently. This integrated approach transforms traditional software development paradigms, establishing scalable frameworks that support continuous innovation while maintaining operational excellence across all deployment phases.
To truly optimize software delivery workflows and achieve sustainable development velocity, organizations must implement comprehensive measurement frameworks that analyze critical performance indicators. DORA metrics comprise a robust analytical framework for evaluating software delivery excellence, facilitating data-driven insights across four fundamental performance dimensions: deployment frequency patterns, lead time optimization for code changes, change failure rate analysis, and service restoration timeframes. Establishing a unified process for monitoring DORA metrics can be challenging due to differing internal procedures across teams. This methodology has reshaped how development teams assess their delivery capabilities and enables organizations to dive into performance bottlenecks with unprecedented precision.
Deployment frequency serves as a crucial indicator that tracks the cadence of software releases reaching production environments, directly reflecting the team's capability to deliver customer value through consistent iteration cycles. Lead time measurement captures the temporal efficiency from initial code commit through production deployment, highlighting process optimization opportunities and identifying workflow impediments that impact delivery velocity. Change failure rate analysis quantifies the percentage of production deployments that result in system failures or service degradations, functioning as a comprehensive reliability metric that ensures quality gates are maintained throughout the delivery pipeline. Time to restore service encompasses the organization's incident response capabilities, measuring how rapidly development and operations teams can remediate production issues and minimize customer-facing disruptions through effective monitoring and recovery procedures.
By continuously monitoring these performance metrics and implementing automated data collection mechanisms, organizations can systematically identify delivery bottlenecks, prioritize process improvements based on empirical evidence, and accelerate their time-to-market capabilities while maintaining quality standards. Leveraging DORA metrics facilitates evidence-based decision-making processes, enabling development teams to achieve sustainable delivery velocity, enhance customer satisfaction through reliable service delivery, and deploy high-quality software products with confidence while optimizing resource allocation across the entire software development lifecycle.
The SDLC has multiple technical challenges at each phase. Some of them include:
Visibility and transparency throughout the process are crucial for tracking progress and addressing these challenges. With clear visibility, teams can identify bottlenecks early and address issues proactively.
Teams grapple with requirement volatility leading to scope creep. API dependencies introduce integration uncertainties, while microservices architecture decisions significantly impact system complexity. Resource estimation becomes particularly challenging when accounting for potential technical debt.
Design phase complications are around system scalability requirements conflicting with performance constraints. Teams must carefully balance cloud infrastructure selections against cost-performance ratios. Database sharding strategies introduce data consistency challenges, while service mesh implementations add layers of operational complexity.
Development phase issues lead to code versioning conflicts across distributed teams. A well-defined software development process can help mitigate some of these challenges by providing structure and best practices for collaboration, automation, and quality delivery. Software engineers frequently face memory leaks in complex object lifecycles and race conditions in concurrent operations. Then there are rapid sprint cycles that often result in technical debt accumulation, while build pipeline failures occur from dependency conflicts.
Testing becomes increasingly complex as teams deal with coverage gaps in async operations and integration failures across microservices. Performance bottlenecks emerge during load testing, while environmental inconsistencies lead to flaky tests. API versioning introduces additional regression testing complications.
Deployment challenges revolve around container orchestration failures and blue-green deployment synchronization. Delays or issues in deployment can hinder the timely delivery of software updates, making it harder to keep applications current and responsive to user needs. Teams must manage database migration errors, SSL certificate expirations, and zero-downtime deployment complexities.
In the maintenance phase, teams face log aggregation challenges across distributed systems, along with memory utilization spikes during peak loads. Cache invalidation issues and service discovery failures in containerized environments require constant attention, while patch management across multiple environments demands careful orchestration.
These challenges compound through modern CI/CD pipelines, with Infrastructure as Code introducing additional failure points.
Effective monitoring and observability become crucial success factors in managing them.
Use software engineering intelligence tools like Typo to get visibility on precise performance of the teams, sprint delivery which helps you in optimizing resource allocation and reducing tech debt better.

Effective software delivery depends on precise performance measurement. Without visibility into resource allocation and workflow efficiency, optimization remains impossible. Continuous learning is essential for ongoing optimization, enabling teams to adapt and improve based on feedback and new insights. Emphasizing continuous learning ensures teams stay updated with new tools and best practices in software delivery.
Typo addresses this fundamental need. The platform delivers insights across development lifecycles - from code commit patterns to deployment metrics. AI-powered code analysis automates optimization, reducing technical debt while accelerating delivery. Real-time dashboards expose developer productivity trends, helping you with proactive resource allocation.
Transform your software delivery pipeline with Typo’s advanced analytics and AI capabilities, enabling rapid deployment of new features.

Smooth and reliable deployments are key to maintaining user satisfaction and business continuity. Change Failure Rate provides valuable insights into how frequently deployments lead to failures. This guide is for engineering leaders, DevOps teams, and software managers seeking to understand and reduce Change Failure Rate (CFR).
We cover what CFR is, how to calculate it, why it matters, and actionable strategies to improve it. By the end, you’ll have a clear understanding of how to measure, interpret, and reduce CFR for more stable software delivery.
In 2015, Gene Kim, Jez Humble, and Nicole Forsgren founded the DORA (DevOps Research and Assessment) team to evaluate and improve software development practices. The aim is to improve the understanding of how organizations can deliver faster, more reliable, and higher-quality software.
DORA metrics help in assessing software delivery performance based on four key (or accelerate) metrics. A comprehensive overview of DORA metrics can further illustrate how these indicators drive software delivery success:
While these metrics provide valuable insights into a team's performance, understanding CFR is crucial. It measures the effectiveness of software changes and their impact on production environments. Mastering the four key DORA metrics for software delivery performance helps put CFR into proper context.
Change Failure Rate (CFR) measures deployment failures requiring fixes or rollbacks. It is calculated as (Failed Changes / Total Changes) x 100. CFR reflects the stability and reliability of the entire software development and deployment lifecycle, making it one of the most critical DevOps metrics for deployment reliability.
It is important to measure the Change Failure Rate for various reasons. Applying a structured approach to measuring DORA metrics ensures that CFR data is accurate and actionable:
To calculate Change Failure Rate, follow these steps:
Example Calculation:
Using the formula: (2/30) × 100 = 6.67%
Therefore, the Change Failure Rate for that period is 6.67%.
An ideal failure rate is between 0% and 15%. This is the benchmark and standard that engineering teams need to maintain. Low CFR equals stable, reliable, and well-tested software.
When the Change Failure Rate is above 15%, it reflects significant issues with code quality, testing, or deployment processes. This leads to increased system downtime, slower deployment cycles, and a negative impact on user experience.
Hence, it is always advisable to keep CFR as low as possible.

Be sure to define what constitutes a failure for your team to ensure accurate CFR measurement. Also, exclude 'fix-only' deployments from CFR calculations.
Identify the root causes of failures and implement best practices in testing, deployment, and monitoring. Here are effective strategies to minimize CFR:
Since the definition of Failure is specific to teams, there are multiple ways this metric can be configured. Here are some guidelines on what can indicate a failure:
To calculate the final percentage, divide the total number of failures by the total number of deployments (this can be picked either from the Deployment PRs or from the CI/CD tool deployments).

Measuring and reducing the Change Failure Rate is a strategic necessity. It enables engineering teams to deliver stable software, leading to happier customers and a stronger competitive advantage. With tools like Typo, organizations can easily track and address failures to ensure successful software deployments, especially when implementing DORA DevOps metrics in large organizations.

Software capitalization is often misunderstood by companies who treat development costs as just another expense. In reality, understanding software capitalization is crucial for businesses aiming to optimize their financial reporting, maximize profitability, and ensure compliance with accounting standards.
Scope:
This guide covers the fundamentals of software capitalization, including definitions, importance, criteria for capitalization, key accounting standards (US GAAP/ASC 350-40 and IFRS/IAS 38), which costs can and cannot be capitalized, financial implications, and a detailed financial model example.
Target Audience:
This article is designed for finance professionals, accounting teams, engineering managers, and business leaders who are responsible for budgeting, reporting, or overseeing software development investments.
Why It Matters:
Properly capitalizing software costs can significantly impact a company’s profitability, tax liability, and attractiveness to investors. It also ensures compliance with regulatory standards and provides a more accurate picture of a company’s assets and long-term value.
Software capitalization is an accounting process that recognizes the incurred software development costs and treats them as long-term assets rather than immediate expenses. Typical costs include employee wages, third-party app expenses, consultation fees, and license purchases. The idea is to amortize these costs over the software's lifetime, thus aligning expenses with future revenues generated by the software. Amortization is the process of spreading the cost of an asset over its useful life.
This process illustrates how IT development and accounting can seamlessly integrate. As more businesses seek to enhance operational efficiency, automating systems with custom software applications becomes essential. By capitalizing software, companies can select systems that not only meet their operational needs but also align accounting practices with strategic IT development goals.
In this way, software capitalization serves as a bridge between the tech and financial realms, ensuring that both departments work hand in hand to support the organization's long-term objectives. This synergy reinforces the importance of choosing compatible systems that optimize both technological advancements and financial reporting.
Below is a checklist outlining the criteria for capitalizing software costs under both US GAAP and IFRS, including which costs are expensed and which are capitalized at each stage.
ASC 350-40 is the US GAAP guideline for capitalizing internal-use software costs.
IAS 38 is the IFRS standard that governs software capitalization.
Shifting a developed software's narrative from being an expense to a revenue-generating asset comes with some key advantages:
Capitalization helps preserve profitability for the longer term by reducing the impact on the company's expenses. That's because you amortize intangible and tangible asset expenses, thus minimizing cash flow impact.
Capitalizing software development costs results in higher reported asset value and reduces short-term expenses, which ultimately improves your profitability metrics like net profit margin, ARR growth, and ROA (return on assets).
Software capitalization complies with the rules set by major accounting standards like ASC 350-40 (the US GAAP guideline for capitalizing internal-use software costs), US GAAP, and IFRS under IAS 38 (the IFRS standard that governs software capitalization), making it easier for companies to undergo audits.
Transition:
Now that we've covered the importance, let's look at when software capitalization is applicable.
Here's when it's acceptable to capitalize software costs:
Under ASC 350-40 (the section of US GAAP that provides guidelines for capitalizing internal-use software costs), the software development stage starts when you receive funding and are in an active development phase, and internal use software costs can be capitalized during the application development stage. Here, you can capitalize on any cost directly related to development, considering the software is for internal use.
Example costs include:
For internal-use software like CRM, production automation, and accounting systems, under US GAAP these costs follow specific capitalization and expense guidelines by project stage:
If the software is intended for external use, then your costs can be capitalized when the software reaches the technological feasibility stage, i.e., when it's viable. Example costs include coding, testing, and employee wages.
The software must be a probable candidate to generate consistent revenue for your company in the long run and considered an “asset.” For external use software, this can mean it possesses a selling and leasing expectation.
The overall software development costs must be accurately measurable. This way, you ensure that the capitalized amount reflects the software's exact invested amount.
Ensure that all accounting procedures adhere to GAAP regulations, which provide the framework for accurately reporting and capitalizing software costs. This compliance underscores the financial integrity of your capitalization efforts.
Transition:
With the criteria established, let's explore which specific costs can and cannot be capitalized.
The five main costs you can capitalize for software are:
Transition:
Just as important as knowing what to capitalize is understanding which costs must be expensed.
Here are a few costs that do not qualify for software capitalization and are expensed:
Transition:
To ensure compliance, it's essential to understand the relevant accounting standards that govern software capitalization.
Below are the two most common accounting standards that state the eligibility criteria for software capitalization:
GAAP is a set of rules and procedures that organizations must follow while preparing their financial statements. ASC 350-40 is the section of US GAAP that provides guidelines for capitalizing internal-use software costs.
IFRS is an alternative to GAAP and is used worldwide. IAS 38 is the IFRS standard governing software capitalization. Compared to GAAP, IFRS allows better capitalization of development costs, considering you meet every criterion, naturally making the standard more complex.
Transition:
With a solid grasp of the standards, let's examine the financial implications of software capitalization.
Software capitalization, from a financial perspective, can have the following aftereffects:
A company's profit and loss (P&L) statement is an income report that shows the company's overall expenses and revenues. So, if your company wishes to capitalize some of the software's R&D costs, they are recognized as “profitable assets” instead of “losses,” so development can be amortized over a time period.
Software capitalization treats your development-related costs as long-term assets rather than incurred expenses. This means putting these costs on a balance sheet without recognizing the initial costs until you have a viable finished product that generates revenue. As a result, it delays paying taxes on those costs and leads to a bigger net income over that period.
This approach allows companies to manage their financial narratives better, giving stakeholders an accurate picture of profitability and stability, which are crucial for growth and investment.
Although tax implications can be complex, capitalizing on software can often lead to tax deferral. That's because amortization deductions are spread across multiple periods, reducing your company's tax burden for the time being.
Transition:
Next, let's consider what happens if a software project is canceled after capitalization has begun.
When a software project is canceled, one of the key financial implications revolves around capitalization. Here's what you need to know:
Understanding these consequences helps businesses make informed decisions about resource allocation and financial management when considering the fate of a software project.
Transition:
Now that you understand the concepts and standards, let's walk through a detailed financial model and worksheet for software capitalization.
Calibrating story points to real delivery performance becomes much easier when you continuously monitor DORA metrics to improve software delivery alongside financial data.
(Insert your story point breakdown here for each engineer level and task.)
Note: Cloud development environments may fall within cloud computing arrangements, and the accounting can differ from licensed software depending on the arrangement; in these setups, the end user accesses the software remotely rather than taking possession of the underlying software.
(Insert your projected income statement impact here.)
Linking engineering throughput and stability data to finance helps refine these risk estimates, especially when you master the art of DORA metrics to understand how delivery patterns affect capitalizable work.
Scenario modeling is stronger when you incorporate operational signals from DevOps and DORA metrics for software delivery, tying cost swings to real changes in deployment performance.
For teams practicing continuous delivery, understanding the pros and cons of DORA metrics for continuous delivery also supports governance by connecting control frameworks to delivery outcomes.
Engineering leaders can pair this model with a practical DORA metrics guide for engineering leaders to keep capitalization assumptions aligned with how work actually flows through the pipeline.
In larger organizations, aligning capitalization policies with how you implement DORA DevOps metrics at scale can make it easier to defend judgments about what work is truly development versus ongoing operations.
Recommendation:
Capitalize the entire $464,145 as an intangible asset, amortizing over 4 years, only if the tracked spend represents qualifying software developed for internal use and excludes non-capitalizable items.
Tracking R&D investments is a major part of streamlining software capitalization while leaving no room for manual errors, and better tracking can significantly improve the developer experience and the reliability of capitalization reporting. Organizations that want to go deeper on R&D cost capitalization for engineering teams can apply similar principles across broader innovation portfolios. With Typo, you streamline this entire process by automating the reporting and management of R&D costs.
Typo's best features and benefits for software capitalization include:
Typo transforms R&D from a cost center into a revenue-generating function by optimizing financial workflows and improving engineering efficiency, thus maximizing your returns on software development investments.
Capitalizing software costs allows tech companies to secure better investment opportunities by increasing profits legitimately.
Although software capitalization can be quite challenging, it presents massive future revenue potential.
With a tool like Typo, you rapidly maximize returns on software development investments with its automated capitalized asset reporting, real-time effort tracking, and visibility into DORA metrics explained for modern DevOps teams.

Look, let's cut to the chase. As a software developer, you've probably heard about cyclomatic complexity, but maybe you've never really dug deep into what it means or why it matters. This guide is going to change that. We'll break down everything you need to know about cyclomatic complexity - from its fundamental concepts to practical implementation strategies.
Cyclomatic complexity is essentially a software metric that measures the structural complexity of your code. Think of it as a way to quantify how complicated your software’s control flow is. The higher the number, the more complex and potentially difficult to understand and maintain your code becomes.
Imagine your code as a roadmap. Cyclomatic complexity tells you how many different paths or “roads” exist through that map. Each decision point, each branch, each conditional statement adds another potential route. More routes mean more complexity, more potential for bugs, and more challenging maintenance.
Cyclomatic complexity is one of several software quality metrics, and more broadly, software metrics, used in computer science and software development to assess software complexity, maintainability, and code quality. Other important metrics include lines of code and code's readability, which help evaluate how large or understandable a codebase is. Cyclomatic complexity complements these by focusing specifically on decision points and control flow. Higher software complexity, as measured by these metrics, can negatively impact code's readability and maintainability, making it harder to test, modify, and ensure software reliability. High cyclomatic complexity is often correlated with a higher probability of defects and security vulnerabilities.
Software developers and the development team rely on cyclomatic complexity as a key metric during the software testing and overall testing process. By understanding and managing cyclomatic complexity, they can ensure thorough test coverage, improve code quality, and maintain the reliability and maintainability of the codebase. The complexity score directly indicates the minimum number of test cases required to achieve complete branch coverage.
Leveraging cyclomatic complexity for comprehensive software analysis encompasses understanding the fundamental principles of control flow graph representation. The control flow graph serves as a systematic visualization framework for program source code—a structured graphical representation that delineates all potential execution trajectories that code implementations can traverse during runtime operations. This analytical framework proves essential for software development professionals seeking to establish comprehensive control over code complexity metrics and enhance overall software quality deliverables.
Within the control flow graph architecture, each node comprises a basic block structure: a sequential arrangement of code statements characterized by the absence of conditional jumps or branching mechanisms. The interconnecting edges between these nodes demonstrate the feasible execution pathways—illustrating how control flow transitions systematically progress from one block to subsequent blocks. When code implementations encounter decision-making junctures, such as conditional if statements or multi-branch switch statements, the control flow graph structure branches accordingly, generating additional pathways that represent diverse potential execution outcomes and logical progressions.
The strategic implementation of control flow graph analysis becomes particularly impactful when organizations focus on calculating cyclomatic complexity metrics. Through comprehensive analysis of the total number of nodes (N), edges (E), and connected components (P) within the flow graph structure, development teams can leverage the cyclomatic complexity metric to obtain quantitative assessments of code complexity characteristics. This analytical metric provides organizations with precise measurements of linearly independent pathways traversing program implementations—essentially determining the minimum number of test case scenarios required to achieve comprehensive coverage across all possible execution trajectories.
The significance of this analytical approach encompasses multiple dimensions of software development optimization. Organizations recognize that increased numbers of independent pathways within code implementations directly correlate with elevated complexity levels. Heightened complexity characteristics can subsequently lead to increased defect rates, more challenging maintenance requirements, and substantially expanded testing efforts across development lifecycles. Through systematic visualization of code structures as control flow graphs, development teams can efficiently identify areas containing excessive decision points or overly complex logical implementations, thereby enabling more targeted refactoring initiatives and strategic complexity reduction efforts.
The classic formula for cyclomatic complexity is beautifully simple:

Where:
In a control flow graph, execution begins at an entry point and ends at an exit point. Each node in the graph represents a basic block, which is an indivisible group of commands. Edges (E) show possible transitions between basic blocks, such as moving from one command to a second command. The formula E - N + 2P (en 2p) is used to calculate cyclomatic complexity, and is referenced in standards like NIST Special Publication. For a single program, program module, or specific module, P is usually 1, which simplifies the calculation. Two basic blocks are connected by an edge, illustrating the flow of control between them. Analyzing a specific module or program module in this way helps in understanding its complexity and the number of independent paths for testing.
Alternatively, you can calculate it by counting decision points:

Decision points include:
Let’s break down a code snippet:

Calculation:
The cyclomatic complexity value is a numerical score that quantifies the number of conditional statements and possible execution paths in the code.
Let's walk through a real-world scenario to demonstrate how complexity increases.

Cyclomatic Complexity: 1 (No decision points)
This code has only a single path through it, as there are no decision points, resulting in the lowest possible cyclomatic complexity.

Cyclomatic Complexity: 3 (Two decision points)
This function contains more lines and introduces more possible paths due to the additional decision points, which increases its cyclomatic complexity.

Cyclomatic Complexity: 7-8 (Multiple nested conditions)
The presence of multiple nested structures in this example results in more execution paths, which significantly increases the complexity of a program.
Most modern programming languages have tools to automatically calculate cyclomatic complexity:
These tools can help ensure comprehensive unit tests are written to cover all execution paths identified by cyclomatic complexity analysis.
Scores of 1-10 indicate well-structured code that is easy to test, while scores above 20 indicate very complex code that likely needs to be refactored.
Maintaining cyclomatic complexity within these recommended thresholds helps achieve better code coverage and more reliable software testing. A limit of 10 for cyclomatic complexity is a good starting point for many organizations.
Strategies to reduce cyclomatic complexity include writing smaller functions and removing duplicate code.
Before (High Complexity):

After (Lower Complexity):

The refactored code achieves the same result with a simpler structure and lower cyclomatic complexity.
For a comprehensive look at the top CI/CD tools in 2024, check out this guide.
Typo's automated code review tool identifies issues in your code and auto-fixes them before you merge to master. This means less time reviewing and more time for important tasks. It keeps your code error-free, making the whole process faster and smoother by optimizing complex methods, reducing cyclomatic complexity, and standardizing code efficiently.
Automate your Code Reviews with Typo
Cyclomatic complexity isn't just a theoretical concept—it's a practical tool for writing better, more maintainable code. By understanding and managing complexity, you transform yourself from a mere coder to a software craftsman.
Remember: Lower complexity means:
Keep your code clean, your complexity low, and your coffee strong! 🚀👩💻👨💻
Pro Tip: Make complexity measurement a regular part of your code review process. Set team standards and continuously refactor to keep your codebase healthy.

Scope creep is one of the most challenging—and often frustrating—issues engineering managers face. As projects progress, new requirements, changing technologies, and evolving stakeholder demands can all lead to incremental additions that push your project beyond its original scope. Left unchecked, scope creep strains resources, raises costs, and jeopardizes deadlines, ultimately threatening project success.
This guide is here to help you take control. We’ll delve into advanced strategies and practical solutions specifically for managers to spot and manage scope creep before it disrupts your project. With detailed steps, technical insights, and tools like Typo, you can set boundaries, keep your team aligned, and drive projects to a successful, timely completion.
Scope creep can significantly impact projects, affecting resource allocation, team morale, and project outcomes. Understanding what scope creep is and why it frequently occurs provides a solid foundation for developing effective strategies to manage it.
Scope creep in projects refers to the gradual addition of project requirements beyond what was originally defined. Unlike industries with stable parameters, Feature projects often encounter rapid changes—emerging features, stakeholder requests, or even unanticipated technical complexities—that challenge the initial project boundaries.
While additional features can improve the end product, they can also risk the project's success if not managed carefully. Common triggers for scope creep include unclear project requirements, mid-project requests from stakeholders, and iterative development cycles, all of which require proactive management to keep projects on track.
Scope creep often results from the unique factors inherent to the industry. By understanding these drivers, you can develop processes that minimize their impact and keep your project on target.
Scope creep often results from several factors unique to the field:
These challenges make it essential for managers to recognize scope creep indicators early and develop robust systems to manage new requests and technical changes.
Identifying scope creep early is key to preventing it from derailing your project. By setting clear boundaries and maintaining consistent communication with stakeholders, you can catch scope changes before they become a problem.
The first step in minimizing scope creep is establishing a well-defined project scope that explicitly outlines deliverables, timelines, and performance metrics. In sprints, this scope must include technical details like software requirements, infrastructure needs, and integration points.
Frequent communication with stakeholders is crucial to ensure alignment on the project’s progress. Schedule periodic reviews to present progress, confirm objectives, and clarify any evolving requirements.
Integrate routine reviews into the project workflow to regularly assess the project’s alignment with its scope. Typo enables teams to conduct these reviews seamlessly, providing a comprehensive view of the project’s current state. This structured approach allows managers to address any adjustments or unexpected tasks before they escalate into significant scope creep issues.
Once scope creep has been identified, implementing specific strategies can help prevent it from escalating. With the following approaches, you can address new requests without compromising your project timeline or objectives.
One of the most effective ways to manage scope creep is to establish a formal change control process. A structured approach allows managers to evaluate each change request based on its technical impact, resource requirements, and alignment with project goals.
Communication breakdowns can lead to unnecessary scope expansion, especially in complex team environments. Use Typo’s Sprint Analysis to track project changes and real-time developments. This level of visibility gives stakeholders a clear understanding of trade-offs and allows managers to communicate the impact of requests, whether related to resource allocation, budget implications, or timeline shifts.
In Software development, feature prioritization can be a strategic way to handle evolving needs without disrupting core project objectives. When a high-priority change arises, use Typo to evaluate resource availability, timelines, and dependencies, making necessary adjustments without jeopardizing essential project elements.
Beyond basic strategies, specific tools and advanced techniques can further safeguard your IT project against scope creep. Leveraging project management solutions and rigorous documentation practices are particularly effective.
For projects, having a comprehensive project management tool can make all the difference. Typo provides robust tracking for timelines, tasks, and resources that align directly with project objectives. Typo also offers visibility into task assignments and dependencies, which helps managers monitor all project facets and mitigate scope risks proactively.
Documentation is vital in managing scope creep, especially in projects where technical requirements can evolve quickly. By creating a “single source of truth,” Typo enables the team to stay aligned, with full visibility into any shifts in project requirements.
Software projects benefit greatly from budget and time contingencies that allow for minor, unexpected adjustments. By pre-allocating resources for possible scope adjustments, managers have the flexibility to accommodate minor changes without impacting the project’s overall trajectory.
As scope adjustments occur, it’s important to maintain team morale and motivation. Empowering the team and celebrating their progress can help keep everyone focused and resilient.
Encouraging team members to communicate openly about their workload and project demands is crucial for maintaining productivity and morale.
Managing IT projects with scope creep can be challenging, so it’s essential to celebrate milestones and acknowledge team achievements.
Typo’s sprint analysis monitors scope creep to quantify its impact on the team’s workload and deliverables. It allows you to track and analyze your team’s progress throughout a sprint and helps you gain visual insights into how much work has been completed, how much work is still in progress, and how much time is left in the sprint. This information enables you to identify any potential problems early on and take corrective action.
Our sprint analysis feature uses data from Git and issue management tools to provide insights into how your team is working. You can see how long tasks are taking, how often they’re being blocked, and where bottlenecks are occurring. This information can help you identify areas for improvement and make sure your team is on track to meet their goals.


Effective management of scope creep in IT projects requires a balance of proactive planning, structured communication, and robust change management. With the right strategies and tools like Typo, managers can control project scope while keeping the team focused and aligned with project goals.
If you’re facing scope creep challenges, consider implementing these best practices and exploring Typo’s project management capabilities. By using Typo to centralize communication, track progress, and evaluate change requests, IT managers can prevent scope creep and lead their projects to successful, timely completion.

Are your code reviews fostering constructive discussions or stuck in endless cycles of revisions?
Let’s change that.
In many development teams, code reviews have become a necessary but frustrating part of the workflow. Rather than enhancing collaboration and improvement, they often drag on, leaving developers feeling drained and disengaged.
This inefficiency can lead to rushed releases, increased bugs in production, and a demotivated team. As deadlines approach, the very process meant to elevate code quality can become a barrier to success, creating a culture where developers feel undervalued and hesitant to share their insights.
The good news? You can transform your code review process into a constructive and engaging experience. By implementing strategic changes, you can cultivate a culture of open communication, collaborative learning, and continuous improvement.
This blog aims to provide developers and engineering managers with a comprehensive framework for optimizing the code review process, incorporating insights on leveraging tools like Typo and discussing the technical nuances that underpin effective code reviews.
Code reviews are a critical aspect of the software development lifecycle. They provide an opportunity to scrutinize code, catch errors early, and ensure adherence to coding standards. Here’s why code reviews are indispensable:
The primary function of code reviews is to identify issues before they escalate into costly bugs or security vulnerabilities. By implementing rigorous review protocols, teams can detect errors at an early stage, reducing technical debt and enhancing code stability.
Utilizing static code analysis tools like SonarQube and ESLint can automate the detection of common issues, allowing developers to focus on more intricate code quality aspects.
Code reviews foster an environment of shared learning and expertise. When developers engage in peer reviews, they expose themselves to different coding styles, techniques, and frameworks. This collaborative process enhances individual skill sets and strengthens the team’s collective knowledge base.
To facilitate this knowledge transfer, teams should maintain documentation of coding standards and review insights, which can serve as a reference for future projects.
Adherence to coding standards and best practices is crucial for maintaining a high-quality codebase. Effective code reviews enforce guidelines related to design patterns, performance optimization, and security practices.
By prioritizing clean, maintainable code, teams can reduce the likelihood of introducing technical debt. Establishing clear documentation for coding standards and conducting periodic training sessions can reinforce these practices.
The code review process inherently encourages open dialogue and constructive feedback. It creates a culture where developers feel comfortable discussing their approaches, leading to richer collaboration. Implementing pair programming alongside code reviews can provide real-time feedback and enhance team cohesion.
For new team members, code reviews are an invaluable resource for understanding the team’s coding conventions and practices. Engaging in the review process allows them to learn from experienced colleagues while providing opportunities for immediate feedback.
Pairing new hires with seasoned developers during the review process accelerates their integration into the team.
Despite their advantages, code reviews can present challenges that hinder productivity. It’s crucial to identify and address these issues to optimize the process effectively:
Extended review cycles can impede development timelines and lead to frustration among developers. This issue often arises from an overload of reviewers or complex pull requests. To combat this, implement guidelines that limit the size of pull requests, making them more manageable and allowing for quicker reviews. Additionally, establishing defined review timelines can help maintain momentum.
A lack of standardization in feedback can create confusion and frustration among team members. Inconsistency often stems from varying reviewer expectations. Implementing a standardized checklist or rubric for code reviews can ensure uniformity in feedback and clarify expectations for all team members.
If code reviews are concentrated among a few individuals, it can lead to bottlenecks that slow down the entire process. Distributing review responsibilities evenly among team members is essential to ensure timely feedback. Utilizing tools like GitHub and GitLab can facilitate the assignment of reviewers and track progress in real-time.
Sparse or overly critical feedback can hinder the collaborative nature of code reviews. Encouraging a culture of constructive criticism is vital. Train reviewers to provide specific, actionable feedback that emphasizes improvement rather than criticism.
Regularly scheduled code review sessions can enhance collaboration and ensure engagement from all team members.
To optimize your code review process effectively, leveraging the right tools is paramount. Typo offers a suite of features designed to enhance productivity and code quality:
Automating code analysis through Typo significantly streamlines the review process. Built-in linting and static analysis tools flag potential issues before the review begins, enabling developers to concentrate on complex aspects of the code. Integrating Typo with CI/CD pipelines ensures that only code that meets quality standards enters the review process.
Typo features an intuitive commenting system that allows reviewers to leave clear, actionable feedback directly within the code. This approach ensures developers receive specific suggestions, leading to more effective revisions. Implementing a tagging system for comments can categorize feedback and prioritize issues efficiently.
Typo provides detailed metrics and insights into code review performance. Engineering managers can analyze trends, such as recurring bottlenecks or areas for improvement, allowing for data-driven decision-making. Tracking metrics like review time, comment density, and acceptance rates can reveal deeper insights into team performance and highlight areas needing further training or resources.
Also read: Best Code Review Tools
In addition to leveraging tools like Typo, adopting best practices can further enhance your code review process:
Define clear objectives for code reviews, detailing what reviewers should focus on during evaluations. Developing a comprehensive checklist that includes adherence to coding conventions, performance considerations, and testing coverage ensures consistency and clarity in expectations.
Employ automation tools to reduce manual effort and improve review quality. Automating code analysis helps identify common mistakes early, freeing reviewers to address more complex issues. Integrating automated testing frameworks validates code functionality before reaching the review stage.
Fostering a culture of constructive feedback is crucial for effective code reviews. Encourage reviewers to provide specific, actionable comments emphasizing improvement. Implementing a “no blame” policy during reviews promotes an environment where developers feel safe to make mistakes and learn from them.
Finding the right balance between thorough reviews and maintaining development velocity is essential. Establish reasonable time limits for reviews to prevent bottlenecks while ensuring reviewers dedicate adequate time to assess code quality thoroughly. Timeboxing reviews can help maintain focus and reduce reviewer fatigue.
Regularly rotating reviewers prevents burnout and ensures diverse perspectives in the review process. Sharing responsibilities promotes knowledge transfer across the team and mitigates the risk of bottlenecks. Implementing a rotation schedule that pairs developers with different reviewers fosters collaboration and learning.
Also read: AI C͏o͏de Rev͏iews ͏for Remote͏ Teams
While developers execute the code review process, engineering managers have a critical role in optimizing and supporting it. Here’s how they can contribute effectively:
Engineering managers must actively facilitate communication within the team, ensuring alignment on the goals and expectations of code reviews. Regular check-ins can help identify roadblocks and provide opportunities for team members to express concerns or seek guidance.
Establishing a culture of accountability around code reviews is essential. Engineering managers should communicate clear expectations for both developers and reviewers, creating a shared understanding of responsibilities. Providing ongoing training on effective review practices reinforces these expectations.
Utilizing the metrics and insights provided by Typo enables engineering managers to monitor team performance during code reviews. Analyzing this data allows managers to identify trends and make informed decisions about adjustments to the review process, ensuring continuous improvement.
Engineering managers should cultivate a growth mindset within the team, encouraging developers to view feedback as an opportunity for learning and improvement. Creating an environment where constructive criticism is welcomed fosters a culture of continuous development and innovation. Encouraging participation in code review workshops or technical training sessions can reinforce this mindset.
An optimized code review process is not merely a procedural necessity; it is a cornerstone of developer productivity and code quality. By establishing clear guidelines, promoting collaboration, and leveraging tools like Typo, you can streamline the review process and foster a culture of continuous improvement within your team.
Typo serves as a robust platform that enhances the efficiency and effectiveness of code reviews, allowing teams to deliver higher-quality software at an accelerated pace. By embracing best practices and adopting a collaborative mindset, you can transform your code review process into a powerful driver of success.

In an ever-changing tech landscape, organizations need to stay agile and deliver high-quality software rapidly. DevOps culture plays a crucial role in achieving these goals by bridging the gap between development and operations teams. This guide is for engineering leaders, DevOps practitioners, and organizations looking to foster a DevOps culture. Understanding DevOps culture is critical for modern software teams because it enables faster innovation, improved collaboration, and more reliable software delivery—key factors for staying competitive in today’s market.
In this blog, we will delve into how to build a DevOps culture within your organization and explore the fundamental practices and strategies that can lead to more efficient, reliable, and customer-focused software development.
DevOps is a software development methodology that integrates development (Dev) and IT operations (Ops) to enhance software delivery's speed, efficiency, and quality. DevOps culture emphasizes collaboration between development and operations teams and shared responsibility for outcomes. The primary goal is to break down traditional silos between development and operations teams and foster a culture of collaboration and communication throughout the software development lifecycle. DevOps culture promotes breaking down silos between teams. This creates a more efficient and agile workflow that allows organizations to respond quickly to changes and deliver value to customers faster.
DevOps culture refers to a collaborative and integrated approach between development and operations teams. It focuses on breaking down silos, fostering a shared sense of responsibility, and improving processes through automation and continuous feedback.
The CALMS framework is used to understand and implement DevOps principles effectively. It breaks down DevOps into five key components:
The culture pillar focuses on fostering a collaborative environment where shared responsibility and open communication are prioritized. It is crucial to break down silos between different teams so they can collaborate effectively, with communication that is frequent as well as transparent. Shared responsibility means development and operations teams are jointly accountable for system stability.
Automation is a cornerstone of DevOps culture. It emphasizes minimizing manual intervention in processes to reduce human error. This includes automating automated tests, deployment, and infrastructure management to enhance efficiency and reliability. It also removes repetitive tasks and helps simplify deployment.
The lean aspect aims to optimize workflows, manage work-in-progress (WIP), and eliminate non-value-adding activities. This is to streamline processes to accelerate software delivery and improve overall quality.
Measurement involves collecting data to assess the effectiveness of software delivery processes and practices, and large enterprises can focus on implementing DORA DevOps metrics at scale. It enables teams to make informed, fact-based decisions by tracking DORA DevOps metrics such as deployment frequency and lead time for changes, identify areas for improvement, and evaluate devops success over time.
The sharing component promotes open communication and knowledge transfer through active knowledge sharing among teams. It facilitates cross-team collaboration, creates valuable insights across team members, and supports continuous learning by treating failures as learning opportunities while ensuring that successful practices and insights are shared and adopted widely.
Don't overwhelm teams completely with the DevOps haul. Begin small and implement DevOps practice gradually, starting with small teams or a pilot group before scaling across the organization. You can start first with the team that is better aligned with DevOps principles and then move ahead with other teams in the organization, allowing teams to adopt practices incrementally as experience grows. Build momentum with early wins and evolve practices as you gain experience.
Teams should communicate openly and frequently. When done correctly, it promotes collaboration and a smooth flow of information across the organization. This further aligns organization operations and lets the engineering leaders make informed decisions.
Leadership buy-in is crucial for sustaining this collaborative environment.
Moreover, the combined working environment between the development and operations teams promotes a culture of shared responsibility and common objectives. Development teams, operations staff, and other different teams need to collaborate effectively around shared objectives. They can openly communicate ideas and challenges, allowing them to have a mutual conversation about resources, schedules, required features, and execution of projects.
Apart from encouraging communication and a collaborative environment, create a clear plan that aligns where you want to go and how you will get there with the system's business goals and operational needs. Ensure that these goals are realistic and achievable. This will allow teams to see the bigger picture and understand not only the desired outcome, but also how their work supports broader business results, motivating them to move in the right direction.
Automation is a cornerstone of DevOps culture. Tools that help build automation capabilities for DevOps teams as part of modern engineering practices include:
These tools are useful because they automate repetitive and mundane tasks, reduce manual effort, and allow teams to focus on value-adding work, improving productivity through faster time to market and improved reliability. This allows them to fail fast, build fast, and deliver quickly while supporting process improvements, positively impacting DevOps culture. Ensure that instead of assuming, ask your team directly what part can be automated and further support facilities to automate it.
The organization must fully understand and implement CI/CD, including continuous delivery, to establish a DevOps culture and streamline the software delivery process. This allows teams to automate deployment from development to production, while continuous integration automates code integration from multiple contributors and helps manage code changes safely so software can be released more frequently with better quality and reduced risks. The CI/CD tools further allow teams to catch bugs early in the development cycle, reduce manual work through automated pipelines, and use continuous feedback loops for rapid feedback, early issue detection, and user insights while minimizing downtime between releases.
Continuous improvement is a key principle of DevOps culture, and engineering leaders should encourage a growth mindset through training and upskilling opportunities. Besides this, give them the freedom to experiment with new tools and techniques in a fail-fast environment where failures are treated as learning opportunities. Create a culture where they feel comfortable making mistakes and learning from them, supported by a blameless mindset and blameless retrospectives that examine root causes rather than assigning blame. In many organizations, this approach helps teams improve, and DevOps culture leads 78% of practitioners to learn new skills as they focus on improving software delivery using DORA metrics.
The teams must ensure that delivering products quickly doesn't mean compromising security. In DevOps culture, the organization must adopt a ‘Security-first approach' by integrating security practices into the DevOps pipeline. To maintain a strong security posture, regular security audits and compliance checks are essential. Security scans should be embedded throughout the development process at every stage of the development lifecycle, not treated as a final checkpoint, so teams can continuously monitor and assess security.
Regularly monitor and track system performance through monitoring and observability, collecting metrics, logs, and traces to understand application health, detect issues early, and ensure smooth operation.
Use metrics, delivery metrics, and data to guide decisions, optimize processes, and create fast feedback for continuous improvement in DevOps practices, including leveraging the importance of DORA metrics for tech team performance. Implement comprehensive dashboards and alerts to ensure teams can quickly respond to performance issues and maintain optimal health. High-performing teams often deploy changes multiple times a day with low failure rates, and resources like the DORA metrics guide for engineering leaders stress steady improvement over chasing elite labels.
In DevOps culture, the organization must emphasize the ever-evolving needs of the customers. Encourage teams to think from the customer's perspective and keep their needs and satisfaction at the forefront of the software delivery processes. Regularly incorporate customer feedback into the development cycle to ensure the product aligns with user expectations.
Typo is an effective software engineering intelligence platform that offers SDLC visibility, developer insights, and workflow automation to build better programs faster. It can seamlessly integrate into tech tool stacks such as version control systems like Git, issue tracker, and CI/CD tools.
It also offers comprehensive insights into the deployment process through DevOps and DORA metrics to improve software delivery and other key metrics such as change failure rate, time to build, and deployment frequency, giving teams a clearer view of operational performance. Organizations practicing DevOps report 49% faster time to market, and DevOps teams ship higher quality deliverables at 61%. Moreover, its automated code tool helps identify issues in the code and auto-fixes them before you merge to master.
Typo has an effective sprint analysis feature that tracks and analyzes the team's progress throughout a sprint. Besides this, It also provides 360 views of the developer experience i.e. captures qualitative insights and provides an in-depth view of the real issues.
Building a DevOps culture is essential for organizations to improve their software delivery capabilities and maintain a competitive edge, and devops culture requires an ongoing cultural shift, not just practice adoption. Implementing key practices as mentioned above will pave the way for a successful DevOps transformation, especially since a common challenge in DevOps transformations is focusing on tools instead of culture. A successful DevOps culture emphasizes collaboration over tools, and a common challenge in DevOps transformations is focusing on tools instead of culture.

DORA metrics are a compass for engineering teams striving to optimise their development and operations processes.
Consistently tracking these metrics can lead to significant and lasting improvements in your software delivery processes and overall business performance.
Below is a detailed guide on how Typo uses DORA to improve DevOps performance and boost efficiency:
In 2015, The DORA (DevOps Research and Assessment) team was founded by Gene Kim, Jez Humble and Nicole Forsgren to evaluate and improve software development practices. The aim was to improve the understanding of how organisations can deliver software faster, more reliable and of higher quality.
They developed DORA metrics that provide insights into the performance of DevOps practices and help organisations improve their software development and delivery processes. These metrics help in finding answers to these two questions:
DORA metrics helps in assessing software delivery performance based on four key (or accelerate) metrics:
Deployment Frequency measures the number of times that code is deployed into production. It helps in understanding team’s throughput and quantifying how much value is delivered to customers.
When organizations achieve a high Deployment Frequency, they can enjoy rapid releases without compromising the software’s robustness. This can be a powerful driver of agility and efficiency, making it an essential component for software development teams.
One deployment per week is standard. However, it also depends on the type of product.
Lead Time for Changes measures the time it takes for code changes to move from inception to deployment. The measurement of this metric offers valuable insights into the effectiveness of development processes, deployment pipelines, and release strategies.
By analysing the Lead Time for Changes, development teams can identify bottlenecks in the delivery pipeline and streamline their workflows to improve software delivery’s overall speed and efficiency. Shorter lead time states that the DevOps team is more efficient in deploying code.
Change Failure Rate gauges the percentage of changes that require hot fixes or other remediation after production. It reflects the stability and reliability of the entire software development and deployment lifecycle.
By tracking CFR, teams can identify bottlenecks, flaws, or vulnerabilities in their processes, tools, or infrastructure that can negatively impact the quality, speed, and cost of software delivery.
0% — 15% CFR is considered to be a good indicator of your code quality.
Mean Time to Recovery measures how quickly a team can bounce back from incidents or failures. It concentrates on determining the efficiency and effectiveness of an organisation’s incident response and resolution procedures.
A lower mean time to recovery is synonymous with a resilient system capable of handling challenges effectively.
The response time should be as short as possible. 24 hours is considered to be a good rule of thumb.
Reliability is a fifth metric that was added by the DORA team in 2021. It measures modern operational practices and doesn’t have standard quantifiable targets for performance levels.
Reliability comprises several metrics used to assess operational performance that includes availability, latency, performance and scalability that measures user-facing behaviour, software SLAs, performance targets, and error budgets.
Typo is an effective software engineering intelligence platform that offers SDLC visibility, developer insights, and workflow automation to build better programs faster. It offers comprehensive insights into the deployment process through key DORA metrics such as change failure rate, time to build, and deployment frequency.
Below is a detailed view of how Typo uses DORA to boost dev efficiency and team performance:
Typo’s DORA metrics dashboard has a user-friendly interface and robust features tailored for DevOps excellence. This helps in identifying bottlenecks, improves collaboration between teams, optimises delivery speed and effectively communicates team’s success.
DORA metrics dashboard pulls in data from all the sources and presents in a visualised and detailed way to engineering leaders and development team.

DORA metrics helps in many ways:
Firstly, define clear and measurable objectives. Consider KPIs that align with your organisational goals. Whether it’s improving deployment speed, reducing failure rates, or enhancing overall efficiency, having a well-defined set of objectives will help guide your implementation of the dashboard.
Gain a deeper understanding of DORA metrics by exploring the nuances of Deployment Frequency, Lead Time, Change Failure Rate, and MTTR. Then, connect each of these metrics with your organisation’s DevOps goals to have a comprehensive understanding of how they contribute towards improving overall performance and efficiency.
Follow specific guidelines to properly configure your dashboard. Customise the widgets to accurately represent important metrics and personalise the layout to create a clear and intuitive visualisation of your data. This ensures that your team can easily interpret the insights provided by the dashboard and take appropriate actions.
To ensure the accuracy and reliability of your DORA Metrics, establish strong data collection mechanisms. Configure your dashboard to collect real-time data from relevant sources, so that the metrics reflect the current state of your DevOps processes.
Integrate automation tools to optimise the performance of your DORA Metrics Dashboard.
By utilising automation for data collection, analysis, and reporting processes, you can streamline routine tasks. This will free up your team’s time and allow them to focus on making strategic decisions and improvements.
To get the most out of your well-configured DORA Metrics Dashboard, use the insights gained to identify bottlenecks, streamline processes, and improve overall DevOps efficiency. Analyse the dashboard data regularly to drive continuous improvement initiatives and make informed decisions that will positively impact your software development lifecycle.
Typo’s dashboard provides clear and intuitive visualisations of the four key DORA metrics:
It tracks how often new code is deployed to production, highlighting the team’s productivity.
By integrating with your CI/CD tool, Typo calculates Deployment Frequency by counting the number of unique production deployments within the selected time range. The workflows and repositories that align with production can be configured by you.

It measures the time it takes from code being committed to it being deployed in production, indicating the efficiency of the development pipeline.
In the context of Typo it is the average time all pull requests have spent in the “Coding”, “Pickup”, “Review” and “Merge” stages of the pipeline. Typo considers all the merged Pull Requests for the main/master/production branch for the selected time range and calculates the average time spent by each Pull Request in every stage of the pipeline. No open/draft Pull Requests are considered in this calculation.

It shows the percentage of deployments causing a failure in production, reflecting the quality and stability of releases.
There are multiple ways this metric can be configured:
To calculate the final percentage, the total number of failures are divided by the total number of deployments (this can be picked either from the Deployment PRs or from the CI/CD tool deployments).

It measures the time taken to recover from a failure, showing the team’s ability to respond to and fix issues.
The way a team tracks production failure (CFR) defines how MTTR is calculated for that team. If a team considers a production failure as :

DORA metrics deliver crucial insights into team performance. Monitoring Change Failure Rate and Mean Time to Recovery helps leaders ensure their teams are building resilient services with minimal downtime. Similarly, keeping an eye on Deployment Frequency and Lead Time for Changes assures engineering leaders that the team is maintaining a swift pace.
Together, these metrics offer a clear picture of how well the team balances speed and quality in their workflows.

One of the ways organizations giving effective and honest feedback are implementing is through a continuous feedback process. While it may seem a straightforward process, it is not. Every developer takes feedback in different ways. Feedback can take different forms, such as formal reviews, pull request comments, Slack messages, and informal conversations, all of which contribute to growth and improved communication. Continuous feedback allows for real-time coaching and immediate addressing of issues, ensuring that challenges are tackled promptly and effectively. Small, internal feedback loops, such as immediate and frequent feedback among team members, play a crucial role in maintaining code quality and efficiency. Larger, external feedback loops, which gather insights from users, stakeholders, and the production environment, are equally important for driving product direction and addressing live issues. Customer feedback management platforms centralize feedback from multiple sources and enable sentiment analysis and feature request management, making it easier to prioritize and act on user insights. Hence, it is important to engineer the feedback the right way, with a focus on effective communication throughout the process.
Below are a few ways why continuous feedback is beneficial for both developers and engineering leaders:
Keeps everyone on the same page: Feedback enables individuals to be on the same page. No matter what type of tasks they are working on. It allows them to understand their strengths and improve their blind spots. Hence, provide high-quality work. Frequent feedback improves engagement and retention among knowledge workers, as it fosters a sense of involvement and alignment with team goals. Balancing structured questions with open-ended prompts in performance reviews yields richer feedback and encourages reflective responses from developers, further enhancing their engagement and alignment. Surveys and forms collect quantitative and qualitative feedback from users at scale through in-app or email surveys, providing additional insights that help align team efforts with user needs.
Facilitates improvement: Feedback enables developers the areas they need to improve and the opportunities they can grab according to their strengths. With the right context and motivation, it can encourage software developers to work on their personal and professional growth. Following best practice in feedback helps both developers and leaders work more effectively together. Code reviews, where peers review code changes using platforms like GitHub, GitLab, or Bitbucket, are an essential part of this process, ensuring quality and sharing context effectively. Iterative development methods like Agile and Scrum further enhance this process by breaking the work into smaller sprints, allowing for continuous alignment with user needs through feedback collection. Visual feedback and bug reporting tools allow users to provide contextual feedback directly on web pages or apps, which is then converted into developer reports, further facilitating targeted improvements.
Nurtures healthy relationships: Feedback fosters open and honest communication. It lets developers be comfortable in sharing ideas and seeking support without any judgements even when they aren’t performing well. Constructive and positive feedback can significantly boost team morale and foster a supportive environment, encouraging collaboration and reducing fear of criticism. Creating a blame-free environment encourages open discussion about technical challenges, further strengthening trust and collaboration within the team. Team retrospectives, regular meetings where the development team discusses recent processes, identify pain points, and brainstorm improvements, are an effective way to nurture these healthy relationships. Closing the loop with users by informing them about the progress and implementation of their feedback also builds trust and strengthens relationships.
Enhances user satisfaction: Feedback helps developers to enhance their quality of work. This can have a direct impact on user satisfaction which further positively affects the organization. Positive feedback not only motivates developers but also reinforces desired behaviors that contribute to better outcomes. Analytics tools like Hotjar provide heatmaps and session recordings to visualize user interactions and identify friction points, enabling developers to address these issues effectively and enhance user satisfaction.
Strengthens effective performance management: Structured feedback processes are essential for effective performance management, as they enable you to set clear expectations, track progress, and provide ongoing support and guidance to developers. Regular performance reviews and feedback sessions provide valuable insights that drive continuous improvement. Daily developer feedback contributes to improved code quality over time, ensuring that developers can refine their skills and deliver better results consistently. Regular performance reviews play a key role in supporting developer growth by aligning goals, offering 360-degree feedback, and tailoring evaluations to specific roles. Developers often view their code as a representation of personal craftsmanship, making feedback particularly sensitive. This further strengthens their performance and streamlines their workflow. The RICE model is one framework used to rank feedback based on its impact, frequency, and implementation effort, ensuring that feedback is prioritized effectively.
Continuous feedback also supports career advancement by helping developers track their progress, assess their skills, and reach important professional milestones.
There are a lot of things to consider when giving effective and honest feedback. We’ve divided the process into three sections. Do check it out below:
Plan in advance how will you start the conversation, what is worth mentioning, and what is not. Focus on the critical aspects of the developer's work to ensure your feedback is impactful and not distracted by trivial details. For example, if it is related to pull requests, can start by discussing their past performance related to the same. Further, you can talk about how well are they performing, whether they are delivering the work on time, rating their performance and action plan, and if there are any challenges they are facing. Make sure to relate it to the bigger picture. Giving feedback that is clear and actionable is essential for fostering growth and maintaining a healthy team environment.
When framed appropriately and constructively, it helps in focusing on improvement rather than criticism. Supporting feedback with specific examples, such as code snippets or measurable outcomes, or concrete examples that illustrate the issue or success clearly, makes it more effective and easier for developers to understand and act upon. It also enables developers to take feedback the right way and help them grow and succeed.
Observe and note down everything related to the developers. Track their performance continuously. Jot down whatever noticed even if it is not worth mentioning during the feedback session. It allows you to share feedback more accurately and comprehensively. As part of this ongoing observation, it is important to review skills that are specifically relevant to the developer's role, ensuring that feedback is targeted and aligned with their job responsibilities. For more strategies to boost developer productivity, consider how systematic observation can support both individual and team growth. It also helps you to identify the trends and patterns in developer performance and lets them know that the feedback isn’t based on isolated incidents but rather the consistent observation. Project and issue tracking tools like Jira and Trello are central hubs for logging, categorizing, prioritizing, and assigning feedback as tasks, making the process more organized and actionable.
For example, XYZ is a software developer at ABC organization. The engineering leader observed XYZ for three months before delivering effective feedback. She told him:
So, the engineering leader was able to discuss effectively his strengths and areas of improvement.
Before offering feedback to software development teams, make sure you are well aware of the differences between constructive feedback and criticism. Critical feedback, when delivered constructively, is essential for professional growth and should focus on technical or behavioral improvements. Constructive criticism is essential for team growth and should be delivered in a way that considers the developer’s emotional response. Constructive feedback encourages developers to enhance their personal and professional development. On the other hand, criticism enables developers to be defensive and hinder their progress.
Constructive feedback allows you to focus on the behavior and outcome of the developers and help them by providing actionable insights while criticism focuses on faults and mistakes without providing the right guidance.
For example,
Situation: A developer’s recent code review missed several critical issues.
Feedback: “Your recent code review missed a few critical issues, like the memory leak in the data processing module. Next time, please double-check for potential memory leaks. If you’re unsure how to spot them, let’s review some strategies together.”
Criticism: “Your code reviews are sloppy and miss too many important issues. You need to do a better job.”
Review previous feedback given to developers before the session. Check what was last discussed and make sure to bring it up again. Also, include those that were you tracking during this time and connect them with the previous feedback process. When preparing for the feedback session, identify key areas for improvement and success, such as technical metrics, feedback effectiveness, and long-term development, to provide a comprehensive view of progress. Look for metrics such as pull request activity, work progress, team velocity, work log, check-ins, and more to get in-depth insights about their work. You can also gather peer reviews and structured peer feedback to get 360-degree feedback and better understand how well individuals are performing, making sure to tailor feedback to different technical roles within the team, such as software engineers and product managers, by focusing on role-specific skills and contributions.
This makes your feedback balanced and takes into account all aspects of developers’ contributions and challenges.
The feedback shouldn’t be a top-down approach. It must go both ways. You can start by bringing up the discussion that happened in the previous feedback session. Know their opinion and perspective on certain topics and ideas. Make sure that you ask questions to make them realize that you respect their opinions and want to hear what they want to discuss. Effective feedback sessions are most productive when people talk openly and listen to each other's perspectives.
Now, share your feedback based on the last discussion, observations, and performance. You can also modify your feedback based on their perspective and reflections. It allows the feedback to be detailed and comprehensive.
When you have shared their areas of improvement, make sure you provide them with clear actionable plans as well. Discuss with them what needs immediate attention and what steps can they take. Set small goals with them as it makes it easier to focus on them and let them know that their goals are important. When setting these goals, it is crucial to establish realistic timelines for achieving them, so progress remains achievable and measurable. Using SMART goals—Specific, Measurable, Achievable, Relevant, and Time-bound—can help structure these improvement plans, making progress more trackable and objectives clearer. You must also schedule follow-up meetings with them after they reach every step and understand if they are facing any challenges. You can also provide resources and tools that can help them attain their goals.
Developed by the Center for Creative Leadership, the SBI stands for situation, behavior, and impact framework. It includes:
Example: Last week’s team collaboration on the new feature development.
Example: “You did not participate actively in the brainstorming sessions and missed a few important meetings.”
Example: “This led to a lack of input from your side, and we missed out on potentially valuable ideas. It also caused some delays as we had to reschedule discussions.”
Final words could be: “Please ensure to attend all relevant meetings and actively participate in discussions. Your contributions are important to the team.”
This allows for delivering feedback that is clear, actionable, and respectful. When you provide feedback, it is important to support your points with concrete details and specific examples, as this makes your input more constructive and effective. It makes it relevant and directly tied to the situation. Note that, this framework is for both positive and negative feedback. Good feedback, when structured using the SBI framework, is clear, actionable, and fosters professional growth.
It is also important to know if any constraints are negatively impacting their performance. It could include tight deadlines, a heavy workload, or technical constraints that are hampering their productivity, or facing health issues due to which they aren’t able to focus properly. Addressing these issues early helps avoid wasting time and saves time by preventing delays and unnecessary rework. Timely intervention ensures that you do not waste time on preventable issues. Ask them while you deliver feedback to them. You can further create actionable plans accordingly. This shows developers that you care for them and makes the feedback more personalized and relevant. Besides this, it also allows you to share tangible improvements rather than adding more pressure.
For example: “During the last sprint, there were a few missed deadlines. Is there something outside of work that might be affecting your ability to meet these deadlines? Please let me know if there’s anything we can do to accommodate your situation.”
Before concluding the meeting, ask them if there's anything they would like to discuss. It could likely be that they have missed out on something or it wasn't bought up during the session.
Afterwards, summarize what has been discussed. Ask the developers what are their key takeaways from the session and share your perspective as well. You can document the summary to help you and developers in the future feedback meetings. This gives mutual understanding and ensures that both are on the same page.
Keep a record of what was discussed during this session and action plans provided to the developers. You can take a look at them in future feedback meetings or performance evaluations. An example of the structure of summary:
Ensure you give them measurable goals and timelines during the feedback session. Monitor their progress through check-ins, provide ongoing support and guidance, and keep discussing the challenges or roadblocks they are facing. It helps the developers stay on track and feel supported throughout their journey.
Establishing a comprehensive feedback infrastructure represents a critical architectural component for optimizing high-performance software development methodologies. When feedback mechanisms are systematically integrated into operational workflows, they function as essential instruments for continuous process optimization, professional capability enhancement, and team performance metrics. A robust feedback architecture enables developers to leverage collaborative knowledge transfer, address critical performance indicators within their deliverables, and accelerate both individual competency development and organizational growth trajectories. Pair programming, where two developers collaborate in real-time on the same code, is an example of such a mechanism, providing immediate feedback and fostering skill development.
To architect this infrastructure, organizations must prioritize transparent communication protocols and comprehensive visibility frameworks. Engineering teams should be configured to facilitate knowledge sharing through structured feedback sessions, whether implemented through formal sprint retrospectives, pull request evaluation processes, pull request reviews and request reviews, or asynchronous communication channels via collaborative platforms. Effective feedback methodologies must demonstrate specificity, temporal relevance, and behavioral focus rather than personality-based assessments. This systematic approach mitigates interpersonal friction while ensuring feedback mechanisms deliver constructive optimization rather than destructive criticism.
Code review processes and peer evaluation frameworks constitute the foundational components of feedback infrastructure within software engineering environments. These mechanisms provide comprehensive insights into code quality metrics, identify overlooked edge case scenarios, and address potential bug fixes early in the development process, and create knowledge transfer opportunities for junior developers to analyze senior developer methodologies. Senior developers play a crucial role in mentoring and guiding less experienced team members, supporting continuous improvement and skill enhancement. Through systematic implementation of code review protocols, development teams can detect defect patterns early in the development lifecycle, optimize resource allocation, and maintain elevated quality standards. Optimal feedback delivery relies on concrete implementation examples and focuses on code enhancement objectives rather than developer performance critiques.
Implementing effective feedback delivery protocols requires establishing comprehensive expectation frameworks and providing actionable optimization recommendations. For instance, when analyzing missed delivery milestones, teams should focus on realistic timeline projections and technical constraint analysis early in the project lifecycle. This methodology not only enhances developer understanding of performance expectations but also cultivates collaborative relationships and professional respect within engineering teams.
Emotional intelligence capabilities serve as fundamental requirements for creating secure and supportive development environments. Engineering teams should be trained to approach complex interpersonal communications with empathy-driven methodologies, acknowledging that team members operate with diverse work patterns and individual circumstances. Through fostering collaborative relationships and establishing trust-based frameworks, development teams can ensure that feedback mechanisms—whether positive reinforcement or critical analysis—are processed as growth optimization opportunities rather than negative performance evaluations.
In today's rapidly evolving software development ecosystem, leveraging data-driven methodologies for decision-making processes has emerged as a comprehensive cornerstone for optimizing feedback mechanisms within high-performing development teams. By anchoring feedback sessions in quantitative metrics and measurable performance indicators, development organizations can transcend subjective assessments and deliver streamlined feedback protocols that systematically drive continuous improvement initiatives. Automated testing provides instant feedback on code validity through unit tests, integration tests, and performance monitoring tools, further enhancing the efficiency and reliability of the development process.
Throughout structured feedback sessions, leveraging comprehensive key performance indicators—including code quality metrics, test coverage percentages, defect density ratios, and performance optimization benchmarks—enables engineering managers and senior developers to systematically identify targeted optimization opportunities. For instance, when a developer's pull request submissions consistently demonstrate suboptimal code coverage metrics compared to established team baselines, this quantitative data can be leveraged to provide feedback that is both strategically actionable and objectively fair: "Your recent pull request submissions demonstrate an average code coverage of 65%, while our established team benchmark targets 80% coverage. Let's collaborate on a comprehensive strategy to enhance your coverage metrics by implementing additional unit testing protocols throughout the upcoming sprint cycle." This systematic approach ensures that feedback delivery is anchored in transparent, quantifiable criteria, streamlining developer comprehension of performance expectations while providing concrete optimization pathways.
Data-driven feedback methodologies enable development professionals to systematically focus on critical optimization areas that directly impact code quality metrics and comprehensive team performance indicators. This approach effectively eliminates ambiguity while mitigating potential interpersonal friction risks, as feedback delivery is anchored in empirical data rather than subjective evaluations. This methodology not only accelerates professional development trajectories but also cultivates a comprehensive culture of transparency and systematic trust within software development organizations.
To maximize the strategic impact of data-driven feedback protocols, implementing specific, measurable, achievable, relevant, and time-bound (SMART) objectives becomes essential for comprehensive optimization. For instance, a development professional might be strategically encouraged to optimize their code defect ratios by 20% within a targeted six-week optimization cycle, or to systematically enhance their participation in peer code review processes by a predetermined threshold each developmental period. These high-quality feedback objectives establish a comprehensive roadmap for continuous improvement initiatives while streamlining progress monitoring capabilities throughout extended timeframes.
Ultimately, integrating data-driven decision-making methodologies into feedback delivery processes represents a comprehensive optimization tool for software development organizations. This systematic approach ensures that feedback remains consistent, strategically actionable, and precisely tailored to each developer's unique optimization requirements, enabling both individual professional development and comprehensive team performance enhancement. By establishing data as an integral component of feedback delivery protocols, organizations empower development professionals to systematically achieve their strategic objectives while contributing to a comprehensive culture of continuous improvement optimization.
Typo is an effective software engineering intelligence platform that can help in improving the feedback process within development teams. Here's how Typo's features can be leveraged to enhance feedback sessions:
Software developers deserve high-quality feedback. It not only helps them identify their blind spots but also polishes their skills. The feedback loop lets developers know where they stand and the recognition they deserve.

Building a high-performing engineering team is crucial for the success of any company, especially in the dynamic and constantly evolving world of technology. Whether you’re a startup on the rise or an established enterprise looking to maintain your competitive edge, having a well-structured engineering team is essential.
This blog will explore the intricacies of building and structuring engineering teams for scale and success. We’ll cover many topics, including talent acquisition, skill development, team management, and more.
Whether you’re a CTO, a team leader, or an entrepreneur looking to build your own engineering team, this blog will equip you with the knowledge and tools to create a high-performing engineering team that can drive innovation and help you achieve your business goals.
Before we dive into the specifics of team structure, it’s vital to understand the dynamics that shape engineering teams. Various factors, including team size, communication channels, leadership style, and cultural fit, influence these dynamics. Each factor plays a significant role in determining how well a team operates.
The size of a team can significantly impact its operation. Smaller teams tend to be more agile and flexible, making it easier for them to make quick decisions and respond to project changes. On the other hand, larger teams can provide more resources, skills, and knowledge, but they may struggle with communication and coordination.
Effective communication is essential for any team’s success. In engineering teams, communication channels play a significant role in ensuring team members can collaborate effectively. Different communication channels, such as email, chat, video conferencing, or face-to-face, can impact the team’s effectiveness.
A team leader’s leadership style can significantly impact the team’s effectiveness. Autocratic leaders tend to make decisions without input from team members, while democratic leaders encourage team members to participate in decision-making. Moreover, transformational leaders inspire and motivate team members to achieve their best.
Cultural fit refers to how well team members align with the team’s values, norms, and beliefs. A team that has members with similar values and beliefs is more likely to work well together and be more productive. In contrast, a team with members with conflicting values and beliefs may struggle to work effectively.
Scaling engineering teams can present challenges, and planning and strategizing thoughtfully is crucial to ensure that the team remains effective. Understanding the dynamics that shape engineering teams can help teams overcome these challenges and work together effectively.
An engineering team must be diverse and collaborative. Each team member should specialize in a particular area but also be able to comprehend and collaborate with others in building a product.
A few of them include:
The software development team lead plays a crucial role in guiding and coordinating the efforts of the software development team. They could have under 10 to hundreds of team members under their lead.
Software developers write the code, their job is purely technical and they build the product. Most of them are individual contributors i.e. they have no management or HR responsibilities.
Product managers define the product vision, gather and prioritize requirements, and deal with collaboration with engineering teams.
Designers create user-friendly interfaces, develop prototypes to visualize concepts and iterate on feedback-based designs.
Once the dynamics of engineering teams are understood, organizations can apply key principles to build and structure teams for scale. From defining goals and establishing role clarity to fostering a culture of collaboration and innovation, these principles serve as a foundation for effective team building.
There is no one-size-fits-all approach to structuring engineering teams. Different structures may be more suitable depending on the organization’s size, industry, and goals. Organizations can identify the structure that best aligns with their unique needs and objectives by exploring various approaches.
The top two approaches are:
When teams are formed based on the project for a defined period. It is a traditional way where engineers and designers are selected from their respective departments and tasked with project-related work.
It may seem logical, but it poses challenges. Project-based teams can prioritize short-term objectives and collaborating with unfamiliar team members can lead to communication gaps, particularly between developers and other project stakeholders.
When teams are aligned around specific products or features to promote ownership and accountability. Since this team structure is centered around the product, it is a long-term project, and team members are bound to work together more efficiently.
As the product gains traction and attracts users, the team needs to adapt to a changing environment i.e. restructuring and hiring specialists.
Other approaches include:
In engineering organizations, there is a tendency to rely heavily on one person for all responsibilities rather than distributing them among team members. It not only leads to bottlenecks and inefficiencies but also, slows down progress and the inability to deliver quality products.
The two most common communication issues while structuring and building engineering teams are – Alignment and context-switching between engineering teams. This increases the miscommunication among team members and leads to duplication of work, neglected responsibilities, and coverage gaps.
When engineering leaders micromanage developers, it can hinder productivity, innovation, and overall team effectiveness. Hence, having a structure that fosters optimization, ownership, and effectiveness is important for building an effective team.
Scaling an engineering team requires careful planning and execution. Here are the best practices to build a team that scales well:
Building and structuring engineering teams for scale is a multifaceted endeavor that requires careful planning, execution, and adaptation.
But this doesn’t end here! Measuring a team’s performance is equally important to build an effective team. This is where Typo comes in!
It is an intelligent engineering management platform used for gaining visibility, removing blockers, and maximizing developer effectiveness. It gives a comparative view of each team’s performance across velocity, quality, and throughput.

For more information, check out our website!

Agile project management relies on iterative development cycles to deliver value efficiently. Central to this methodology is the iteration burndown chart, a visual representation of work progress over time. In this blog, we’ll explore leveraging and enhancing the iteration burndown chart to optimize Agile project outcomes and team collaboration. By providing a shared visual reference for progress and goals, iteration burndown charts help keep the team on the same page. Burndown charts are commonly used in agile project management methodologies such as Scrum.
Agile project management is a modern approach that emphasizes adaptability, collaboration, and ongoing enhancement throughout the project lifecycle. Unlike traditional project management methods, Agile breaks down complex projects into smaller, manageable increments, allowing teams to deliver value in short, focused cycles known as sprints. This iterative process not only helps teams respond quickly to changing requirements but also fosters a culture of continuous improvement.
A key aspect of Agile project management is the use of visual tools to track progress and keep everyone aligned. Burndown charts are among the most effective tools for this purpose. By providing a clear, graphical representation of work remaining versus time left in a sprint, burndown charts help teams and stakeholders quickly assess project status, identify potential bottlenecks, and make informed decisions. These charts enable teams to monitor their progress in real time, ensuring that any issues can be addressed promptly and that the project stays on track. Ultimately, integrating burndown charts into Agile project management practices supports transparency, accountability, and the steady delivery of high-quality results.
An iteration burndown chart is a graphical representation of the total work remaining over time in an Agile iteration, helping teams visualize progress toward completing their planned work. Burndown and burnup charts are essential Agile tools for measuring progress within Sprints and communicating ongoing achievements to stakeholders.
A burndown chart, also known as a burn chart, shows the amount of work completed versus the remaining effort throughout the iteration, allowing teams to track daily progress and quickly identify any deviations from the plan. Burndown charts help teams track scope changes and visualize the project timeline, making it easier to identify delays or issues early. At the start of a given sprint, all tasks or backlog items are listed and their estimated effort is determined. This estimated effort is used to plan workload and monitor progress throughout the sprint.

The key components of an iteration burndown chart include axes, effort lines, story points, and the sprint goal. The chart typically features two axes: the x axis (horizontal axis), which represents the iteration timeline (such as days), and the y axis (vertical axis), which represents the remaining effort—often measured in story points. The vertical axis represents the amount of work left to complete in the project or sprint.
The ideal line, also known as the ideal work remaining line, is usually shown as a straight line representing the planned progress from the start to the end of the iteration. This ideal line serves as a benchmark or reference trajectory, helping teams pace their work and compare actual progress to the plan. It typically flattens on non-working days to reflect realistic pacing.
In contrast, the actual line, sometimes displayed as a red line, tracks the actual work remaining throughout the project. The actual line reflects the team's completed work each day and may fluctuate above or below the ideal line depending on the team’s progress. This fluctuation indicates whether the project is ahead, on track, or behind schedule. If a team consistently overestimates time requirements, the burndown chart will show progress as ahead of schedule, while underestimating will show it as behind schedule.
The chart should be based on the team's estimates for each task to ensure accurate forecasting and tracking. Story points are commonly used as the unit of measurement for work remaining on the chart. It's important to note that tracking completed tasks alone can be misleading, especially when task sizes vary. Effort-based metrics like story points provide a more accurate view of progress. The ideal burndown line is based on initial estimates and should be recalibrated after the first iteration to improve accuracy in future sprints.
The chart enables teams to monitor their velocity, identify potential bottlenecks, and make data-driven decisions to ensure successful iteration completion. Teams use the iteration burndown chart to monitor progress throughout the sprint and discuss progress during daily stand-ups, helping to identify blockers and make informed decisions about workload adjustments. The chart helps ensure steady progress toward sprint goals as the sprint progresses by providing a visual representation of work remaining. It also allows teams to compare actual progress against the team’s estimates and the planned pace, so they can make timely adjustments if they fall behind what was originally predicted at the start of the iteration. After the first iteration, teams can recalibrate their estimates and use the chart to project completion dates for future iterations. Teams should review and adjust their plans based on the burndown chart to ensure they meet their sprint goals.
Understanding the advantages of iteration burndown charts is key to appreciating their value in Agile project management. From enhanced visibility to improved decision-making, these charts offer numerous benefits that can positively impact project outcomes. A burndown chart shows how quickly a team is working through a customer’s user stories.
To create a burndown chart, follow these step-by-step instructions to ensure your iteration burndown chart accurately reflects progress and supports efficient project management:
By following these detailed guidelines, you’ll be able to create an accurate and effective iteration burndown chart that can help you and your team monitor your project’s progress and manage it more efficiently.
While creating a burndown chart is a crucial first step, maximizing its effectiveness requires ongoing attention and refinement. These tips will help you harness the full potential of your iteration burndown chart, empowering your development teams to achieve greater success in Agile projects.
Continuous improvement lies at the heart of Agile methodology, and your iteration burndown chart is no exception. By incorporating feedback, analyzing historical data, and experimenting with different approaches, you can refine your chart to better meet your team’s and stakeholders’ needs.
A burndown chart is great for evaluating the ratio of work remaining and the time it takes to complete the work. However, while burndown charts track remaining work, they may not provide detailed insights into the completed work or the types of tasks finished during the iteration. Additionally, burndown charts provide a straightforward view of tasks getting completed but do not reveal much about the quality of that work. Burndown charts do not measure developer productivity, as they only visualize remaining work without considering quality or effectiveness.
Although creating a burndown chart in Excel is easy, entering data manually requires more time and effort. This makes the work repetitive and tiresome after a certain point. Excel and Google Sheets are widely used for basic burndown visualization, allowing users to create a line chart with days on the x-axis and remaining effort on the y-axis.
The Burndown chart helps to track the progress of completing tasks or user stories over time within a sprint or iteration. But, it doesn't provide insights about the specific types of issues or tasks being worked on. It includes shipping new features, determining technical debt, and so on.
A burndown chart doesn’t differentiate between an easy and difficult task. It considers all of them equal, regardless of their size, complexity, or effort required to complete it. Task complexity can significantly affect the interpretation of burndown chart data and may mislead stakeholders about the team's actual performance and capacity. Hence, leading to ineffective outlines of project progress. This further potentially masks critical issues and hinders project management efforts. Using burndown charts as a performance scorecard can lead to negative behaviors, such as inflating estimates or rushing work. Burndown charts should not be used as performance scorecards for individual developers, as this can lead to gaming the system and misrepresenting progress.
The burndown chart primarily focuses on tracking remaining work throughout a sprint, but it doesn't directly indicate the predictability of completing that work within the sprint timeframe. It lacks insight into factors like team velocity fluctuations or scope changes, which are crucial for assessing sprint predictability accurately. Burndown charts are not suitable for projects with fluid requirements, as they do not handle scope changes well.
Burnup charts represent a sophisticated and transformative approach for agile project managers and development teams, offering an unprecedented alternative to conventional burndown methodologies while delivering comprehensive insights into project trajectory and accomplishment metrics throughout the entire development lifecycle. Unlike traditional burndown charts, which inherently limit their focus to the singular dimension of remaining work capacity, burnup charts simultaneously visualize both the total scope of deliverables and the cumulative volume of completed work over temporal progressions. This dual-axis visualization methodology provides stakeholders with an exceptionally comprehensive and nuanced understanding of project advancement, enabling teams to accurately assess their proximity to achieving established objectives while maintaining complete visibility into both accomplished milestones and outstanding deliverables.
Within the complex landscape of agile project management methodologies, burnup charts demonstrate particular excellence in illuminating and quantifying the substantial impact of scope modifications and requirement changes on overall project dynamics. When additional user stories, feature requests, or task specifications are incorporated into the project backlog, the total scope trajectory line within the burnup chart will experience corresponding elevation, creating immediate visual representation of how these evolutionary changes influence the comprehensive timeline and resource allocation strategies. Simultaneously, the completed work progression line continues to demonstrate the team's actual productivity and delivery velocity, facilitating precise comparative analysis between accomplished deliverables and remaining work obligations, thereby enabling data-driven decision-making processes and strategic project adjustments based on empirical performance metrics.
Typo's sprint analysis is an essential tool for any team using an agile development methodology. It allows agile teams to track and analyze overall progress throughout a sprint timeline. It helps to gain visual insights into how much work has been completed, how much work is still in progress, and how much time is left in the sprint. This information can help to identify any potential problems early on and take corrective action.
Our sprint analysis feature uses data from Git and issue management tools to provide insights into how software development teams are working. They can see how long tasks are taking, how often they're being blocked, and where bottlenecks are occurring.
It is easy to use and can be integrated with existing Git and Jira/Linear/Clickup workflows.
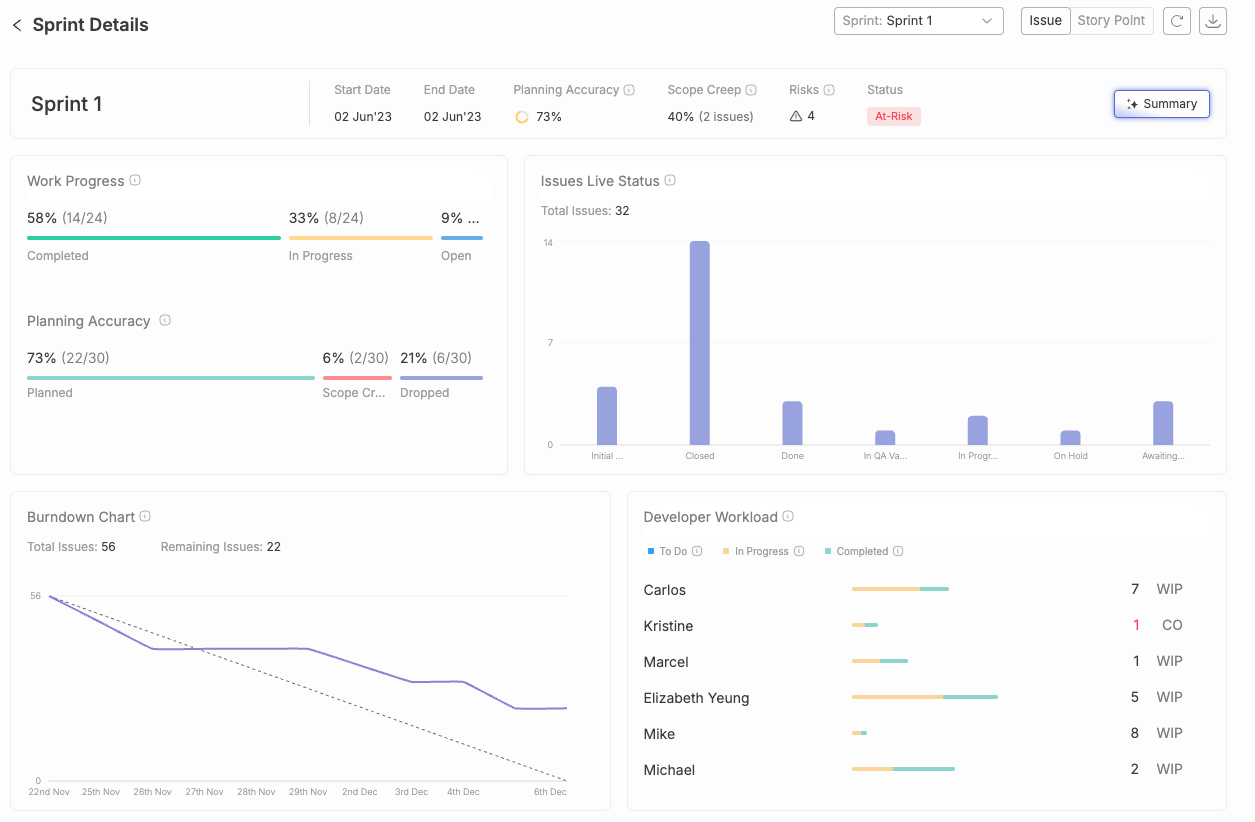
The iteration burndown chart is a vital tool in Agile project management. It offers agile and scrum teams a clear, concise way to track progress and make data-driven decisions.
However, one shouldn't rely solely on the burndown charts. Moreover, there are various advanced sprint analysis tools such as Typo in the market that allow teams to track and gain visual insights into the overall progress of the work. Burndown charts are most effective for short-term sprints with fixed scope, where requirements are unlikely to change. ProjectManager is an online software that offers multiple project views to help you collect and track your burndown chart. Jira remains the standard for agile project tracking, with sprint and release burndown charts that update in real time as issues move through the workflow.

A Jira dashboard is a customizable homepage that displays a collection of visual elements related to your Jira projects. Jira supports various types of dashboards tailored to different project needs. Jira dashboards are a vital component of Jira, providing teams with insights and project visibility. They transform raw project data into actionable intelligence, empowering teams to stay organized, productive, and aligned with project goals. Dashboards in Jira are driven by JQL queries and use gadgets to display dynamic content, such as pie charts and bar charts, offering a high-level overview of project health and performance metrics. Jira dashboards are incredibly powerful, especially when enhanced with plugins or integrations. To create a Jira dashboard, users can use a template to streamline the setup process, define objectives, select and arrange gadgets, and configure layouts to best visualize key project data.
A Jira dashboard is a customizable homepage that displays a collection of visual elements related to your Jira projects. It serves as the nerve center of project activity, offering a consolidated view of tasks, progress, and key metrics. A dashboard displays a lot of issue data at once as graphs, counts, trends, and charts. Dashboards can be based on different functionalities or tailored for specific roles or teams, allowing users to create dashboards that fit their unique needs and workflows. It gives stakeholders a centralized location to monitor project health, track progress, and make informed decisions. Jira administrators also use the system dashboard to oversee system health and performance.
Dashboards in Jira are driven by JQL queries. This means you can filter and display exactly the data you need for your team or project.
Now that we’ve defined what a Jira dashboard is, let’s look at its main components.
Jira dashboards are a vital component of Jira, providing teams with insights and project visibility. This article is designed for Jira users, project managers, team leads, and anyone involved in project management who wants to understand how to leverage Jira dashboards for better project visibility, efficiency, and decision-making. Understanding Jira dashboards matters because they transform raw project data into actionable intelligence, helping teams stay organized, productive, and aligned with project goals. In this article, we will cover what Jira dashboards are, their main features, how to create and customize them, practical examples, and best practices for maximizing their impact.

Gadgets are mini-visual tools that display key data, such as pie charts, bar charts, and lists of issues. Jira dashboards come equipped with built-in gadgets—pre-installed, ready-to-use tools that allow users to display and customize issue data, metrics, and charts. These modular components provide specific information and functionality, such as task lists, burndown charts, and activity streams. Users can add gadgets to their Jira dashboards to display key data such as pie charts and bar charts. There are several built-in gadgets in project management tools, such as filter results gadget, issue statistics gadget, and road map gadget. However, additional gadgets can also be downloaded from third-party marketplaces. Some of them are the pivot gadget and gauge gadget.
To build an effective project management dashboard, start with the essentials:
This ensures that the most critical data is easily accessible and actionable. Here’s a list of must-have gadgets to consider:
Once you’ve added these key components, you’ll have a robust dashboard ready to streamline your project management workflow. Users can explore third-party apps from the Atlassian Marketplace to find additional dashboard gadgets.
Transition: With a clear understanding of the components, let's explore why Jira dashboards are used and their benefits.
Jira dashboards host various reports, including Jira reports, Jira reports dashboards, and reports dashboards, such as velocity charts, sprint summaries, and issue statistics, offering valuable insights into team performance and project trends.
Dashboards can display a lot of issue data at once as graphs, counts, trends, and charts.
Jira dashboards are used for several reasons:
With Jira dashboards, you can quickly gauge a system's health, view a team's workload, or detect trends in issue data.
Transition: Now that you know why Jira dashboards are essential, let's look at the default dashboard and how to create your own.
The default dashboard is also known as the system dashboard. It is the screen Jira users see the first time they log in. It includes gadgets from Jira's pre-installed selection and is limited to only one dashboard page.
Transition: Understanding the default dashboard sets the stage for creating custom dashboards tailored to your team's needs.
Creating custom dashboards requires careful planning and consideration of project objectives and team requirements. In Jira, users can create multiple dashboards to organize different views for various projects or teams. You can also copy existing dashboards to use as templates for new dashboards, making it easier to maintain consistency and save time. Additionally, Jira allows you to star favorite dashboards for quick access.
Transition: With your dashboard created, you can now tailor it for specific use cases, such as status meetings.
Imagine the power of walking into a status meeting and instantly knowing how projects are progressing without waiting for updates. Here’s how you can create your own project dashboard to monitor progress efficiently before any discussions start.
Project dashboards also enhance stakeholder alignment through customizable views tailored to different audiences.
To ensure your dashboard gives you a clear picture of the project status, integrate these key components and take advantage of the features offered by various gadgets:
For visualization, you might include:
Transition: By following these steps, you’ll build a dashboard that empowers you to walk into meetings well-prepared and informed, streamlining discussions and decision-making. With the process for creating dashboards clear, let's explore some practical examples.
A personal dashboard is tailored to individual needs and offers various advantages in streamlining workflow management and improving productivity. It provides a centralized platform for organizing and visualizing user's tasks, different projects, issues, etc.
This dashboard gives real-time updates on whether the team is on pace to meet a sprint goal. It offers a glimpse of how much work is left in the queue and how long your team will take to complete it. Moreover, the sprint burndown dashboard allows you to jump on any issue when the remaining workload is pacing slower than the delivery date.
The workload dashboard, also known as the monitor resource dashboard, tracks the amount of work and capacity assigned to each team member and adjusts their workload accordingly. It helps identify workload patterns and plan resource allocation.
Jira dashboards help project managers optimize resource allocation by providing insights into team workload and capacity.
To ensure that your target release dates are realistic, it's crucial to monitor the workload effectively and adjust your strategies accordingly. Here's how you can do that:
Transition: By following these steps, you can maintain visibility over your work progress and adjust timelines appropriately, ensuring that release targets remain feasible given the current workload.
The issue tracking dashboard allows users to quickly identify and prioritize the most important issues. It focuses on providing visibility into the status and progress of issues or tickets within a project.
In any project, some tasks inherently carry more risk due to their complexity or resource requirements. To effectively manage these, it's crucial to identify and keep track of them using project management tools. Here's how you can streamline this process:
Transition: By maintaining a clear focus on high-risk tasks through strategic filtering and dashboard visualization, you ensure that potential issues are addressed proactively, reducing the likelihood of them derailing your project. With these examples in mind, let's discuss how to maximize the impact of your Jira dashboards.
To maximize the impact of your Jira dashboard, consider the following best practices:
Transition: By following these best practices, you can ensure your Jira dashboard remains a valuable asset for your team. Next, let's explore advanced customization techniques to further enhance your dashboards.
Take your Jira dashboard customization to the next level with these advanced techniques and strategies for data integration and visualization:
To effectively monitor progress towards your next project milestone, follow these steps:
By setting up this filter, you can maintain a clear view of your project's progress towards the next milestone, ensuring everyone on your team is aligned with the priorities.
Transition: By incorporating these strategies, you can ensure that your project management dashboard remains a powerful tool for driving project success and adapting to the evolving demands of your release cycle.
Typo's sprint analysis feature can be seamlessly integrated with the Jira dashboard. It allows you to track and analyze the team's progress throughout a sprint and provides valuable insights into work progress, work breakup, team velocity, developer workload, and issue cycle time.
The benefits of the Sprint analysis feature are:
Transition: With these advanced features, you can further enhance your Jira dashboard's effectiveness.

A well-designed Jira dashboard is a catalyst for project excellence, providing teams with the insights and visibility they need to succeed. By understanding its components, crafting a tailored dashboard, and maximizing its impact, you can unlock Jira dashboards' full potential and drive your projects toward success.
Furthermore, while Jira dashboards offer extensive functionalities, it's essential to explore alternative tools that may simplify the process and enhance user experience. Typo is one such tool that streamlines project management by offering intuitive dashboard creation, seamless integration, and a user-friendly interface. With Typo, teams can effortlessly visualize project data, track progress, and collaborate effectively, ultimately leading to improved productivity and project outcomes. Explore Typo today and revolutionize your project management experience.
This article is designed for Jira users, project managers, team leads, and anyone involved in project management who wants to understand how to leverage Jira dashboards for better project visibility, efficiency, and decision-making. Understanding Jira dashboards is crucial for transforming raw project data into actionable insights, keeping teams organized, and ensuring alignment with project goals.

Scrum anti-patterns are flawed practices or behaviors that hinder a team’s agility, productivity, and effectiveness. Understanding and addressing these anti-patterns is crucial for Scrum Masters, Product Owners, and Agile teams aiming for successful Agile adoption and project outcomes. The most significant Scrum anti-patterns include:
These anti-patterns can lead to decreased productivity, low morale, missed deadlines, and ultimately, project failure. Scrum anti-patterns hinder a team’s agility, productivity, and effectiveness.
Scrum anti-patterns are flawed practices or behaviors that hinder a team’s agility, productivity, and effectiveness. This guide is designed for Scrum Masters, Product Owners, and Agile teams who want to identify and overcome the most common Scrum anti-patterns. Understanding Scrum anti-patterns is essential for successful Agile adoption and achieving positive project outcomes. This guide covers the most common Scrum anti-patterns and practical solutions for Agile teams. Scrum anti-patterns hinder a team’s agility, productivity, and effectiveness, making it vital to recognize and address them early.
Successfully implementing Scrum requires more than just following the framework—it is intentionally lightweight, and many Scrum anti-patterns arise from treating it as a rigid process instead of applying Scrum theory empirically. The Scrum Guide is the baseline for understanding Scrum roles and events before tailoring practices. By addressing common Scrum anti-patterns, teams can cultivate a culture of collaboration, efficiency, and continuous improvement, leading to better project outcomes and stakeholder satisfaction.
However, without the right tools, identifying and addressing these anti-patterns can be daunting. That's where Typo comes in. Typo is an intuitive project management platform designed to streamline Agile processes, enhance team communication, and mitigate common Scrum challenges.
This article also works as a practical Scrum anti-patterns guide. With Typo, teams can effortlessly manage their Scrum projects, identify and address anti-patterns in real-time, and avoid the notorious sprint anti issues that hurt agility, productivity, and overall effectiveness.
So why wait? Try Typo today and elevate your Scrum experience to new heights!
A lack of a clear Definition of Done (DoD) can cause teams to struggle to deliver shippable increments at the end of each sprint. This often results from poor communication and transparency, leading to ambiguity, rework, and dissatisfaction among stakeholders.
Another common challenge is overcommitting during sprint planning.
Overcommitting during sprint planning meetings is a frequent anti-pattern. It sets unrealistic expectations, leading to compromised quality and missed deadlines.
Similarly, teams may also face micromanagement issues from the Scrum Master.
Micromanagement stifles team autonomy and creativity, reflecting rigid process thinking rather than adaptive teamwork. This leads to disengagement, lack of trust, reduced ownership, and lower productivity.
Another common anti-pattern is lack of Product Owner engagement.
Disengaged Product Owners fail to provide clear direction and effectively prioritize the product backlog, leading to confusion and inefficiency.
Similarly, teams may also struggle with failure to adapt and improve.
Failing to embrace a mindset of continuous improvement and adaptation leads to stagnation and inefficiency. Skipping or minimizing retrospectives prevents teams from learning and evolving.
Another frequent issue is scope creep.
Allowing the project scope to expand unchecked during the sprint leads to incomplete work and missed deadlines.
Similarly, teams may also encounter a lack of cross-functional collaboration.
Siloed teams hinder communication and collaboration, leading to bottlenecks and inefficiencies.
Another related anti-pattern is inadequate Sprint review and retrospective.
Rushing through Sprint Review and Retrospective meetings reduces learning and transparency, resulting in missed opportunities for feedback and improvement.
Similarly, unrealistic commitments by the Product Owner can disrupt progress.
Product Owners making unrealistic commitments disrupt the team's focus and cause delays.
Another challenge is lack of stakeholder involvement.
Limited involvement or feedback from stakeholders leads to misunderstandings and dissatisfaction with the final product.
Similarly, ignoring technical debt can have long-term negative effects.
Neglecting to address technical debt results in decreased code quality, increased bugs, and slower development velocity. Relying on a hardening sprint to clean things up later is itself a Scrum anti-pattern.
Another related anti-pattern is lack of continuous integration and deployment.
Failing to implement continuous integration and deployment practices leads to integration issues, longer release cycles, and reduced agility.
Similarly, daily scrum meetings can become inefficient if not properly facilitated.
Daily scrum meetings are often treated as status meetings, reducing collaboration and turning the event into reporting instead of planning together. This can lead to disengagement and decreased motivation.
By understanding and addressing these Scrum anti-patterns, Agile teams, Scrum Masters, and Product Owners can significantly improve their agility, productivity, and effectiveness, leading to better project outcomes and higher stakeholder satisfaction.

"Jira software has become the backbone of project management for many teams across various industries. Its flexibility and powerful features make it an invaluable tool for organizing tasks, tracking progress, and collaborating effectively. However, maximizing its potential requires more than just basic knowledge. To truly excel in Jira ticket management, you must implement strategies and best practices that streamline your workflows and enhance productivity.
Jira is a popular project management tool developed by Atlassian, commonly used for issue tracking, bug tracking, and project management. Jira ticket management refers to the process of creating, updating, assigning, prioritizing, and tracking issues within Jira.
A Jira ticket acts as a digital record of a task, issue, or request within your Jira system. Here are the key elements that a Jira ticket typically contains:
These components keep everything organized and explained, ensuring your team stays on the same page while managing projects efficiently. By understanding the detailed structure of a Jira ticket, teams can improve their workflow and collaboration.
Creating a ticket in Jira is a straightforward process that helps streamline your workflow and ensures tasks are tracked efficiently. Here's how you can do it:
By following these steps, your ticket will be successfully created and primed for oversight until resolution. This systematic approach ensures clarity and accountability across your team.

Creating a Jira Service Management project and selecting the appropriate request types is a straightforward process. Follow these steps to get started:
By following these steps, you’ll establish a structured project environment tailored to your team's service management needs while keeping the setup manageable and adaptable.
One of the major challenges with the Jira ticketing platform is that it requires a lot of tedious and manual work. This leads to developer frustration, incomplete ticket updates, and undocumented work.
To mitigate this, consider automating repetitive tasks where possible. Use Jira's automation tools to streamline processes, such as auto-assigning tickets or updating statuses, to reduce manual input and enhance team productivity.
Setting up Jira software to align with the specific needs of a team or project can be complicated. Configuring workflows, custom fields, and permissions requires careful planning and may involve a learning curve for administrators.
Simplify Workflows: While it's tempting to create intricate workflows to cover every scenario, simplicity is key. Focus on the essential steps and decision points to resolve tickets efficiently. Involve your team in mapping out workflows to ensure they are intuitive and effective for everyone involved.
Due to the above-mentioned points, it can lead to software development team work becoming untracked and invisible. Hence, the team lacks data hygiene which further leads top management to make decisions with incomplete information. This can further impact planning accuracy as well.
Set Clear Guidelines: Establishing clear, concise guidelines for ticket management can help maintain data integrity. Define what information should be included in ticket descriptions, how to categorize and prioritize tasks, and when to update or close tickets. Ensuring these guidelines are easily accessible and consistently followed will promote better data hygiene.
Customize for Better Fit: Avoid using Jira in its most basic form. Explore customization options to tailor the system to your team’s unique needs. Create custom fields and design workflows that align with your processes. Set up dashboards to display key metrics and integrate Jira with other tools your team uses to enhance visibility and efficiency.
By addressing these challenges with thoughtful solutions, you can transform Jira into a powerful tool that supports your team’s workflow and decision-making processes effectively.
Below are some essential tips to help you manage your Jira tickets better:
Developers often find it labor-intensive to keep tickets updated. Hence, JIRA provides some automation that eases the work of developers. Although these automations are a bit complex initially, once mastered, they offer significant efficiency gains. Moreover, they can be customized as well.
Here are a few JIRA automation that you can take note of:
This is one of the most commonly used automation that involves ensuring accountability for an issue by automatically assigning it to its creator. It ensures that there is always a designated individual responsible for addressing the matter, streamlining workflow management and accountability within the team.
This automation can be customized to suit various scenarios, such as applying it to epics and stories or refining it with specific conditions tailored to your workflow. For example, when a bug issue is reported, you can set up automation to automatically create tasks aimed at resolving the problem. It not only streamlines the process but also ensures that necessary tasks are promptly initiated, enhancing overall efficiency in issue management.
Implementing this advanced automation involves creating a duplicate of an issue in a different project when it undergoes a specific transition. It also leaves a comment on the original issue to establish a connection between them. It becomes particularly valuable in scenarios where one project is dedicated to managing customer requests, while another project is focused on executing the actual work.
This automation automatically computes and assigns a due date to an issue when it’s moved from the backlog to the ‘In Progress’ status. This streamlines the process of managing task timelines, ensuring that deadlines are promptly established as tasks transition into active development stages.
If you're looking to make your Service Level Agreements (SLAs) visible to external stakeholders within Jira Service Management, follow these steps to ensure seamless transparency:
Utilizing these configuration options within Jira allows for greater transparency at every stage of your service process. This ensures that all stakeholders have the necessary insights into SLA metrics, thereby enhancing accountability and improving service delivery.
Remember, integrating these settings effectively helps leverage the full potential of Jira Service Management, turning your ticketing system into a powerful tool for stakeholder engagement.
Establishing clear guidelines for creating tickets ensures consistency across your projects. Include essential details such as a descriptive title, priority level, assignee, and due date. This ensures that everyone understands what needs to be done at a glance, reducing confusion and streamlining the workflow.
Moreover, standardizing ticket creation practices fosters alignment within your team and improves communication. When everyone follows the same format for ticket creation, it becomes easier to track progress, assign tasks, and prioritize work effectively. Consistency also enhances transparency, as stakeholders can quickly grasp the status of each ticket without needing to decipher varying formats.
Tailoring Jira workflows to match your team’s specific processes and requirements is essential for efficient ticket management. Whether you follow Agile, Scrum, Kanban, or a hybrid methodology, configure workflows that accurately reflect your workflow stages and transitions. This customization ensures your team can work seamlessly within Jira, optimizing productivity and collaboration.
Customizing workflows allows you to streamline your team’s unique processes and adapt to changing project needs. For example, you can define distinct stages for task assignment, development, testing, and deployment that reflect your team’s workflow. Custom workflows empower teams to work more efficiently by clarifying task progression and facilitating smoother handoffs between team members.
Not all tasks are created equal in Jira. Use priority fields to categorize tickets based on urgency and importance. This strategic prioritization helps your team focus on high-priority items and prevents critical tasks from slipping through the cracks. By prioritizing effectively, you can ensure that important deadlines are met and resources are allocated efficiently.
Effective prioritization involves considering various factors, such as project deadlines, stakeholder requirements, and resource availability. By assessing the impact and urgency of each task, teams can more effectively allocate their time and resources. Regularly reviewing and updating priorities ensures your team remains agile and responsive to changing project needs.
Leverage tags or custom fields to add context to your tickets. Whether it’s categorizing tasks by feature, department, or milestone, these metadata elements make it easier to filter and search for relevant tickets. By utilizing labels and tags effectively, you can improve organization and streamline ticket management within Jira.
Furthermore, consistent labeling conventions enhance collaboration and communication across teams. When everyone adopts a standardized approach to labeling tickets, it becomes simpler to locate specific tasks and understand their context. Moreover, labels and tags can provide valuable insights for reporting and analytics, enabling teams to track progress and identify trends over time.
Effective communication is the cornerstone of successful project management. Encourage team members to provide detailed updates, ask questions, and collaborate openly within Jira ticket comments. This transparent communication ensures that everyone stays informed and aligned, fostering a collaborative environment conducive to productivity and success.
Clear communication within Jira ticket comments keeps team members informed and facilitates knowledge sharing and problem-solving. Encouraging open dialogue enables team members to provide feedback, offer assistance, and address potential roadblocks promptly. Additionally, documenting discussions within ticket comments provides valuable context for future reference, aiding in project continuity and decision-making.
Identify repetitive tasks or processes and automate them using Jira’s built-in automation features or third-party integrations. This not only saves time but also reduces the likelihood of human error. By automating repetitive tasks, you can free up valuable resources and focus on more strategic initiatives, improving overall efficiency and productivity.
To ensure tickets are never missed, leverage Jira's automation capabilities to create rules for assigning and updating tickets. You can:
Additionally, keep stakeholders informed by setting up automated notifications. This ensures that everyone involved is aware of any changes or updates, reducing the risk of overlooked tickets.
For high-priority issues, implement escalation automation. This feature automatically alerts your team if important tickets remain unresolved beyond a specified timeframe, allowing you to address critical issues before they escalate further.
By combining these automation strategies, you can maintain a seamless workflow while ensuring that no ticket is left unattended.
Continuously reviewing your Jira setup and workflows is essential to identify areas for improvement. Solicit feedback from team members and stakeholders to understand pain points and make necessary adjustments. By regularly reviewing and refining your Jira configuration, you can optimize processes and adapt to evolving project requirements effectively.
Moreover, regular reviews foster a culture of continuous improvement within your team. By actively seeking feedback and incorporating suggestions for enhancement, you demonstrate a commitment to excellence and encourage team members to engage. Additionally, periodic reviews help identify bottlenecks and inefficiencies, allowing teams to address them proactively and maintain high productivity levels.
Jira seamlessly integrates with a wide range of third-party tools and services, enhancing its capabilities and extending its functionality. Integrating with other tools can streamline your development process and enhance collaboration, whether it’s version control systems, CI/CD pipelines, or communication platforms. Incorporating workflow automation tools into the mix further enhances efficiency by automating repetitive tasks and reducing manual intervention, ultimately accelerating project delivery and reducing errors.
Furthermore, integrating Jira with other tools promotes cross-functional collaboration and data sharing. By connecting disparate systems and centralizing information within Jira, teams can eliminate silos and improve visibility into project progress. Additionally, integrating with complementary tools allows teams to leverage existing investments and build upon established workflows, maximizing efficiency and effectiveness.
Encourage a mindset of continuous improvement within your software teams. Encourage feedback, experimentation, and learning from both successes and failures. By embracing a culture of constant improvement, you can adapt to changing requirements and drive greater efficiency in your Jira ticket management process while also building a robust knowledge base of best practices and lessons learned.
Moreover, fostering a culture of continuous improvement empowers team members to take ownership of their work and seek opportunities for growth and innovation. By encouraging experimentation and learning from failures, teams can cultivate resilience and agility, enabling them to thrive in dynamic environments. Additionally, celebrating successes and acknowledging contributions fosters morale and motivation, creating a positive and supportive work culture.
Customizing your Jira Service Management project is key to optimizing your workflow and ensuring your team operates efficiently. Here’s a guide to help you tailor your project for the best possible outcomes.
To stay on top of incoming requests, set up email notifications. As a project administrator, you can link a custom email account to ensure no request goes unnoticed:
Enhance your request management by configuring chat channels. This feature allows you to generate tickets directly from platforms like Slack or Microsoft Teams:
To get your team fully operational, add members to your project with the appropriate roles:
While these steps will set a solid foundation, consider further customizations such as adjusting request views, organizing queues, and setting up Service Level Agreements (SLAs) to match your team’s specific needs.
By following these guidelines, you’ll ensure that your Jira Service Management project is customized for maximum efficiency and productivity.
Jira is designed to streamline project management and problem-solving tasks. By leveraging its capabilities, various teams can maintain seamless operations. Here’s how Jira can be utilized:
Using Jira for ticketing enables teams to collaborate effectively, monitor tasks, and troubleshoot efficiently. By providing clarity and structure, Jira helps in swiftly navigating roadblocks.
Better JIRA ticket management helps in improving planning accuracy. Below are a few of the ways how these strategies can further help in better planning:
Improving your Jira ticket management, essential for effective task management, requires thoughtful planning, ongoing refinement, and a commitment to best practices. Implementing these tips and fostering a culture of continuous improvement can optimize your workflows, enhance collaboration, and drive greater project success, benefiting both internal teams and external customers.
To achieve these goals, consider how a robust ticketing system can transform your software team's operations:
By leveraging these capabilities, your team can streamline workflows and improve project outcomes, ultimately driving success across all facets of your software development process.
If you need further help in optimizing your engineering processes, Typo is here to help you.
Curious to know more? Learn about Typo here!

In Agile project management, it is crucial to get a clear picture of the project’s reality. Many teams use Microsoft Excel for creating burndown charts in agile project management, as it is a widely adopted tool for tracking progress.
A Burndown chart is a project management chart that shows the remaining work needed to reach project completion over time. Creating burndown charts in Excel can be done in a few steps, making it accessible for agile teams.
Let’s understand how you can create a burndown chart in Microsoft Excel by following a few steps:
Burndown chart visually represents teams’ or projects’ progress over time. It analyzes their pace, reflects progress, and determines if they are on track to complete it on time. Burndown charts help monitor the team's progress and the project's progress by visualizing remaining effort and sprint progress throughout the project lifecycle.
Burndown charts are generally of three types:
The product burndown chart focuses on the big picture and visualizes the entire project. It determines how many product goals the development team has achieved so far and the remaining work. The product burndown chart also helps track the completion of project tasks and provides an overview of progress towards project goals.
Sprint burndown charts focus on the ongoing sprints. It indicates progress towards completing the sprint backlog. Sprint burndown charts also help teams stay focused on their sprint goals and measure progress against these objectives.
This chart focuses on how your team is performing against the work in the epic over time. It helps to track the advancement of major deliverables within a project. Epic burndown charts also assist teams in forecasting workload and planning for future sprints based on the progress of major deliverables.
A burndown chart has two axes: X and Y. The horizontal axis represents the time or iteration and the vertical axis displays user story points. These axes form the basis of a simple line chart, which is commonly used to visualize burndown data.
It is the diagonal straight line, also known as the ideal line, sloping downwards that represents the remaining work a team has at a specific point of the project or sprint under ideal conditions. This straight line serves as a baseline for planned progress, helping teams compare actual progress against the optimal trajectory.
It is a realistic depiction of the team’s performance that is updated in real-time, shown by the actual work line, which tracks the real progress of the team throughout the project or sprint. It is drawn as the teams progress and complete user stories.
Each point on the work lines displays a measurement of work remaining at a given time, and story points can also be used to estimate the number of remaining tasks at any given time.
It is the rightmost point of your burndown chart that represents whether the team has completed a project/sprint on time, behind, or ahead of schedule; this point corresponds to the project's end date. In other project management tools like Gantt charts, both start and end dates are used for scheduling, tracking progress, and visualizing task dependencies within the project timeline.
A Burndown chart helps in keeping an eye on teams’ work progress visually, making it easy to monitor task completion throughout the project or sprint. This is not only simple to use but also motivates the team to perform well.
A burndown chart is useful to show the direct comparison between planned work and actual progress over time, highlighting the amount of work completed versus what was initially planned. This helps in quickly assessing whether the team is on track to meet its goals.
A burndown chart acts as a tool for inspiration. Such types of charts transparently show the progress and work efficiency, allowing project teams to benefit from increased transparency and collaboration. Hence, improving the collaboration and cooperation between team members.
A burndown chart must be updated daily, ensuring the chart always reflects the current status of the project or sprint. This helps in tracking progress in real-time, identifying problems in early stages hence, assisting in completing the project on time.
Open a new sheet in Excel and create a new table that includes 3 columns. This table will serve as the foundation for your sprint burndown chart.
Now, fill in the data accordingly. This includes the dates of your sprints and numbers in the Ideal Burndown column indicating the desired number of tasks remaining after each day throughout the, let’s say, 10-day sprint.
To do this effectively, start by clearly defining your planned tasks data. This data should reflect the number of tasks you expect to remain at the end of each day. Remember, this is your ideal work progression, and it won’t account for unexpected delays or challenges. Tracking how many tasks remain at the end of each day is essential for monitoring progress and ensuring the team stays on schedule.
Here’s a straightforward example to guide you:
It’s crucial to update your actual tasks column daily as your team completes tasks. At the end of each day, record the number of tasks remaining. This will give you an accurate picture of how your team is progressing compared to your plan.
By maintaining this discipline, you’ll be able to adjust your strategy and resources in real time, ensuring your project stays on track.
As you complete tasks each day, update the spreadsheet to document the number of tasks you can finish under the ‘Actual Burndown’ column.

Now, it’s time to convert the data into a graph. To create a chart, follow these steps: Select the three columns > Click ‘Insert’ on the menu bar > Select the ‘Line chart’ icon, and generate a line graph to visualize the different data points you have in your chart.
For an even faster start, consider using a burndown chart template or a simple burndown chart template, which provides a ready-made structure for tracking progress and can be easily customized to fit your project needs.

Study project scope and divide the projects or sprints into short-term tasks, as this process is essential for effective scheduling and timeline management. Ensure to review them and estimate the time required to complete each task based on the project deadline.
The Scrum master must check the chart often and update it daily, and each team member should also regularly review and update the chart to ensure accuracy. It helps to understand the flagging trends, know the pitfalls, and ensure it aligns with the expectations.
Don't lose sight of the outcome. By focusing on it, software development teams can ensure they are making progress toward their goals and adjust their efforts accordingly to stay on track for successful project completion.
Teams pause the work during weekends or holidays. Excluding weekends provides accuracy by focusing solely on the days when active work is being done hence giving a clearer representation of progress and highlighting the team's actual productivity levels during working days.
Burndown chart, when accessible to the entire team, fosters collaboration and accountability. It gives them a sense of ownership to discuss points to address challenges and celebrate achievements.
A burndown chart is great for evaluating the ratio of work remaining and the time it takes to complete the work. However, relying solely on a burndown chart is not the right way due to certain limitations. Data management in Excel can be challenging, especially when handling large projects or requiring real-time updates.
Although creating a burndown chart in Excel is easy, entering data manually requires more time and effort. Creating burndown charts in Excel can be less efficient than using dedicated project management tools with automation features. This makes the work repetitive and tiresome after a certain point. Fortunately, there are various tools available in the market that offer collaboration and automation features, including Jira, Linear, Trello, and Asana, which streamline this process significantly.
These tools allow for real-time progress tracking, where updates to burndown charts happen automatically as tasks are completed, saving hours that would otherwise be spent on manual input. This automation not only saves time but also reduces the risk of human error, ensuring that your reports are always accurate and up-to-date.
The Burndown chart helps in tracking the progress of completing tasks or user stories over time within a sprint or iteration. But, it doesn't provide insights about the specific types of issues or tasks being worked on, such as shipping new features or determining technical debt. This is where advanced project management tools shine.
They offer visual reports and overviews that give you a birds-eye view of project health, timelines, and workload distribution. This comprehensive insight is something a simple Excel spreadsheet cannot match.
A burndown chart doesn't differentiate between an easy and difficult task. It considers all of them equal, regardless of their size, complexity, or effort required to complete it. Hence, leading to ineffective outlines of project progress. This further potentially masks critical issues and hinders project management efforts.
Project management tools address this by providing task management features with customizable boards and views, allowing you to assign varying weights and priorities to tasks. This approach ensures a more accurate reflection of project status and helps in identifying bottlenecks before they escalate.
As a result, the burndown chart is not a reliable metric engineering leaders can solely trust. It is always better to complement it with sprint analysis tools to provide additional insights tailored to agile project management. A few of the reasons are stated below:
Moreover, these tools often support collaboration features, such as built-in chat and video meetings, keeping all communication linked to tasks and ensuring transparency across the team. With mobile and remote access capabilities, they enable project management on the go, maintaining team alignment whether you're in the office or working remotely.
Typo's sprint analysis feature allows engineering leaders to track and analyze their team's progress throughout a sprint. It uses data from Git and the issue management tool to provide insights into getting insights on how much work has been completed, how much work is still in progress, and how much time is left in the sprint hence, identifying any potential problems early on and taking corrective action.


Martin Fowler once said “Anyone can write a code that a computer can understand. Good programmers write code that humans can understand.”
Clean code is an essential component of software development.
Writing clean code is exactly like a sales pitch. When you use words full of technical jargon, you end up losing your target audience. The same is true with coding as well. Writing clean code enhances the readability, maintainability, and understandability of the software.
Robert C. Martin in his book “Clean Code: A Handbook of Agile Software Craftsmanship“ defined clean code as:
“A code that has been taken care of. Someone has taken the time to keep it simple and orderly. They have laid appropriate attention to details. They have cared.”
Clean code is clear, understandable, and maintainable. It is well-organized, properly documented, and follows standard conventions. The purpose behind clean code is to create software that is not just functional but readable and efficient throughout its lifecycle. Since the audience isn’t a computer but rather a real live audience.
Clean code is the foundation of sustainable software development. Below are a few reasons why clean code is important:
Technical debt can slow down the development process in the long run. Having clean code ensures that future modifications will be smoother as well as less costly process.
Clean code means that the developers are prioritizing clarity. When it is easier to read, understand, and modify code, it leads to faster software development.
Good code means that the code is accessible to all team members and follows coding standards. This helps in improved communication and collaboration among them.
Clean code is designed with clarity and simplicity. Hence, making it easier to locate and understand specific sections of the codebase. This further helps in identifying and resolving issues in the early stages.
Clean code facilitates unit testing, integrated testing, and other forms of automated testing. Hence, leading to increased reliability and maintainability of the software.
Below are some established clean code principles that most developers find useful.
Apply the KISS (Keep it simple, stupid) rule. It is one of the oldest principles of clean code. This means that don’t make the code unnecessarily complex. Make it as simple as possible. So that it takes less time to write, has less chance of bugs, easier to understand and modify.
This law states that the entity (class, function, or variable) must have a single, defined goal. It should only do one thing in one circumstance.
DRY (Don’t repeat yourself) is closely related to the KISS rule and Curly’s law. It states to avoid unnecessary repetition or duplication of code. Not following this can make the code prone to bugs and make the code change difficult.
YAGNI (You aren’t gonna need it) rule is an extreme programming practice that states that the developers shouldn’t add functionality unless deemed necessary. It should be used in conjunction with continuous refactoring, unit testing, and integration.
It means that the code should fail as early as possible. This is because issues can be quickly identified and resolved which further limits the number of bugs that make it into production.
This rule by Uncle Bob states that always leave the code cleaner than you found it. It means that software developers must incrementally improve parts of the codebase they interact with, no matter how minute the enhancement might be.
Apply the SOLID principles. This refers to:
S: Single Responsibility Principle which means that the classes must only have a single responsibility.
O: The open-closed Principle states that the piece of software should be open for extension but closed for modification.
L: The Liskov Substitution Principle means that subclasses should be able to substitute their base class without getting incorrect results.
I: The Interface Segregation Principle states that interfaces should be specific to clients instead of being generic for all clients.
D: The dependency Inversion Principle means that classes should depend on abstractions (interfaces) rather than concrete implementations.
A few of the best practices include:
Choose descriptive and clear names for variables, functions, classes, and other identifiers. They should be easy to remember and according to the context that conveys the purpose and behavior to make the code understandable.
Most programming languages have community-accepted coding standards and style guides. Some of them include Google Java style and PEP 8 for Python and Javascript. Organizations must also have internal coding rules and standards that provide guidelines for consistent formal, naming conventions and overall code organization.
Comments help explain the code. However, the codebase changes continuously so the comment can become old or obsolete soon. This can create confusion and distraction among software developers. Make sure to keep the comments updated. Also, avoid writing poorly written or redundant comments as it may increase the cognitive load of software engineering teams.
Magic numbers are hard-coded numbers in code. They are considered to be a bad practice since they can cause ambiguity and confusion among developers. Instead of directly using them, create symbolic constants for hard-coded values. It makes it easy to change the value at a later stage and improves the readability and maintainability of the code.
Ensure that you regularly refactor to enhance the structure and readability of the code. It also helps in improving its flexibility and maintaining code that is overly complex, poorly structured, or duplicated.
You can apply refactoring techniques such as extracting methods, renaming variables, and consolidating duplicate code to keep the codebase cleaner.
Version control systems such as GIT, SVN, and Mercurial help track changes to your code and pull back to previous versions, if necessary. Before refactoring, ensure that the code is under version control to safely experiment with changes. Moreover, it helps understand the evolution of the project and maintains the integrity of the codebase by enforcing a structured workflow.

Software developers can write unit tests to verify the code’s correctness as well-tested code is reliable and easier to refactor. Test-driven development helps in writing cleaner code as it considers edge cases and provides immediate feedback on code changes.
Code reviewing continuously helps in ensuring code quality by identifying potential issues, catching bugs, and enforcing coding standards. It also facilitates collaboration between software developers to see each other’s strengths and review mistakes together.
Typo’s automated code review tool not only enables developers to catch issues related to code maintainability, readability, and potential bugs but also can detect code smells. It identifies issues in the code and auto-fixes them before you merge to master. This means less time reviewing and more time for important tasks. It keeps the code error-free, making the whole process faster and smoother.
Key features:

Writing clean code isn’t just a crucial skill for developers. It is an important way to sustain software development projects.
By following the above-mentioned principles and best practices, you can develop a habit of writing clean code. It will take time but it will be worth it in the end.
Hope this was helpful. All the best!

Dead code is the most overlooked aspect of software development projects. They can become common when they evolve. A large amount of dead code can be harmful to software.
The best way to ensure this is to detect dead code in the early stages to maintain the quality of the software application.
Let’s talk more about dead code below:
Dead code can be referred to as the segment of code that is unnecessary for the software program. They are executed without their results being used or accessed.
Dead code is known as zombie code. Such a portion of code may have been part of earlier versions, experimental features, or functions that are no longer needed. If the dead code remains in the software, it can decrease the software’s efficiency and add unnecessary complexity to it. This can further make the code harder to understand and maintain.
The segment of code that is never executed under any condition during program runtime. It could be due to conditional statements, loops, or other control flow structures. Besides this, the issue may even arise during development because of coding errors, incorrect logic, or unintended consequences of code refactoring.
The portion of code that was once useful but not anymore. They have now become outdated or irrelevant due to changes in software requirements or function, technology, or best practices. Obsolete code may still be present in the codebase however, no longer recommended for use.
Code that was once part of a functional feature or system but is now left behind or isolated. This can result from changes in project requirements, refactoring, feature removal, or other modifications in the development process. As obsolete code, this code may still be present but no longer integrated or contribute to the application functionality.
Sometimes, developers ‘comment out’ code rather than deleting it to use it in the future. However, when they forget about it, it can facilitate dead code. While it is a common practice, developers must take note of it otherwise it can reduce code readability and maintainability.
Dead code majorly contributes to Technical Debt. While a small amount of technical debt is still fine, if it grows, it can negatively affect the team’s progress. This can also increase the delivery time to market to end-users and reduce customer satisfaction.
Hence, it is important to monitor technical debt through engineering metrics to take note of dead code as well.
Besides this, there are other reasons why removing dead code is crucial:
When dead code is present, it can complicate the understanding and maintenance of software systems. It can further lead to confusion and misunderstandings which increases the cognitive load of the engineering team.
Eliminating dead code lets them focus on relevant code that helps increase code readability, and facilitates feature updates and bug fixes.
Dead code could be a hidden backdoor entry point to the system. This can be a threat to the security of the software. Moreover, dead code includes dependencies that are no longer needed.
Removing dead code simplifies code complexities, and improves code review and analysis processes. This further helps to address and reduce security vulnerabilities easily.
Dead code disrupts the understanding of codebase structure. It not only decreases the development process but also developers’ productivity and effectiveness.
Eliminating dead code results in reducing the overall size of the code. Hence, it makes it concise and easier to manage which potentially enhances developers’ performance.
Duplicate code is a considerable strain on the software development process. However, when dead code is present, it diverts developers from identifying and addressing areas where code duplication occurs.
Hence, eliminating dead code avoids code duplication and improves the codebase’s quality.
When dead code is not present in the software, it allows developers to focus on the relevant active parts of the codebase. It also streamlines the process as there are no unnecessary distractions and identifies and addresses issues.
Dead code can often be removed through static code analysis tools. Automated tools such as code quality checkers can help in detecting unused variables, classes, imports, or modules. This allows developers to address and eliminate the dead code easily which reduces the development cost and improves the overall quality of the system.
However, the drawback is that during uncertainty regarding programming behavior, dead code may not be removed. Hence, static code analysis tools are not a complete solution.
Dynamic code analysis tools involve running the program to see which lines are executed and identifying which code paths are never reached. Hence, the code that is never executed or used in the codebase i.e. dead code is eliminated.
However, most of these tools are specific to programming languages.
Leverage version control systems such as GIT commits to identify code that was once active but now deprecated or replaced. Commits that were removed or modified could indicate areas where dead code be found.
In case of a mistake, the code can be retrieved from the version control system. Hence, less risky and easily manageable.
Through refactoring, developers carefully examine the codebase to identify sections that include unused or old code, unnecessary variables, functions, or classes. Hence, revealing dead code that can be safely removed. Moreover, refactoring aims to optimize code for performance, maintainability, and readability. This further allows developers to look out for inefficient or unnecessary code by replacing or redesigning these segments.
Code review is an effective method to maintain the quality of code. It promotes simplicity and clarity in the codebase. They can help in detecting dead code by applying best practices, standards, and conventions. However, when not automated, they can be time-consuming and harder to implement. Hence, it is recommended to use automated code review tools to speed up the process.
Typo’s automated code review tool identifies issues in your code and auto-fixes them before you merge to master. This means less time reviewing and more time for important tasks. It keeps your code error-free, making the whole process faster and smoother.
Key features:
In software engineering, detecting and removing dead code is imperative for streamlining the development process. You can choose the method or combination of methods to remove dead code that best aligns with your project’s needs, resources, and constraints.
All the best!

Time is a finite resource. Once it is gone, you cannot alter it.
This is why the calendar plays a major role in organizing and focusing towards our goals. However, it can become cluttered and overwhelming, when done incorrectly. It not only affects the engineering teams but also impacts business and client experience negatively. Effective calendar management should be aligned with business needs to ensure that scheduling practices support organizational goals and operational requirements. Designating specific days or time blocks as meeting-free can allow for uninterrupted work, helping to maintain focus and productivity. Additionally, encouraging team members to block out time for deep work and personal time can help prevent burnout and maintain a healthy work-life balance. Establishing clear rules for what to include in the calendar, such as using color-coding for different types of meetings, can further enhance clarity and efficiency.
With the rise of digital tools and digital platforms, calendar management for engineering teams has been transformed, enabling better collaboration, communication, and scheduling.
Hence, the optimization of calendars is important for both engineering managers and developers. Artificial intelligence is increasingly being used in calendar tools to automate and optimize scheduling, making it easier to suggest meeting times and allocate resources efficiently. These AI-powered scheduling tools help organizations save valuable scheduling time by reducing manual effort and streamlining the process of finding and reserving time for important tasks or meetings.
In this blog, let’s dive further into the art of calendar optimization and various time management techniques. Optimizing calendars leads to improved operational efficiency and overall efficiency for both teams and businesses.
Comprehensive calendar management systems serve as the foundational infrastructure for high-performance engineering teams leveraging distributed development methodologies and agile workflows. The proliferation of advanced scheduling platforms and API-driven integration tools has fundamentally transformed calendar orchestration capabilities, enabling organizations to optimize resource allocation while mitigating temporal conflicts through intelligent automation. Enterprise-grade solutions such as Google Calendar, integrated with CI/CD pipelines and team collaboration frameworks, provide sophisticated interfaces that streamline meeting orchestration, implement automated notification systems, and facilitate real-time calendar synchronization across distributed teams. By defining and communicating core working hours and setting calendar permissions, teams can manage expectations around availability, ensuring smoother collaboration. Calendar overlay tools allow users to visualize multiple calendars simultaneously, providing a comprehensive view of schedules, deadlines, and resource allocation. By centralizing temporal resource management through unified calendar architectures, development teams can effectively coordinate sprint planning activities, eliminate scheduling bottlenecks, and implement data-driven decision-making processes for optimal time allocation strategies. These advanced calendar management frameworks not only enhance individual productivity metrics but also enable cross-functional teams to achieve superior collaborative efficiency and maintain seamless operational continuity across complex development cycles.
Optimizing your calendar means making the most of your working hours. Effective time management allows you to create a micro plan for the day ahead and focus on high-priority tasks. Managing your time effectively reduces the risk of burnout and stress, and can enhance productivity by ensuring you stay aligned with your goals. Using a calendar to schedule tasks allows you to forget about them until the time comes to do them, freeing up mental space for other priorities. Using reminders for calendar entries ensures you are prepared for upcoming tasks and meetings, further streamlining your workflow. Checking your calendar at the start and end of every week helps you know what to expect and plan accordingly.
Another importance of optimizing your calendar is that it helps in defining the project goals. Project planning with calendar tools assists in organizing tasks and resource allocation, ensuring smoother project execution and efficient use of resources. When they are clearly outlined, it lets you align your schedules with the project needs. Breaking them down into smaller tasks lets you focus on them more effectively and tackle critical tasks first. Creating a central, shared calendar makes everyone's availability and project milestones visible at a glance, further enhancing coordination and transparency.
Creating a daily schedule empowers you to spend more time on the project that matters and capture bigger opportunities. This further helps in prioritization and taking control of your day. Hence, reduces distractions and empowers you to do deep work.
By prioritizing tasks in your calendar, you can make more informed decisions about where to focus your efforts.
Another benefit of optimizing your calendar is achieving a work-life balance. You and your team get time for both personal and professional tasks. This helps in becoming more productive and reduces stress and feeling overwhelmed throughout the day.
When your priorities are set and have a clear schedule, it helps you deliver high-quality commits on time. It makes your team reliable and improves their professional reputation which further helps in their career growth.
How does strategic team scheduling transform engineering workflow optimization and project synchronization? Leveraging advanced scheduling software platforms fundamentally reshapes how development teams orchestrate their collaborative efforts and achieve synchronized project deliverables. By implementing sophisticated scheduling algorithms and real-time coordination systems, engineering teams can streamline resource allocation workflows, eliminate scheduling conflicts through predictive analysis, and ensure comprehensive stakeholder alignment across all project phases. Effective team scheduling serves as the backbone for resource management optimization, facilitating intelligent task distribution and responsibility allocation based on dynamic availability matrices and project requirement analysis. Real-time synchronization capabilities and collaborative session orchestration features enable seamless coordination across distributed development environments and multiple time zones, ensuring that critical milestones, sprint ceremonies, and deployment deadlines are met without operational friction or resource bottlenecks. Ultimately, robust calendar management through strategic team scheduling acts as a force multiplier for team cohesion, enables optimal resource allocation patterns, and accelerates project delivery pipelines with enhanced operational efficiency and reduced time-to-market cycles.
The optimization of calendar infrastructure represents a critical determinant in enhancing operational efficiency and productivity metrics for engineering organizations pursuing advanced scheduling methodologies and workflow optimization. Complex organizations, with their intricate structures and diverse departments, require calendar tools that can accommodate their unique scheduling and coordination needs. Given the diverse technological solutions available in the contemporary digital ecosystem, including enterprise-grade platforms such as Google Calendar, it becomes imperative to conduct comprehensive evaluation frameworks that align with specific organizational scheduling requirements and operational parameters. Engineering teams should prioritize calendar technologies that demonstrate robust integration capabilities with existing project management infrastructures, enabling centralized calendar management across distributed systems while facilitating seamless cross-timezone coordination and resource allocation. The optimal solution architecture should encompass intuitive user interface design patterns, real-time availability synchronization mechanisms, and advanced conflict resolution algorithms that minimize scheduling inefficiencies and resource contention. Through the implementation of calendar solutions that demonstrate alignment with organizational business logic and provide unified calendar aggregation capabilities, engineering teams can achieve enhanced collaborative workflows, reduced communication overhead, and sustained focus on core engineering deliverables and strategic objectives.
When architecting calendar solutions for your engineering organization, prioritize advanced capabilities that optimize temporal coordination and cross-functional collaboration workflows. Comprehensive multi-calendar orchestration functionality proves essential, particularly for distributed engineering teams operating across diverse project lifecycles and geographical time zones. Calendar solutions should also support diverse teams by offering features such as accessibility, multilingual support, and user-friendly design to enable effective collaboration among team members with varied backgrounds and needs. Seek robust API integration architectures with enterprise platforms such as Microsoft Teams and Apple Calendar ecosystems to ensure seamless communication protocols and synchronized coordination mechanisms. Automated notification algorithms maintain team synchronization and eliminate scheduling conflicts through predictive reminder systems, while granular access controls—incorporating role-based permissions, privacy settings, and compliance standards—safeguard sensitive organizational data and prevent resource allocation conflicts. Using color coding for different calendars can create clarity at a glance, making it easier for teams to manage their schedules effectively. Advanced verification protocols for successful booking confirmations and configurable notification pipelines can further streamline your temporal resource management processes. By implementing these critical technical capabilities, your engineering organization can optimize scheduling efficiency, eliminate potential temporal conflicts, and enhance overall operational productivity through data-driven coordination strategies.
Orchestrating cross-functional team scheduling frameworks presents multifaceted complexities, particularly when addressing heterogeneous individual workflow patterns and distributed geographical time zone configurations. To systematically mitigate potential scheduling conflicts and optimize collaborative efficiency, development teams can implement comprehensive strategies that encompass scheduling coordination during standardized core operational hours, deploying strategic time-blocking methodologies to preserve dedicated periods for high-focus development activities, and establishing automated notification systems that facilitate seamless workflow synchronization across all stakeholders. Leveraging sophisticated calendar management platforms with robust API integration capabilities—such as Microsoft Teams ecosystem and Apple Calendar infrastructure—can significantly streamline the entire scheduling orchestration process through real-time availability synchronization and unified calendar view provisioning that enables comprehensive visibility across team resources. Use features like real-time synchronization, automated notifications, and AI assistants for note-taking to reduce manual work and enhance scheduling efficiency. These advanced group scheduling methodologies ensure optimal stakeholder communication protocols, systematically reduce the probability of missed collaborative sessions, and facilitate efficient identification of suitable time slots for cross-team collaboration initiatives, regardless of distributed team member geographical locations or varying operational timezone requirements.
Advanced scheduling methodologies leverage sophisticated artificial intelligence algorithms and automated optimization frameworks to transform meeting coordination workflows within engineering organizations. AI-enhanced scheduling platforms systematically analyze team members' calendar data, identify behavioral patterns and usage trends, and algorithmically recommend optimal meeting timeframes that maximize stakeholder availability while minimizing scheduling conflicts and resource allocation inefficiencies. Enterprise-grade features including customizable booking interfaces for external stakeholder management and integrated communication pipelines ensure comprehensive alignment across all organizational hierarchies, facilitating seamless collaboration between internal development teams and external partner ecosystems. Through the strategic implementation of intelligent scheduling architectures, engineering organizations can optimize meeting orchestration processes, enhance work-life balance metrics, and execute data-driven resource allocation decisions regarding temporal investment strategies. These methodological approaches not only amplify operational efficiency and streamline workflow automation but also cultivate organizational cultures centered on collaborative excellence and transparent communication frameworks.
In 2009, Paul Graham (co-founder of Y-Combinator), coined the terms – Maker schedule and Manager schedule. These are two different styles of working that require different approaches.
When managing schedules for different departments within engineering teams, it’s important to find the right balance between structure and flexibility to accommodate varying workflows and priorities. Coordinating calendars across different departments can be challenging, but effective communication and adaptable policies help ensure smooth collaboration. Advanced calendar tools play a crucial role in enhancing team collaboration by streamlining communication, improving shared schedules, and integrating with other productivity systems.
Remaining flexible is also crucial when managing both maker and manager schedules, as it allows teams to adjust to changes and optimize productivity.
Let’s understand both these terms in detail:

The maker schedule is designed for individuals who need long, uninterrupted slots for focus time. It allows them to enter into the state of flow to achieve peak productivity. For the developers who require deep concentration, this type of schedule lets them fully immerse in projects and let the creativity flow.
First things first, create a to-do list. See which tasks need to be done solo and which need to be collaborated. Now, prioritize them according to their due dates. Communicate with other team members for the collaborative tasks.
Set a specific time for deep work. You can add more than one per day since the tasks can stretch further. Use shorter blocks for meetings, communication, and other administrative tasks. Ensure that you communicate with others to minimize interruptions and distractions.
Bunch meetings such as team meetings, and one-on-one conversations together. However, schedule a 5-minute break between these meetings. This can reduce context switches and let you enter into a specific mental state. Hence, helps you with better concentration and productivity.
Don't forget to take short breaks between your slots. This can be anything ranging from short naps to exercise. This helps in maintaining focus and better retention of information. As a result, it increases your energy and prevents burnout.
The manager schedule is for individuals who have various duties while handling teams and systems. It is usually for engineering managers and leaders since their day comprises meetings, managing teams, and their solo tasks as well. Their schedule is majorly based on coordinating with people who produce output. Hence, the schedule needs to be flexible yet maintain structure in their workflow.
Manager schedules also require ongoing coordination efforts to ensure team alignment and productivity, making it essential to regularly review processes and use centralized scheduling methods.
Ensure that your meetings have clear goals and objectives. This helps minimize time wastage and keep discussions on track. Also, note that the meetings should be purposeful with a time limit. So, that they are straightforward and crisp. Using dedicated tools for scheduling meetings, such as Calendly, can help ensure agendas are followed and time is used efficiently. Set clear meeting durations, capping routine meetings at 15–45 minutes and brainstorming sessions at around an hour, to maintain focus and productivity.
Maker’s and manager’s schedules can contradict each other. Managing individual schedules within a team can be complex, but calendar tools can help streamline this process. Hence, have open communication about each other’s schedules. This allows everyone to not interrupt each other’s focus time and other important schedule. As a result, it reduces stress and pressure.
Make sure that you integrate your personal calendar as well so that your team knows when you are not available. It saves you and your team members from the trouble of rescheduling and streamlining planning without any stress.
Regularly review your schedule and adjust it accordingly. Check what's working for you, and what can be delegated and eliminated. Align your time with evolving priorities and communicate the same with your team members.
In the current scenario, the maker schedule is difficult to follow in the organization. The culture is still meeting-heavy and prioritizes urgent and reactive tasks over deep work. Group scheduling tools can help teams coordinate collaborative work sessions and find a suitable time for everyone, reducing the friction of endless back and forth email exchanges. It is also important to align individual and team schedules with project timelines to ensure deadlines are met and work progresses efficiently.
Below are a few of the ways to balance both approaches:
As the manager and maker schedules are different, async communication works better in this case. Tools like Slack and Microsoft Teams bridge the gap between these two frameworks. It creates an ecosystem where deep and creative work is prioritized yet allows you to be in regular contact with your team members without interruptions.
Meetings that don't have clear agendas and comes between your team members' schedule need to be assessed. Review them regularly so that you know which of them are overlapping and can disrupt the workflow.
To make it easier to assess, you can ask yourself three questions:
It is important to understand that creativity doesn’t always come at office hours. It can occur at different times and manners. Hence, communicate with your team members what are their focus time slots. A flexible schedule also allows them to respond to you at their convenient time while maintaining overall balance.
Additionally, remaining flexible is essential to adapt to changing priorities and team needs.
Synchronization is important for both schedules. In these cases, creating a feedback loop to discuss scheduling and priorities. Encourage open communication to see what works for you as well as for others. This lets team members have mutual understanding, empathy, and respect for each other's roles and working styles.
Scheduling collisions and temporal resource conflicts can severely compromise team operational efficiency and result in critical collaboration opportunity degradation. To mitigate these systemic inefficiencies, organizations must implement enterprise-grade calendar management architectures that leverage multi-calendar synchronization protocols and provide real-time resource availability algorithms across all team stakeholders. Advanced features including mutual temporal availability matrices and intelligent scheduling optimization engines facilitate optimal meeting slot identification algorithms, even across distributed geographical time zone configurations, ensuring comprehensive stakeholder participation without temporal overlap conflicts. Establishing robust scheduling governance frameworks—such as implementing dedicated temporal blocks for collaborative sessions or deep-focus work cycles—can significantly reduce conflict probability vectors. By leveraging sophisticated calendar intelligence platforms and maintaining transparent scheduling workflow protocols, development teams can achieve streamlined scheduling process optimization, minimize operational disruptions, and maximize overall team productivity metrics through systematic temporal resource management.
Despite the advantages of enterprise-grade calendar orchestration systems and intelligent team scheduling algorithms, complexities such as resource allocation conflicts, concurrent booking anomalies, and cross-organizational stakeholder coordination can still emerge within modern collaborative environments. To address these operational challenges, development teams should implement robust verification protocols that leverage automated confirmation mechanisms to validate successful resource reservations and utilize comprehensive calendar metadata structures to track meeting dependencies, task interconnections, and project milestone alignments. Establishing granular access control frameworks helps safeguard sensitive scheduling data while ensuring that only authenticated team members with appropriate permissions can modify critical timeline configurations. Integrating advanced project management platforms with calendar synchronization APIs can further streamline collaborative workflows, optimize resource distribution algorithms, and support data-driven scheduling decisions through predictive analytics and historical pattern recognition. By maintaining adaptive scheduling methodologies, embracing emerging calendar automation technologies, and continuously refining algorithmic scheduling strategies through iterative feedback loops and performance metrics analysis, engineering teams can overcome scheduling bottlenecks, minimize temporal conflicts, and achieve their project deliverables with enhanced operational efficiency and improved timeline predictability.
Safeguarding your organization's calendar infrastructure comprises critical security protocols, particularly when operating within complex enterprise environments or facilitating collaboration with external stakeholders. Effective calendar ecosystem management leverages robust access control mechanisms that ensure exclusively authorized personnel can access or modify sensitive scheduling data. Organizations should implement calendar solutions that facilitate comprehensive encryption protocols, secure authentication frameworks, and granular permission architectures to optimize the security of scheduling workflows. Establishing systematic protocols for provisioning and deprovisioning access becomes essential when onboarding new organizational members or integrating external collaborative partners. By strategically prioritizing calendar security infrastructure and access control optimization, organizations can maintain the integrity of their scheduling ecosystems, protect confidential operational data, and enhance trust frameworks within internal teams and external partnership networks.
Deploying advanced calendar management systems within your organizational framework requires strategic implementation methodologies to optimize scheduling workflows and maximize operational efficiency. Initiating comprehensive training protocols and continuous technical support infrastructure ensures seamless user onboarding and facilitates proficiency development across all system functionalities. Leveraging the inherent advantages—including conflict resolution algorithms, automated scheduling optimization, and enhanced collaborative frameworks—drives stakeholder engagement and accelerates adoption trajectories. Demonstrating system integration capabilities with existing enterprise management platforms and workflow architectures streamlines the migration process while minimizing operational disruptions. Incorporating end-user feedback loops and collaborative decision-making processes during solution selection and deployment phases ensures alignment with organizational requirements and user preferences. Through fostering inclusive implementation environments and emphasizing quantifiable productivity enhancements, organizations can achieve optimal adoption rates and unlock the comprehensive potential of their calendar management infrastructure.
Even after balancing the schedules, developers may still not have time to complete all their tasks.
By using these techniques, teams can spend time more effectively and benefit from a streamlined approach to managing their workload. Reviewing your calendar daily can help you prepare for the next day effectively, ensuring that you stay on top of your tasks and commitments.
Below are a few of the time management techniques you can experiment with:
This technique was coined by Dwight Eisenhower. This framework is specially built for individuals in leadership positions such as engineering managers, tech leads, and heads of engineering.
This time management technique helps to prioritize tasks based on urgency and importance.
It includes four separate quadrants:

This technique was developed by David Allen to make your tasks into a straightforward to-do list and break them down into actionable work items. It is a 5-step method that includes:
Getting things done helps developers if they feel overwhelmed and struggle to focus on a single task.
This time technique is an 80/20 rule created by Vilfredo Pareto. This states that 20% of our actions are responsible for 80% of outcomes. It allows you to prioritize tasks that are most effective at solving problems.
This can be done by:
This time management technique was created by Francesco Cirilio. It creates a sense of urgency and focus on a single task without interruptions.
In this technique:
This helps to eliminate burnout and improve performance and productivity.

Created by Taiichi Ohno, the main idea behind this visual time-tracking technique is to improve overall productivity and effectiveness. It helps to plan effectively, create SMART goals, and proper task delegation.
You have to:
There is no one-size-fits-all template for this technique. You can customize it according to your preferences and team size.
Implementing calendar orchestration technologies represents a paradigmatic shift in streamlining cross-functional team scheduling methodologies and optimizing overall team productivity metrics. For engineering teams operating within complex software development lifecycles, selecting the optimal scheduling infrastructure—such as Google Calendar's enterprise-grade API ecosystem—can fundamentally reshape operational efficiency, particularly when managing multi-dimensional calendar matrices, coordinating across distributed time zone architectures, and integrating with sophisticated project management platforms like Jira or Asana. The critical success factor lies in architecting seamless alignment between the tool's feature set capabilities and your team's unique scheduling requirements while ensuring robust integration capabilities with existing collaborative ecosystems including Microsoft Teams, Slack, or Apple Calendar's enterprise solutions.
Initiate comprehensive assessment protocols for your team's scheduling pain points and bottlenecks: Are scheduling conflicts or double-booking incidents creating systemic inefficiencies in your development pipeline? Do your coordination requirements span multiple departments, external stakeholders, or cross-organizational partnerships? Determine whether advanced functionalities like mutual availability algorithms, group scheduling optimization engines, or personalized booking page configurations are mission-critical for your workflow architecture. Prioritize calendar orchestration platforms that deliver intuitive user experience interfaces, enabling seamless adoption for all team members to schedule meetings, manage calendar entries, and organize task prioritization without encountering steep learning curve impediments or user adoption resistance.
Integration architecture proves absolutely crucial—ensure your selected calendar orchestration platform synchronizes effortlessly with your current project management infrastructure and communication technology stack. This unified ecosystem approach enables centralized calendar management, significantly reducing missed meeting incidents and enhancing cross-team coordination effectiveness. For distributed engineering teams operating across global time zones, robust support for multiple time zone intelligence and real-time availability detection algorithms becomes essential to accommodate diverse working hour patterns and proactively mitigate potential scheduling conflicts that could disrupt sprint cycles or development velocity.
Once the optimal platform is selected, focus intensively on comprehensive onboarding and change management processes. Provide extensive training curricula ensuring team members understand how to leverage advanced features like automated reminder systems, intelligent scheduling algorithms, and sophisticated group scheduling optimization engines. Encourage systematic exploration of advanced functionalities, including recurring meeting automation or leveraging integration capabilities to connect with other enterprise digital platforms within your technology ecosystem. Implement regular review cycles for the implementation process, systematically gather user feedback through surveys and analytics, and make iterative adjustments to ensure the platform continues meeting your team's evolving scheduling requirements and scaling demands. With optimal calendar orchestration technologies properly architected, your engineering team can achieve unprecedented scheduling efficiency, enhanced resource allocation optimization, and transformative collaborative capabilities.
To ensure organizational scheduling initiatives achieve optimal effectiveness, enterprises must leverage comprehensive measurement frameworks utilizing data-driven metrics and performance indicators. Organizations should establish key performance indicators (KPIs) that comprehensively reflect strategic objectives—encompassing conflict reduction algorithms, double booking minimization protocols, and enhanced team productivity optimization. The systematic tracking of these quantitative measures facilitates valuable analytical insights into scheduling process efficiency and identifies strategic opportunities for operational enhancement and workflow refinement.
Enterprises should implement continuous monitoring protocols to assess scheduling conflict frequency, missed meeting occurrences, and last-minute modification patterns. Leveraging advanced analytics capabilities from sophisticated scheduling platforms enables organizations to identify recurring patterns, including systematic double booking scenarios and temporal bottlenecks that impede optimal meeting coordination. The deployment of automated notification systems and intelligent reminder mechanisms serves to mitigate missed appointments while ensuring stakeholder alignment, thereby facilitating enhanced operational efficiency and workflow optimization.
Organizations should establish systematic review protocols by soliciting comprehensive feedback from team members and key stakeholders regarding their scheduling experiences. This analytical approach should encompass evaluation of calendar tool functionality, meeting coordination accessibility, and identification of challenges encountered in group scheduling scenarios or multi-calendar management environments. The collected feedback data should inform strategic refinements to the scheduling approach—whether through temporal adjustment optimization, enhanced integration with project management platforms, or user interface accessibility improvements.
Through continuous measurement protocols and systematic scheduling process optimization, organizations can leverage data-driven decision-making frameworks that facilitate enhanced team collaboration, productivity maximization, and ensure calendar management systems evolve dynamically alongside evolving business requirements and operational complexities.
The paradigm of team scheduling optimization is undergoing substantial transformation, propelled by sophisticated artificial intelligence algorithms, machine learning models, and enterprise-grade digital platforms. AI-driven scheduling architectures are achieving unprecedented levels of sophistication, executing comprehensive analysis of team members' calendar metadata, behavioral patterns, and preference algorithms to generate optimal meeting time recommendations and proactively mitigate scheduling conflicts. These intelligent scheduling solutions facilitate automated detection of mutual availability windows, recommend optimal meeting slots based on historical data patterns, and dynamically reschedule meetings to accommodate real-time changes—effectively eliminating the iterative communication overhead that characterizes traditional scheduling methodologies.
Enterprise digital platforms including Google Calendar and Microsoft Teams ecosystems spearhead this technological evolution, delivering real-time availability synchronization, seamless integration with project management infrastructures, and personalized booking interfaces for both internal stakeholders and external partners. As development teams become increasingly distributed across geographical boundaries and organizational hierarchies, the capability to orchestrate multiple calendar systems across diverse time zones and departmental domains becomes mission-critical. Mobile technology has revolutionized team calendar coordination, enabling schedule management from any location with internet access. Future scheduling software architectures will continue to enhance resource allocation algorithms, facilitate collaborative session management, and provide advanced functionalities including automated notification systems and intelligent conflict detection mechanisms.
Analyzing forward-looking trends, the strategic emphasis will center on flexibility optimization, adaptive algorithms, and continuous improvement methodologies. Development teams must maintain architectural agility, experimenting with emerging calendar tools and feature sets to establish optimal equilibrium between structural governance and operational flexibility. By embracing next-generation technologies and prioritizing user feedback integration, engineering teams can proactively address scheduling challenges, streamline team collaboration workflows, and drive operational efficiency optimization within increasingly complex and dynamic development environments.
Optimizing the calendar is most important for engineering teams. They have a lot on their plate and have different working styles which allow them to create their best schedules and communicate with their team members.
Advanced scheduling software and shared calendars, featuring robust calendar view options, team calendars, and integrated resource management, help teams streamline workflows and prevent conflicts. These tools make accommodating last minute changes, using a personalized booking page for easy self-service scheduling, and automating follow ups simple, ensuring flexibility and strong client relationships. Modern calendar tools also make it easier to find the optimal time for meetings and tasks, boosting productivity and convenience. For many engineering teams, these advanced calendar solutions have been a game changer, significantly improving collaboration, efficiency, and business outcomes.
Typo, an engineering management platform, allows engineering leaders to gain visibility on the team’s efficiency and workload. Book your demo and level up your developer game today!

Welcome to this comprehensive guide on the types of code smells, their impact on software projects, and effective strategies for prevention. This article is designed for developers, testers, and software teams who want to improve the maintainability, security, and long-term health of their codebases. Understanding code smells is crucial because they are early warning signs of deeper issues—such as complexity, tight coupling, or poor naming—that can lead to increased technical debt, reduced maintainability, and potential security vulnerabilities.
In this guide, you will learn:
Whether you are a developer aiming to write cleaner code, a tester seeking to identify maintainability risks, or a software team striving for robust and scalable solutions, this article will equip you with the knowledge to recognize, categorize, and eliminate code smells from your projects.
Code smell was first introduced by Kent Beck in the 1990s and popularized by Martin Fowler’s Refactoring Book. In simple terms, a code smell is a warning that the source code is messy and isn’t meeting best practice standards. Code smells are not bugs or errors; they do not necessarily break functionality but indicate underlying issues that can impact maintainability, security, and future stability.
Code smells highlight bottlenecks in the codebase that need immediate attention. If left unaddressed, they can reduce code quality, readability, and maintainability. Over time, smelly code can become rotten code, leading to increased technical debt and making future changes more costly and error-prone.
Code refactoring is a crucial strategy to counteract these issues. It involves restructuring existing code to enhance its quality while maintaining its core functionality. Fixing code smells is essential for maintaining clean, maintainable, and high-quality software. As defined by experts such as Kent Beck, refactoring is a change that leaves the system’s behavior unchanged, yet improves nonfunctional qualities like simplicity and flexibility. Martin Fowler adds that refactoring makes the internal structure of software easier to understand and cheaper to modify.
Incorporating these practices will help maintain the integrity of your code and prevent the pitfalls of neglect, such as code rot and mounting technical debt.
Now that we've defined code smells, let's explore how code quality practices can help prevent them.
Code quality establishes the fundamental infrastructure for successful software development initiatives. It directly influences the maintainability, extensibility, and comprehensibility of source code implementations across complex development environments.
Organizations that prioritize comprehensive code quality initiatives from project inception effectively prevent code smell proliferation before these anti-patterns establish deep architectural roots within the codebase.
With a strong foundation in code quality, let's move on to understanding the main types of code smells and how to identify them.
Before diving into individual code smells, it's important to understand how they are classified. Code smells are typically grouped into five main categories, each representing a different kind of problem in the codebase. Here’s a summary table to help you quickly identify and understand the main types:
Understanding these categories will help you quickly identify the nature of a code smell and choose the right strategy for addressing it.
Code Smell Category
Definition & Relationship to Examples
Bloaters
Code that has grown excessively (e.g., Long Methods, Large Classes)
Object-Orientation Abusers
Misuse of OOP principles (e.g., Feature Envy, Primitive Obsession)
Change Preventers
Structures that hinder change (e.g., Divergent Change, Shotgun Surgery)
Dispensables
Unnecessary code (e.g., Dead Code, Duplicate Code, Comments)
Couplers
Excessive coupling (e.g., Inappropriate Intimacy, Middle Man)
Below, we’ll explore each type in detail, with definitions, examples, and actionable solutions.
In software development, code smells are indicators of potential issues in the codebase that may hinder maintainability and readability. Understanding and addressing these common code smells can significantly improve your software quality.
Definition: Bloaters are code, methods, or classes that have grown too large or complex, making them difficult to maintain and understand.
A long method is when the method contains too many lines of code, violating the single responsibility principle.
A large class contains many fields, methods, lines of code, or responsibilities, making it hard to maintain.
Definition: These code smells arise from the misuse or poor application of object-oriented principles.
Occurs when a class accesses the data or method of another class more than its own.
Happens when code relies too much on primitive values instead of small objects.
Definition: Change preventers are code structures that make it difficult or risky to modify code.
Occurs when one class is commonly changed in different ways for different reasons.
Happens when developers have to make lots of small changes to the codebase for a single modification.
Definition: Dispensables are unnecessary code that can be safely removed.
Code that is no longer needed yet is still present in the application.
Duplicated code exists in more than one area, often due to copying and pasting.
While comments can be helpful, overuse or outdated comments can be a code smell.
Definition: Couplers are code smells that result from excessive or inappropriate coupling between classes or modules.
Occurs when a method has too much intimate knowledge of another class or method’s inner workings.
Occurs when a class delegates work to another class and doesn't have any independent functionality.
By identifying and addressing these common code smells, developers can enhance code quality, maintainability, and efficiency, leading to a more robust and scalable software system.
Now that you’re familiar with the main types of code smells and their categories, let’s look at how to manage specific patterns like data clumps and adopt clean code practices to prevent these issues.
Data clumps are bundles of related data items that tend to appear together across different parts of a codebase. This might be seen as fields across several classes or as parameters frequently used together in multiple functions. When certain pieces of data constantly travel as a group, it can become difficult to manage their behavior effectively across the application.
The presence of data clumps makes a codebase less flexible and more prone to errors. When a particular data item is only meaningful as part of a group, rather than on its own, it’s a strong indicator of a data clump.
By addressing data clumps promptly, developers can maintain a clean, efficient, and manageable codebase. Implementing these refactoring techniques helps keep code logical and reduces the complexity that data clumps can introduce.
With data clumps under control, let’s move on to clean code practices that can further optimize your codebase and prevent code smells from emerging.
Adopting comprehensive clean code methodologies transforms software development workflows and optimizes code quality metrics. Clean code practices are essential for maintaining superior code quality standards and mitigating the emergence of detrimental code smells.
By consistently applying these clean code practices, development teams can architect software solutions that are maintainable, adaptable, and resilient.
Transitioning from clean code practices, let’s explore the best strategies to prevent code smells in your development process.
Code smells, while easily overlooked, can significantly affect the long-term health of your software. Identifying code smells early is crucial for maintaining code quality and preventing issues that can compromise security and maintainability. By adopting proactive strategies, teams can mitigate these issues early on.
Regular code refactoring remains one of the most effective methods to dodge code smells. This process involves fine-tuning your code for clarity and efficiency without altering its external behavior.
CI/CD practices enable seamless tracking and integration of code changes, ensuring that issues are caught promptly.
Automated code reviews act as a safeguard, highlighting potential code smells that might have been missed during development.
By incorporating these key strategies into your development process, you ensure that code remains robust, adaptable, and free from detrimental impurities that can accumulate over time.
With these strategies in place, let’s examine how continuous integration can further reduce code smells and support ongoing code quality.
Continuous Integration (CI) plays a crucial role in maintaining high code quality and reducing the presence of code smells. But what exactly does it do?
Ultimately, Continuous Integration not only accelerates the development process but actively works to maintain clean, efficient, and high-quality code by quickly catching potential issues before they escalate.
With CI in your workflow, let’s discuss how ongoing code maintenance and improvement can ensure your codebase remains healthy over time.
Establishing robust code maintenance and improvement practices has fundamentally transformed how development teams ensure codebase resilience and adaptability in rapidly evolving technological landscapes.
By integrating code maintenance and improvement as fundamental components of your development lifecycle, organizations can ensure their software ecosystems remain performant, reliable, and maintainable as they evolve to meet future market demands and technological advancements.
Now, let’s look at how automated tools like Typo can help you detect and fix code smells efficiently.
A code smell is a common problem faced by developers, indicating the potential issues within a codebase. It is important to address them in the early stages, otherwise, it can reduce the code quality and slow down the entire development process.
Detect these code smells with Typo's automated code tool which enables developers to catch issues related to maintainability, readability, and potential bugs. It identifies issues in the code and auto-fixes them before you merge to master. This means less time reviewing and more time for important tasks. It keeps the code error-free, making the whole process faster and smoother.
Learn more about common mistakes to avoid during code reviews to enhance your software development process.

In conclusion, establishing and maintaining superior code quality serves as the cornerstone for building robust, scalable software solutions that withstand evolving technological demands. By systematically identifying and eliminating code smells—including dormant code segments, oversized class structures, and redundant code patterns—while implementing proven clean code methodologies such as the single responsibility principle and systematic code refactoring cycles, development teams can architect codebases that demonstrate exceptional maintainability, operational efficiency, and seamless adaptability to changing requirements.
Continuous code maintenance protocols and iterative improvement strategies prove instrumental in preserving codebase integrity, minimizing accumulated technical debt, and ensuring that software systems remain resilient and modification-ready throughout their operational lifecycle.
By strategically prioritizing code quality initiatives and embracing these industry-proven methodologies, development organizations can deliver software solutions that not only satisfy immediate functional requirements but also demonstrate remarkable preparedness for future expansion and technological evolution. Implementing clean code principles and proactively managing code smell detection will enable development teams to construct software architectures that demonstrate exceptional longevity, consistently delivering substantial value to end-users and organizational stakeholders while maintaining peak performance standards across diverse operational environments.

Code review helps you to improve the quality and maintainability of your code. However, this process is challenging for both engineering managers and developers. While managers need to perform thorough reviews to ensure code quality, developers are usually overwhelmed when receiving feedback.
Code review is a critical part of software development and plays a key role in fostering collaboration among team members. The review begins when a developer creates a pull request or changelist, initiating the feedback process.
Engineering managers need to be courteous and respectful while offering constructive feedback to their developers. They must be clear with their feedback so that developers can understand your feedback in the right way and not take it negatively.
In this blog post, let’s explore the ways to provide code review feedback to developers:
Also known as peer review, code review is a key practice within quality assurance. It is a systematic examination of source code by one or more individuals to improve its quality, identify issues, and ensure that it aligns with established coding standards and best practices. Code review comments play a crucial role in this process by providing actionable and constructive feedback, helping developers understand what needs improvement and fostering a positive collaboration environment.
Code reviews are often facilitated by source control systems, which help manage code changes and streamline the review process.
Code reviews allow engineering managers and developers to detect issues and bugs (finding bugs early is a key benefit of code reviews) in the early stages. This process also helps identify wrong implementations or logic before they reach production. So that the problems can be fixed before the end-users see them. Besides this, It allows developers to work with fresh knowledge, or else they may struggle to remember code, solutions, and reasoning.
Reviewing code regularly allows developers to learn more reliable techniques and best practices. It helps in gaining valuable insights into diverse coding styles and problem-solving approaches. Code review also allows engineering managers to mentor junior developers and support junior team members through constructive feedback, fostering a culture of continuous learning and growth. Senior developers play a crucial role in sharing advanced knowledge and best practices during code reviews, ensuring the team benefits from their experience.
Regular code reviews ensure the entire team adheres to consistent coding standards and best practices, such as following naming conventions and clear variable naming. This makes it easier for developers to understand and contribute to the codebase. Hence, they can write more readable and maintainable code over time. Besides this, it provides opportunities for refactoring.
Optimizing code through the code review process eliminates a significant amount of technical debt. It also detects code smells which are early signs of potential technical debt. Code reviews analyze the code and catch bugs to reduce the need for extensive rework later.
While not all technical debt is inherently a bad thing, code reviews help ensure it is managed appropriately.

Always ask questions rather than demanding changes. It not only opens up a dialogue and encourages discussion but also lets them think about input without being defensive. This also ensures that both parties can decide on the right course of action and know each other’s perspective. When asking questions, developers can explain their thought process and rationale behind the code and provide more context for their decisions. Framing a comment as a question during code review encourages open discussion and constructive feedback, making the commenting process more collaborative and effective. This also fosters a culture of collaboration and highlights that nobody is always right. Framing feedback as requests rather than commands promotes a sense of autonomy for the code author.
Instead of saying ‘Change the variable name', ask ‘I see you named this variable ‘Temp'. What about calling this variable ‘UserID'?
It is seen that written constructive feedback is usually taken negatively. Since the individual cannot see the body language, facial expressions, or tone of the other person. Words like just, easy, and obvious may seem belittling to the developers. This not only diminishes confidence but also introduces ambiguity within the team.
Make sure that you provide feedback in clear and complete language. And most importantly, Be polite! Feedback should never be framed as a personal attack. A note in a code review should be constructive, specific, and never vague or dismissive, focusing on principle-based suggestions rather than commands.
This will help developers grow and work efficiently. Hence, enhancing overall code quality.
Don't say ‘This fix is way too easy'. Instead, use this ‘I see a straightforward implementation here. Can you walk me through your decision-making process?'
Address the code directly rather than the developer. Focus feedback on the code itself, not the code author. Discuss what can be improved in the code, not the developer’s skills or characters. Blaming them will lead to judgments, rejections, and defensiveness. They would avoid taking feedback positively. Focusing on the code and its logic, rather than the individual, leads to more objective and productive reviews. Assuming miscommunication over malice during code reviews can help maintain a positive atmosphere.
Hence, ensure an objective evaluation of the code. Guide code authors by offering specific suggestions for improvement and clarity. Make this process a team sport that focuses on the code and its improvement, and focus only on facts.
This will not affect any interpersonal relationships within the team and developers will take feedback seriously.
Instead of saying ‘You haven't optimized the code efficiently', You can say ‘This code hasn't been optimized properly'.
Instead of just telling what improvements to be made to pull requests or code, explain the reason behind the change. Let developers know about the thought process and reasoning so that they look from the other’s perspective. Add a brief explanation along with the change mentioned.
Never assume that developers understand the ‘Why’ behind the change. Always clarify the reason so that they know where it is coming from. Explaining the underlying logic behind code changes helps developers understand and apply feedback more effectively. Clear explanations help ensure the code is understandable for future changes and for future readers who may need to review or maintain the code.
This will help developers improve their skills and knowledge, enhancing code quality.
Don't say ‘Update the variable names'. Instead, say this ‘Try adding descriptive variable names to enhance code readability and make it easy for other developers to collaborate and maintain the codebase.'
Clarify to developers that it is not a universal statement or generalization. Rather, it’s an observation or one perspective as per the code written.
Hence, use ‘I’ while writing constructive feedback. It not only fosters an open and receptive environment for discussing code changes and improvements but also makes it easier for both sides to look for solutions.
This makes developers less defensive about their work and more open to pair programming and learning opportunities. Using ‘I’ statements is a helpful and good practice for effective communication. Making your point with 'I' statements helps avoid misunderstandings and defensiveness.
‘The code is hard to follow' should be changed to ‘I am finding this flow of code a bit challenging to follow.'
Always suggest solutions and guidance on how they can improve. Use your expertise to suggest improvements and offer at least one suggestion for each major issue you identify. It could be a framework, method, or API. It doesn’t mean giving a complete solution but sharing an improvement strategy. This will save developers time in implementing these suggestions and address issues (which they might have overlooked). Also, they will be able to learn new techniques, best practices, and coding standards to improve their coding skills.
Use examples as well so they understand the solution practically. For instance, you can recommend refactoring code into reusable functions, improving the implementation of a specific function for better maintainability, or using a list comprehension in Python to make the code more concise and readable where appropriate.
If the loop structure is inefficient, suggest a solution like ‘Consider using a 'for-each' loop instead of a 'for' loop for better readability and concise code.'
Apart from solutions, share learning resources with them. It could be related to the areas where developers need improvement, new industry trends, or code review best practices. It will help them stay updated with the current trends and improve their understanding of specific technologies and frameworks. Resources such as relevant documentation, tutorials, and online courses work wonders. Sharing resources on JavaScript best practices can help developers stay updated with modern web development trends. You can also share insightful articles or a comprehensive article on best practices. Work with your team to build these automated checks directly into the code review workflow.
This will help developers take ownership of their learning and foster a sense of autonomy.
Instead of simply pointing out the developer's blindspot, for example - Not familiar with the new framework's syntax. Write this - ‘I noticed some challenges with the syntax of the new framework. I recommend checking this document ‘Framework Documentation.' as it provides clear examples and explanations.'
Review code frequently as it reduces the need to make the process lengthy. Long code reviews would be overwhelming and confusing for developers since they need to make a lot of changes and improvements altogether. Even after doing it frequently, the code reviews take hours, break it down into small parts. Reviewing fewer lines of code at a time makes the process more manageable and allows reviewers to focus on specific lines for targeted feedback and discussion. Attaching feedback directly to a particular line clarifies the context of the comment and makes the review more actionable.
Smaller code reviews allow developers to understand the reason behind the constructive feedback. Hence, they can make changes to the code without any dilemma or misunderstanding.
Suppose a developer has submitted a large pull request that considers various features and changes.
Instead of sharing feedback all at once, say this ‘Let's first focus on the changes related to the new feature implementation. Once done, we can move on to reviewing the improvements in the existing code.'
Effective code reviews take place when both positive and constructive feedback is included. Developers may make a few mistakes here and there. But, this doesn’t come from a bad place. They are improving, growing, and giving their best.
Hence, pat their backs on the things they have done correctly. Positive feedback creates a culture of recognition and gratitude which improves collaboration and communication.
This also lets development teams to continue put efforts and strive for excellence. Appreciation should be extended to all team members, as recognizing the contributions of everyone fosters a stronger team dynamic. Both the reviewer and the recipient benefit from positive feedback, reinforcing a collaborative and supportive environment. Recognizing valuable feedback encourages continuous improvement and motivates team members to keep enhancing their skills.
When recognizing their efforts, say this ‘Nice job on the new feature. Your attention to detail and writing readable code is commendable.' Praise specific aspects of the code enhances morale, such as acknowledging good use of dependency injection or clarity in structure.
Use code review tools to help in assessing the quality of code. These tools can help in spotting bugs and vulnerabilities, detecting code smells, syntax errors, security vulnerabilities, and many more. Automated checks and continuous integration pipelines can automatically correct style issues, enforce naming conventions, and ensure high quality code. These tools can also highlight areas that need code comments, support inline comments, and make commenting more efficient and consistent. Automated tools may also politely recommend placing related code, such as CSS or scripts, into a separate file to improve maintainability. It also gives visibility into changes, hence, making the feedback more focused and contextually relevant. Automated checks run in the background whenever a pull request is opened.
These tools also ensure that the code adheres to the coding standards and best practices.
Typo’s automated code review tool combines the power of hybrid Static Application Security Testing (SAST) and advanced AI-driven analysis to deliver comprehensive code reviews. Supporting tall top programming languages, it seamlessly integrates with any major programming language and leverages their unique language features. This innovative approach not only detects potential security vulnerabilities and code quality issues early but also provides intelligent suggestions to improve code quality and maintainability.
By automating routine checks and offering valuable feedback, Typo’s tool reduces the time spent on manual reviews, allowing developers to focus on complex logic and creative problem-solving. Its deep contextual understanding ensures accurate issue detection and precise, actionable recommendations, making the entire code review process faster, smoother, and more effective.
The code review process might be time-consuming, but, it is rewarding too. Code reviews are a fundamental part of software engineering and contribute to a virtuous cycle of continuous improvement. It helps in knowing whether the code needs refactoring, has bugs or errors, or anything else that could hamper its performance.
Follow the 10 tips mentioned above to encourage collaboration, open communication, and knowledge sharing among developers. The key points discussed include best practices for effective reviews, and leaving actionable notes during code reviews can help guide future improvements and clarify feedback for your team.
Happy reviewing!

Product Management and Software Engineering are among the roles that drive innovation for a product. And today, these roles are intertwined in ways that responsibilities and capabilities can seem blurred – which leads to the question, which role is right for you? Understanding the company environment, available jobs, and how these factors align with your personal preferences can significantly influence your career decisions. Reflecting on whether you enjoy engaging with diverse teams or focusing on technical craft can also help guide your choice.
Product Managers answer the “why” and “what” questions about a product, while the Software Engineers answer the “how” – both important in software creation. Software engineers ensure that the software meets customer-driven specifications and requirements set by product managers, bridging the gap between vision and execution.
Choosing between product management and Software Engineering can be challenging since they are crucial for businesses. For example, someone might weigh their options by considering whether a company's culture values innovation or structured processes, or by comparing the specific job responsibilities each role entails. To help you make an easy decision, in this blog, we break down their roles, career responsibilities, trajectories, differences in day-to-day work, and where they are similar. Let’s dive in! Product managers are often considered the "CEOs" of their product, responsible for the end-to-end user experience and overall product success.
The Product Managers serve as the guiding strategic navigators of innovation and steer products from a mere idea, conceptualize it, and take it all the way to market launch. They provide the blueprint for the product’s path from inception.
Unlike Software Engineers, the Product Manager role extends beyond coding. They combine business acumen, technological insights, and customer-centric thinking and translate into the fulfillment of a product. Product managers gather consumer feedback and work with various personnel to determine product features, while software engineers primarily interact with other engineers to build software.
They deep dive into market analysis and identify user needs, effectively shaping the product roadmap. With this information, Product Managers align customers with business objectives. The product role also includes fostering a collaborative culture between engineers, designers, sales, and marketing teams while staying true to ever-changing market dynamics through agile methodologies. Aligning people across the product team and development team is crucial to ensure everyone is working towards the same goals. Product specifications are used to guide the development team in building the right features and translating user needs into technical solutions. After product launch, product managers measure outcomes and adjust strategies based on user feedback to ensure continued success.
They drive teams toward a shared goal while crafting a roadmap.
The Product Managers serve as the guiding strategic navigators of innovation and steer products from a mere idea, conceptualize it, and take it all the way to market launch. They provide the blueprint for the product’s path from inception. Unlike Software Engineers, the Product Manager role extends beyond coding. They combine business acumen, technological insights, and customer-centric thinking and translate into the fulfillment of a product. Product Managers are also involved in business development, collaborating with stakeholders across sales, legal, and marketing to support strategic growth efforts and facilitate the overall product launch process. They deep dive into market analysis and identify user needs, effectively shaping the product roadmap. Product Managers use data to inform their decisions, analyze key metrics, and measure product success, ensuring that technical improvements align with user behavior and business outcomes. With this information, Product Managers align customers with business objectives. The product role also includes fostering a collaborative culture between engineers, designers, sales, and marketing teams, as well as managing resources across teams to achieve product goals, while staying true to ever-changing market dynamics through agile methodologies.
They drive teams toward a shared goal while crafting a roadmap.
A Software Engineer evolves from an entry-level position to senior and staff levels. This path can lead them to management roles. They can manage engineering teams and progress to positions like VP of Engineering, CTO, and Director. Alternatively, some engineers choose to pursue a more technical role, focusing on hands-on programming, system design, and backend infrastructure work. Software engineers typically have a clearer roadmap for their early careers, focusing on technical tasks and deliverables.
However, through this transition, they must develop varied skills to support their growth. From purely technical skills, their role can evolve to people management, a distinct skill honed over time. Collaborating with other engineers is also essential, as it fosters knowledge sharing, mentorship, and collective problem-solving. Additionally, understanding the common challenges every engineering manager faces can help them navigate this journey more effectively.
Product Managers also grow similarly in their career paths. They move from being individual contributors to leading fellow Product Managers. It often involves market research and product marketing. Their trajectory then moves into the business aspects of the organization. Many of them move into roles like Managing Directors or Vice Presidents. In such roles, they oversee several divisions and business lines.
In these roles, Product Managers influence the product strategy and the marketing, sales, and finance functions in line with the company's goals.
To know which role is right for you, understand what the day-to-day responsibilities of the roles look like:
Software Engineers and Product Managers drive the creation and evolution of software products. However, each has a distinct set of responsibilities, strategies, and perspectives. Product managers are focused on outcomes, user needs, and business impact, while engineers are focused on technical concepts and implementation details. A project needs a blend of these roles and their unique skill sets. Both product managers and software engineers need strong communication skills to collaborate effectively and achieve shared goals.
When working as a software developer, it's important to acknowledge and appreciate each team member's unique roles and responsibilities. Even though everyone has specific tasks, teamwork is still crucial to success. That's where a Product Manager comes in - as a mediator between stakeholders and the engineering team, they gather feedback and ensure everyone is on the same page.
While the PM might help push specific deliverables, it's ultimately up to the engineering team to execute them. That being said, the PM might be held accountable for the project's overall outcome, especially regarding user satisfaction and management expectations. It's crucial to understand the difference between responsibility and accountability in any project and to work together to achieve success.
Software Engineers and Product Managers have contrasting approaches to tackling gaps in products. While engineers focus on technical obstacles and evaluating technologies, Product Managers prioritize bridging gaps and identifying opportunities. They streamline user scenarios, engage with users, and ensure alignment with key stakeholders. Collaboration between the two roles leads to impressive outcomes, with PMs providing valuable input and engineers making technical trade-offs to create optimized features.
The roles of software engineers and product managers differ significantly, not only in their skills and responsibilities but also in their approach to problem-solving. Software engineers are primarily oriented toward engineering and coding solutions, often diving deep into technical specifics and leveraging their expertise to overcome technical hurdles. Their analytical mindset drives them to focus on the intricacies of technology and the detailed execution of code.
Conversely, product managers are more collaborative and strategic, requiring a holistic perspective on solutions. They must understand the broader business goals and user needs, coordinating with various stakeholders to ensure that the product vision aligns with market demands and customer expectations. This overarching view helps them identify opportunities and streamline processes, ultimately fostering a product that meets both user and business needs.
Together, these roles create a dynamic synergy. Engineers apply their technical prowess to develop robust solutions, while product managers provide the strategic direction necessary for those solutions to thrive in the market. This harmonious collaboration ensures that both technical and product gaps—including the distinctions between technical leadership roles—are effectively addressed, leading to successful product development and innovation.
It is essential to recognize that different roles in product management have varying timeframes. Software Engineers (SWEs) typically operate on regular sprints, often on a weekly or bi-weekly basis, which enables them to structure their working schedules and remain on top of their tasks. In contrast, Product Managers (PMs) have more flexible timelines, as their responsibility lies in steering long-term strategies.
While PMs must pay attention to immediate tasks and customer feedback, they must also align with engineering sprints to provide the necessary specifications and artifacts. To be a good PM, it is essential to support the engineering team, and engineering timelines should influence their timeline but not necessarily be linked to them.
As a Software Engineer, it can be challenging to keep up with the frequent deliverables that come your way. From minor bug fixes to complex feature releases, each deliverable can impact the user differently. Ensuring timely delivery of these features and updates to users and stakeholders is crucial, as it directly affects their experience and satisfaction. Some tasks, like maintenance tasks, may seem insignificant, while others can be game-changing for the product.
When it comes to customer-facing products, the release cadence may be less frequent, but the user impact of each new feature or improvement can be significant. It’s essential to consider the user’s perspective when prioritizing and planning deliverables to ensure a positive experience.
Software Engineers typically have a one-month ramp-up period before their responsibilities increase. At the same time, project managers may require up to two years, especially in larger companies. This is due to the complex decision-making involved in project management and the need for a deep understanding of the context. Although Software Engineers and project managers can impact user experiences, project managers are generally responsible for end-to-end user scenarios.
Let’s simplify each role to help you decide which suits you best. As you explore your options, start thinking like a product manager by integrating product thinking with your technical skills and asking insightful questions in meetings. Many software engineers naturally start thinking like product managers when they question the purpose of features during development.
As you consider your career path, take time to write about your experiences and reflections. Documenting your thoughts can help clarify your goals and demonstrate your product thinking.
Do you enjoy strategizing, collaborating, and connecting user needs with product plans? If so, Product Management might be your fit. As a Product Manager, you'll shape the "what" and "why" of a product, drawing insights from user research. You'll understand customer desires, align business goals, and guide teams, from concept to product launch. If you love crafting solutions and teamwork, this could be your calling.
Are you intrigued by coding, solving problems, and building software solutions in a technical role? Software Engineering might be your compass. Software Engineers craft the "how" of products by turning ideas into functional code through their expertise in software development. If you thrive on coding challenges, value technical expertise, and want to create digital innovations, this path could be for you.
Remember, these paths often blend, and you're in control. Consider your strengths. Do you want to explore code and technology? Software Engineering might be your choice. Or do strategic thinking and teamwork drive you? Product Management could resonate.
Both roles demand learning and adaptability, shaping our tech world. As you gain clarity, let your choice align with your ambitions, guiding you toward a fulfilling career in the ever-changing tech landscape.
If you are passionate about technology, product management, and engineering are fascinating fields. They provide unique paths to explore, each with its challenges and rewards.
Whether you thrive on navigating the strategic landscape of product development or find joy in the creative process of coding, your choice of focus reflects your aspirations and strengths. By embracing the path that resonates with you the most, you can build a fulfilling and impactful career in this exciting industry.

Code rot is a common problem among engineering teams. It can compound unless it is well-managed. Code rot is sometimes referred to as ‘bit rot’, which describes the gradual deterioration of software over time, often due to lack of updates or adaptation to changing environments. In the early days of software and AI development, initial groundbreaking programs eventually became outdated as technology advanced, illustrating how even innovative code can succumb to obsolescence. In contrast, modern systems are designed to adapt to current technology environments and are more resilient to code rot due to their flexible and self-healing architectures.
Just like how we need to nurture our plants to grow or else they will be withered. The same should be done with code, otherwise, it will rot. ‘Bad code’ and poor coding practices can accelerate code rot, leading to maintainability issues and increased technical debt.
Code rot is a slow decay and does not happen overnight; it develops gradually as software is neglected or becomes overly complex, affecting performance and maintainability long before obvious failures occur. Over time, this process can make the code base worse, as accumulated issues like unused code or misnamed methods increase the difficulty of managing and maintaining the system.
So, let’s delve deeper into the concept of Code rot, ways to recognize it, and how to address it. As a developer, recognizing and addressing code rot early is crucial to maintaining a healthy, sustainable codebase.
Also known as software rot or software decay, it refers to the deterioration in the performance of a piece of code. It doesn’t mean code doesn’t break down or rot away. Rather, the quality of the code starts degrading over time, emphasizing the importance of clean code practices. Misnamed methods are a common cause of code rot, as incorrect or outdated method names make the code harder to understand and maintain. As code rots, software can become more complex and harder to maintain, making future changes increasingly difficult. AI-generated code can increase duplication by 8x and reduce code reuse, further complicating the maintenance of a healthy codebase.
This further makes the software faulty, unusable, or need upgradation. Code may become unreliable or introduce unexpected bugs as it ages. A changing environment, such as updates in technology, user requirements, or underlying infrastructure, can accelerate code rot and make maintenance more challenging. Code rot can also lead to performance issues, such as system slowdowns and operational disruptions, affecting performance and maintainability long before obvious failures occur. However, old code that is well-maintained can remain functional and stable, in contrast to code that suffers from rot and degrades over time. Software rot increases development costs by 20% to 40% compared to actively managed systems. If not taken care of in the long run, it can also directly impact the team’s productivity and morale.
Code rot, also recognized as software rot or software decay, represents a transformative challenge that progressively undermines software quality and maintainability over time. While this deterioration rarely emerges overnight, the gradual erosion of a codebase can ultimately reshape development workflows, making it significantly more challenging for developers to comprehend, modify, or enhance systems. Understanding how code rot impacts software development is essential for any team aiming to streamline their processes and avoid the hidden costs that software degradation brings.
Technical debt stands out as one of the most impactful drivers reshaping code quality over time. When development teams face pressure to meet ambitious deadlines or rapidly deliver cutting-edge features, they often leverage quick solutions—such as duplicating existing code, bypassing documentation requirements, or overlooking established coding standards. Tight deadlines can pressure developers into making quick fixes that contribute to code rot. Code rot stems from accumulated technical debt, poor coding practices, outdated dependencies, lack of documentation, insufficient testing, developer turnover, and evolving requirements. These expedient approaches can accumulate rapidly, transforming clean codebases into complex, difficult-to-manage systems. This accumulated technical debt ultimately transforms even minor modifications into risky, time-intensive endeavors, significantly slowing development velocity and enhancing the likelihood of introducing additional defects.
Legacy systems emerge as another significant factor driving software degradation across modern development environments. Older applications frequently contain outdated dependencies, redundant code segments, and poorly-named methods that no longer align with current application states. As fresh talent joins development teams or original authors transition to new opportunities, unfamiliarity with existing code patterns can trigger accidental errors and further system deterioration. Without implementing regular code reviews and automated testing frameworks, these issues remain undetected, enabling dormant degradation to establish itself and progressively weakening the codebase with each subsequent update.
Development workflows themselves can significantly influence and accelerate code rot patterns. For instance, when teams maintain a forked online forum—an open-source platform that has been heavily customized—without proper alignment to upstream modifications, critical security patches and essential updates may become incompatible with existing implementations. This can lead to maintenance difficulties, security vulnerabilities, and compatibility issues with updates or patches. This scenario leaves software vulnerable and substantially more challenging to maintain effectively. Additionally, the absence of automated testing suites and static analysis capabilities means that code smells, performance bottlenecks, and escalating cyclomatic complexity often go unnoticed, continuously eroding overall software quality and maintainability. Automating dependency management ensures that libraries and dependencies are regularly updated to avoid major breaking changes later. Automated tests are essential for early bug detection and help maintain code reliability during updates or refactoring, providing teams with confidence to make necessary changes without introducing new issues.
Active degradation emerges when code undergoes frequent modifications without proper refactoring or comprehensive testing, leading to a progressive decline in overall system quality. Code rigidity—where software becomes resistant to modification or extension—can transform bug fixes and feature implementations into complex, error-prone endeavors. Code duplication, unused functionality, and inconsistent naming patterns collectively contribute to a codebase that becomes increasingly difficult to navigate and maintain, ultimately impacting development team productivity and software reliability.
In today’s software landscape, the consequences of unchecked code rot can dramatically reshape project outcomes, ranging from significant performance degradation and security vulnerabilities to extended lead times and unexpected costs. As code rot progresses, it often results in more bugs, which are a clear warning sign of software decay. Code rot can become a major issue, significantly impacting software development and longevity. To detect and address code rot proactively, development teams should leverage advanced metrics such as cyclomatic complexity analysis and deploy sophisticated static analysis tools alongside comprehensive automated testing frameworks. By prioritizing code quality initiatives, adhering to established coding standards, and engaging in regular code review sessions and systematic refactoring, teams can effectively prevent gradual software deterioration and ensure long-term system sustainability and performance optimization.
Active rot shows signs of code while they are actively handled and maintained. Also known as Gradual Decay, these codes slowly worsen in small details. The common type of code rot can be found in every code base to a varying degree. This is because most software requires constant updates and bug fixing. Building features without proper safeguards can accelerate active code rot, as new changes may introduce issues that contribute to the slow decay of the codebase. Hence, deviating the program from its original design.
Dormant rot is easy to detect. This code isn’t being touched constantly which makes them useless as the rest of the application upgrades. Dormant rot often affects old systems that are no longer updated, leading to inconsistencies and maintenance challenges. An old system, with outdated data formats and legacy code, can result in data inconsistencies and increased technical debt, making it harder to maintain data integrity and development efficiency. Additionally, unfamiliar code in these dormant sections can make maintenance and updates more difficult, increasing the risk of bugs and structural decay. Dormant code rot remains unchanged and is easier to monitor, as it does not grow or spread. The reasons could vary. A few of them include API no longer working, Hardware and platforms have stopped working, and missing device adaptations.

In this case, the code breaks in many places whenever a change is made. As more code is added, the risk of fragility increases, making the system harder to maintain and more prone to defects. Access to the source code is essential for diagnosing and fixing fragile code, as it allows developers to understand and address the underlying issues. The code isn’t stable as software becomes difficult to maintain. When the code is fragile, every new change introduces several new defects. Even when the areas aren’t related to each other. They can be either detected early by an automated testing suite or found in production by end-users.
Declining software metrics don’t always indicate code rot, but they can be a warning sign that the code needs to be reviewed. Sometimes, it’s a slow deterioration, showing that the code isn’t as healthy as it once was, and action should be taken to resolve it. A few of the metrics that can collect software codebase health data include Coupling, Cyclomatic Complexity, and Test Coverage. These metrics provide valuable insights into software complexity and can guide improvements. Implementing robust processes helps teams respond effectively to declining metrics and prevent code rot.
When the code is hard to change, it can be a warning sign of code rot. Even when it is a simple change, it takes longer than expected. Moreover, one change may lead to other changes as well. The code becomes less adaptable to changes and prone to errors, instability, and crashes. As a result, this leads to a slowing down of the development process. Code rigidity often leads to tech debt, making future maintenance more difficult and costly. Introducing new code or refactoring existing code can help address rigidity and improve overall code quality.
In continuation of the above point, code rigidity can also increase the time to deliver value. As the code is in an unhealthy state, more time will be needed to add new features. Hence, it takes longer to ship new features to the customers. Moreover, the developers may fear managing non-critical issues as they aren't sure of the full impact of the change.
When the documentation isn’t updated or maintained for a long time, it gets out of sync with the code. This makes it misleading. As a result, it creates confusion and errors for developers to rely on it. If the documentation remains outdated for a long time, it can make the end users unhappy with the product. Maintaining good code practices, such as regular validation and clear structure, helps ensure that documentation and code stay aligned.
Code maintenance stands as the backbone of sustainable software development, serving as the primary defense against software rot and gradual decay that undermines robust codebases. As software evolves, regular maintenance ensures existing code remains efficient, reliable, and adaptable to new requirements—preventing the slow deterioration that plagues legacy code and older systems.
A proactive approach to code maintenance leverages a strategic combination of manual testing, automated testing, and static analysis tools. These processes help developers detect code rot early by:
By systematically reviewing and refining the codebase, teams reduce future development time and minimize error-prone scenarios.
Establishing and enforcing coding standards represents another critical aspect of effective code maintenance strategy. Consistent standards ensure new code integrates seamlessly with existing codebases, reducing the risk of introducing inconsistencies or new sources of software erosion. Regular code reviews further reinforce these standards by:
This systematic approach creates a foundation for sustainable code evolution and team collaboration.
Refactoring serves as an essential maintenance practice that targets areas showing early signs of software rot. By restructuring messy code, eliminating duplication, and updating outdated logic, developers improve code quality and maintainability without altering software's external behavior. This gradual improvement process:
The strategic application of refactoring principles prevents accumulation of maintenance debt over time.
Monitoring key metrics such as cyclomatic complexity, lead time, and code coverage provides valuable insights into codebase health. High cyclomatic complexity signals areas where code has become overly complicated and risks further decay. By tracking these metrics, teams can:
These metrics-driven approaches enable data-informed decisions about maintenance priorities and resource allocation.
The human element proves equally important in effective code maintenance strategies. Developers who are deeply familiar with the codebase are better equipped to spot subtle signs of software rot and address them before they affect overall quality. Investing in ongoing training, encouraging collaboration, and promoting knowledge sharing within teams ensures that:
This human-centered approach complements automated tools and processes for comprehensive maintenance coverage.
Prioritizing code maintenance proves essential for delivering high-quality products and services to end users. By addressing software rot proactively, organizations can:
Regular maintenance preserves code integrity, builds customer trust, and supports long-term business growth through reliable software delivery.
Code maintenance is not a one-time task but an ongoing commitment to software excellence. By combining robust processes, modern analysis tools, and a culture of continuous improvement, development teams can detect code rot early, prevent gradual deterioration, and ensure software remains stable, efficient, and ready to meet end user needs. This comprehensive approach transforms maintenance from reactive problem-solving into proactive quality assurance that supports sustainable software development practices.
You can start by defining what Healthy software stands for in your organization. Establish a set of common coding guidelines and practices for your team members. It allows them to be on the same page and move in the same direction. Moreover, it creates a social contract between the team and lets them consistently write code.
Software metrics may not necessarily identify code rot. But it can help in knowing the quality and health of the codebase. Various metrics such as cycle time, code churn, and cyclomatic complexity let the developers know how the code is performing. It can identify code smells and technical debt, track their changes over time, and much more. Hence, helping in further inspection.
Software metrics can also help in knowing the blind spots within your software development. Hence, it helps developers to know which areas need refactoring to enhance the overall quality of the code. Refactoring them in small, frequent iterations lets the code adapt better to new environments and improves its quality and longevity. This approach also assists in the gradual improvement of the code base and keeps it manageable, ensuring that your test suite remains effective.
While manual testing may take a lot of time, you can go for automated testing of the code. However, ensure that the code is written with testing in mind. It lets you know whether the code is working as expected. Moreover, if any recent changes are made, automated testing lets the developers know any previously working functionality has been affected. Hence, helping in detecting the issues early.
Lastly, after hiring the right set of developers, ensure that you train them regarding coding guidelines. Make them understand how refactoring should be done often and coding best practices. Try aligning them with other developers. Create a culture of continuous learning and foster open communication in your organization.
Combating software rot requires a proactive approach that combines the right tools, techniques, and best practices throughout the Software Development Life Cycle (SDLC). Let's explore how static analysis tools serve as the primary line of defense against code deterioration. One of the most effective strategies involves leveraging static analysis tools that automatically examine your codebase for potential issues:
How do automated testing suites impact software decay prevention? Automated testing frameworks serve as another essential defense mechanism against software deterioration. By integrating comprehensive automated test coverage into your development workflows, teams can swiftly detect when new features or bug fixes inadvertently introduce defects or performance degradation:
What role do code reviews play in maintaining software quality? Peer review processes serve as a critical checkpoint in preventing messy code infiltration into production systems. Regular collaborative reviews ensure adherence to coding standards while facilitating knowledge transfer across development teams:
How do metrics provide insights into software health? Monitoring various performance indicators—including cyclomatic complexity, lead time, and test coverage—delivers valuable intelligence regarding software complexity and overall system wellness:
Beyond technical implementations, fostering a culture of documentation, knowledge sharing, and coding standard adherence proves vital for long-term software health. Clear documentation protocols ensure that knowledge distribution extends beyond individual contributors, reducing software rot risks during team transitions:
What does effective software rot prevention ultimately require? Preventing software deterioration demands an ongoing commitment that encompasses vigilance, strategic tool selection, and dedication to continuous improvement processes. By combining static analysis tools, automated testing suites, code review protocols, and robust development methodologies, teams can effectively detect code rot, manage technical debt systematically, and ensure their software systems remain reliable, maintainable, and future-ready for evolving technological landscapes.
While code rot is a universal problem, It can still be prevented. Take care of your code base often. If any issue is detected, take the necessary steps at the earliest.
Typo, an intelligent engineering platform, can help in identifying SDLC metrics. It can further help in detecting blind spots and reducing code rot.

Speed is crucial in software development, but it’s not the only thing that counts. Without clear direction and purpose, your team may struggle to stay on track and deliver valuable results. This is where scrum velocity can help you.
So, let’s delve into the concept of Scrum velocity, how it’s calculated, and why it’s a game-changer for Agile teams.
Velocity is speed with direction, and development speed without direction is an utter waste of time. Therefore, team velocity in scrum development is the team’s capacity for producing useful, working software. Simply put, scrum velocity is one of the key agile metrics that represents the capacity of a development team to achieve a given purpose.
For example, if a team completes user stories with a total of 30 story points within a two-week sprint, their velocity for that sprint is 30.
To calculate velocity in Scrum, follow these key steps. First, determine the unit of measurement to track progress and select a time frame (iteration or sprint) for the calculation. Once these basics are in place, track completed story points.
Story points are used in Scrum to estimate the size or complexity of user stories or backlog items. Teams can compare and prioritize different pieces of work based on their difficulty level.
Track progress during the sprint by recording the total number of story points completed. This allows accurate calculation of velocity at the end of the sprint.
Velocity is measured per sprint and used for planning and productivity measurement. Tracking velocity, a fundamental Scrum metric, helps forecast how much work can be accomplished in future sprints and informs release and iteration planning. If there is a user story with 4 story points and another with 5 story points, then this sprint’s scrum velocity is 9 (4+5) by adding both story points.
Velocity tracking is one of the key agile metrics used in Scrum and other agile frameworks. Below are a few benefits of velocity tracking:
Monitoring velocity is essential for boosting team productivity and improving forecasting and planning. By tracking velocity across various sprints, the team can establish a standard and use it to estimate the amount of work they can handle in future sprints. This ensures that they can set practical goals and make informed commitments to stakeholders.
By using velocity tracking, the team can detect patterns and trends in their performance. They can also examine the factors that cause fluctuations in velocity, such as changes in team structure, task complexity, or external dependencies. Through iterative development, the team incorporates lessons learned from each sprint into the next, fostering a cycle of continuous improvement. By better understanding these factors, the team can refine and improve their procedures, resulting in more dependable and consistent delivery.
When teams can track their velocity and see improvements or consistency, it significantly impacts their motivation and overall satisfaction with their job. This can also foster a spirit of collaboration and transparency within the team as they work together to achieve their goals and continuously improve their velocity.
Monitoring velocity provides an exact measure for stakeholders and management to track team progress, capacity, and abilities. It encourages transparency and fosters trust between the team and stakeholders, leading to successful collaboration.
While velocity is a valuable metric for scrum teams, setting it as a target can create undue pressure and even lead to punishment for team members who fall short. A more compassionate approach focuses on tracking metrics and identifying any underlying causes of issues. This way, your team can improve their processes, eliminate bottlenecks, and incorporate new tools to enhance their skills over time.
It’s understandable that teams approach projects in their unique way, so it’s not always fair or practical to judge them solely based on their speed. A team’s velocity can be influenced by various factors, including the project’s complexity and the team members’ individual skill sets.When calculating scrum velocity, it’s important to remember that story point estimates can be subjective. Comparing teams solely based on velocity can lead to a negative work environment, internal conflicts, and low morale. It’s better to use this measure to navigate situations within a team rather than to compare teams against each other.
When you introduce the concept to the team, it’s understandable that every team needs time to work together effectively. Whether they’re a new or old scrum team, they would take time to understand new complexities and create action plans. It’s unrealistic to expect them to perform at maximum velocity right away, and it’s common for leaders to have unrealistic expectations based on an outsider’s perspective. Only the scrum teams and managers working on the project can accurately estimate true scrum velocity, as they’re facing internal roadblocks and several complexities.Therefore, providing them with space and time to work together effectively is crucial. Business leaders who fail to acknowledge this may unknowingly hinder their team’s progress and prevent them from moving in the right direction.
Scrum teams must allocate time for unforeseen activities, such as addressing technical debt and critical bugs reported by customers. But teams who only focus on scrum velocity need more investment in quality.
Neglecting these essential tasks can lead to a decrease in the quality of the final product and cause issues for future timelines. Short-term focus on velocity can hurt progress and ultimately harm business success. Therefore, it’s crucial to invest in the necessary resources for scrum teams to work effectively and prioritize quality over speed.
While some team leaders rely on scrum velocity for project completion estimates, this may not align with Agile principles. Factors such as changing requirements, short development sprints, and unpredictable variables affect velocity.
Therefore, depending solely on a static tool or metric for progress measurement may not be an efficient choice, especially if it only provides an estimation instead of a precise timeline. It’s important to remember that scrum velocity can only offer an approximate timeframe for project execution and should be treated as such.
Overemphasizing scrum velocity as a performance metric can lead to inaccurate predictions and frustration when tasks take longer than expected.
Moreover, assigning blame for incomplete stories can create negative feelings among team members. To avoid these issues, remember that velocity should only be used for prediction purposes and not for comparison or competition. Ultimately, the goal of development should be predictable progress rather than constantly increasing speed.
While velocity provides a general sense of how much work has been completed, it doesn’t give the full picture. You must account for factors like technical debt, bug fixes, and non-functional requirements to ensure you get all the important details that impact the overall value the team delivers. It’s essential to look beyond the surface level and consider the specifics of what was achieved and the quality of the work.
As part of sprint planning, the Scrum Master plays a crucial role in facilitating these retrospectives and ensuring that the team's feedback is incorporated into future sprints.
As an Agile team, it’s essential to recognize the significant role that velocity plays in your success. By understanding your team’s past velocity, you can better plan for future sprints and set realistic goals everyone can commit to within the Scrum framework. This helps keep everyone on the same page and provides a clear measure of your productivity and progress over time.
It also enables you to make data-driven decisions and aim for constant improvement. Ensure you look at scrum velocity objectively and not as a sole indicator of performance and productivity.
By following some simple tweaks to your process and journey with scrum velocity, you can achieve your goals efficiently.

Developers are constantly juggling between one or the other tasks. It may seem a ‘normal’ thing, but it can harm the software development process. If not measured timely and properly.
There are many metrics that engineering managers can take note of. But, here we will be discussing one of the important yet overlooked metrics in software development – Code Churn.
In this blog, let’s dive deeper into code churn, what causes high code churn, and how you can prevent it:
Also known as code rework. It is when a developer makes changes to a specific piece of code including a file, a class, or a function during the development process. Although, it is a normal thing, but also depends on when and why it is taking place.By this, we mean that testing, reworking, and exploring various solutions to a problem is fine. Especially, during the beginning of the project when code doesn’t have a clear solution.
It is healthy and expected unless it surpasses 20% – This is when it is a problem. The lower the code churn, the closer you get to a release date.

Common workflows and dynamics that can result in a high churn rate include:
Prototyping is a natural and healthy trend. It is usually seen when there is a new or unfamiliar project. During these times, the churn rate may rise to 60-80% and this is not unusual.
Apart from prototyping, redesign, and POCs are all examples of where large chunks of code are rewritten. Hence, it is fine to allow developers the time and space to research and experiment.
But, if it continues for an extended period beyond what was expected then it is a cause for concern. It could be that the developer is not able to comprehend the specific components or the entire problem. Or the problem could be complex.
One of the main factors behind high churn rates is inconsistent or unclear requirements. It further spreads to subsequent phases of software development which compromises the quality of final products.
It could also be that the requirements change midway through the work which is another reason for high code churn. Due to this, developers may rely on their best guess to interpret and fill in any gaps. As a result, some assumptions could be wrong too.
This further damages the morale and progress of the development team.
Uncertain developers may also impact team performance as they juggle between various approaches, such as:
Any of the above leads to subsequent changes in the code base which results in a delay in progress. Since decisions are constantly revisited or revised.
Complex tasks are another reason for higher code churn. Since the developers are continuously exploring and backtracking the project, it is not unusual that churn rates may exceed the desired level.
But, as mentioned above, if it goes on for too long, then it is a cause for concern. It could be that developers may not have the resources they need or may require additional help.
It can also increase Technical Debt resulting in high code churn. Developers take shortcuts and make compromises that hinder the entire development process.
Software developers are more likely to be burnout due to their busy work schedules. Even when enough resources are available and they have the required skills, developers who are burnout may not be able to do their tasks efficiently.
It can further result in becoming disinterested in work, failing to show up, and increasing the rate of presenteeism. Hence, developers may want to change their jobs resulting in an increased turnover rate.
When former developers resign, new ones replace them. They would need time to familiarise themselves with the existing code and team. Hence, it leads to knowledge loss which causes potential errors or inefficient changes.
Minimizing and managing code churn is done by measuring it. This allows you to prepare to take things in control when there is an increase in code churn.
Measuring it helps you understand the software development process and know how many times code is changed. It also lets you see in-depth insights into internal and external hurdles allowing you to create actionable plans.
It is the measure of the number of times the developers made changes to the file in GIT control.
The number of lines of code that were added to files for the code that was written recently.
The measure of lines of code that was deleted from files within three weeks of writing the code.
The measure of lines of code that was modified within three weeks of writing the code.
The total of lines added, lines deleted and lines modified.
High code churn usually arises when requirements are not properly defined. Hence, it is important to take sufficient time to understand the requirements.
In case, the requirements are ambiguous, ask for additional clarification and review it once before starting with the project. Make sure that every team member is on the same page and knows what needs to be done.
Also, aware clients and stakeholders as well of how mid-stream changes can result in slow delivery and increased time.
Higher code churn usually occurs due to ineffective planning. Always use data-driven and factual insights to plan team and task allocation for reducing code churn. It includes thorough pre-development preparation, comprehensive requirement analysis, and careful project scheduling. This reduces the likelihood of frequent code changes or major rework during later stages.
Moreover, effective planning allows software engineering teams to navigate new areas of the codebase.
Understanding the root cause lets you identify a long-term solution that helps in improving the quality of the database.
For example, if you are aware that the developers are still lacking needed skills, you can involve pair programming sessions with senior engineers.
Failing to address the root cause makes you constantly make changes to the codebase which lets you create a cycle of rework and inefficiency, potentially leading to bug fixes and future quality problems.
Usually, developers spend more time reading code than writing it. Hence, ensure that the code is readable to all.
It could be that developers may have different professional qualifications and work experience. Their language preference and writing styles could be different from each other. Hence, implement standardization in the workplace. And ensure that your team knows about it.
Also, select coding style guides. It will allow developers to read code easier and faster. It further helps in promoting best practices and coding techniques, leading to low code churn.
The code review process lets developers catch errors early in the development process. This further helps in improving code quality.
Apart from this, code reviews also allow team members to identify areas where code needs refactoring. As a result, helping them to prevent the need for extensive rework later. Code reviews let developers get honest feedback at the right time.
Typo’s automated code review tool identifies issues in your code and auto-fixes them before you merge to master. This means less time reviewing and more time for important tasks. It keeps your code error-free, making the whole process faster and smoother.
High churn can signify that developers are innovative and determined. But, when it goes on for a long period, there is a problem that needs to be addressed as soon as possible.

ull requests are made on Git to work with a team collaboratively. In most open source projects, the contributors request the review and acceptance of a branch, and then depending on the vitality of the code, it is either accepted into the code or not.
A pull request serves as a crucial mechanism for contributors who wish to offer code enhancements to a project. It is a process where the project's maintainer is asked to review and potentially merge the contributions into the mainline branch.
While pull requests are a staple of collaborative coding, it's important to note that they are not a native feature of Git itself. Instead, they are a key function provided by source code management (SCM) platforms. GitHub was instrumental in popularizing pull requests, and today, they are a common feature across platforms like GitLab, BitBucket, and Azure DevOps.
Quick note: Though Git does offer a command called request-pull, this predates hosting services such as GitHub. It generates a list of changes in the format of a patch file, which is then typically sent by email. This nod to Git's history highlights the evolution of collaborative coding practices.
However, what happens when it is not merged and needs to be reverted? This is why we'll tell you how to revert a git pull request.
Leveraging Git as a robust version control system has fundamentally reshaped how development teams orchestrate collaborative workflows, enabling practitioners to meticulously track evolutionary changes, facilitate seamless coordination across distributed teams, and maintain comprehensive historical documentation of their entire codebase ecosystem. Among the most transformative capabilities within collaborative development paradigms lies the strategic implementation of pull requests. These sophisticated mechanisms empower contributors to systematically propose modifications from specialized feature branches toward primary integration branches, thereby facilitating comprehensive peer review processes, fostering meaningful technical discourse, and ultimately orchestrating the seamless merger of validated enhancements into the overarching project architecture.
Pull requests transcend conventional code integration methodologies—they serve as comprehensive quality assurance checkpoints that enhance operational efficiency and accuracy across development lifecycles, enabling cross-functional teams to proactively identify potential issues during early phases while maintaining pristine commit history trajectories. When collaborative pull request implementations introduce modifications requiring systematic reversal, the git revert command emerges as an invaluable strategic tool for maintaining enterprise-grade stability. This sophisticated functionality facilitates the creation of new commits that systematically neutralize the operational impact of previous pull request integrations, ensuring that primary branch environments remain optimally stable without compromising the contextual integrity of original modification patterns. Comprehensively understanding the strategic deployment of git revert within pull request frameworks proves essential for any development organization committed to sustaining healthy, scalable, and collaborative workflow optimization.
You want to avoid being in a position of reverting the pull request as often as possible, but sometimes, you just have to do it. And a lot of situations are beyond your control. So here are some of the reasons:
There are multiple ways you can revert a git pull request; some are safer than others. Here are some of the methods:
Reverting a pull request in GitHub is a straightforward process that allows you to undo changes from a previous merge. Whenever a revert is made, it creates one revert of the merge commit. If you have write permissions, go ahead with the following steps:


In GitHub, reverting a pull request can be done using the web interface to create a new revert pull request.
This thorough approach ensures that any unwanted changes from a previously merged pull request are efficiently reverted, maintaining the integrity of your project’s codebase.
The Git revert command helps you create an inverse to the introduced changes and adds a new revert commit with these changes. This method uses the command line and is non-destructive, meaning it preserves the history of the repository while effectively negating the changes made by the pull request. To revert a merge commit, find the commit hash (SHA) using git log, perform the revert with the git revert command, resolve conflicts if any, then push the changes to the remote repository.
Here are the steps:
This step doesn’t remove the changes made but adds a revert commit to negate the pull request. If the merge was done using methods like squash or merge commit, you can target the resulting merge commit directly. However, if rebase was used, you’ll need to reverse each individual commit.
Using this approach, you can efficiently revert pull requests from the command line while maintaining a clear project history.
The previous method altered the new reality caused by the merged unneeded pull request, but Git reset is like going back in time to change what was done.
While this might have unintended consequences, it might still be a route you can take if needed, and here is how you can do it.
It’s crucial to understand the risks associated with this operation. Rewriting history, especially on the default branch, can lead to significant issues. You may disrupt the historical integrity of the codebase, making it difficult for anyone, including your coworkers, to trace how the code has evolved over time. This can impact collaboration negatively, as the shared understanding of the project’s development might be lost. Resetting the local repository to a previous commit can also result in the loss of uncommitted work.
Additionally, the behavior of git reset can differ depending on whether the branch was merged using a fast forward or a fast forward merge. If the merge was a fast forward, the branch pointer simply moved forward without creating a merge commit, making it easier to reset to a previous state. In contrast, undoing a non-fast-forward merge may require extra steps to properly revert the changes and maintain a clean history.
Moreover, performing a hard reset can lead to the permanent loss of commits. This means you might lose valuable work and insights into the development process—something that cannot be undone. Be sure to thoroughly consider these potential consequences before proceeding, as the operation is not without its drawbacks.
When you use git reset –hard, all the changes in your working directory and staging area will be discarded. This operation directly affects the current branch, so make sure you have saved any important local changes before proceeding.
Leveraging advanced Git workflows for pull request management and reversion requires a comprehensive understanding of merge commits—the transformative foundation of modern collaborative development. A merge commit represents a revolutionary approach to integrating feature branch innovations into the mainline codebase, typically manifesting as the sophisticated result of merging a pull request through cutting-edge version control methodologies. This specialized commit type harnesses unprecedented dual-parent architecture: one parent traces back to the latest commit on the main branch while the other connects to the final commit on the feature branch. The merge commit operates as an intelligent snapshot mechanism, capturing the enhanced repository state after both branches have been seamlessly unified through advanced integration processes.
When a pull request undergoes successful merging operations, Git assigns a distinctive commit hash to the resulting merge commit—a transformative identifier that revolutionizes change tracking capabilities. This commit hash proves absolutely crucial because it empowers development teams to precisely target the specific commit that introduced potentially disruptive modifications requiring reversion strategies. If your team discovers that the merged pull request has introduced broken functionality or unintended behavioral changes, you can leverage this commit hash to strategically target the merge commit for comprehensive reversion workflows.
The most robust and transparent methodology for reverting changes from merge commits involves leveraging the sophisticated ``` git revert
command infrastructure. This powerful git command generates a new commit that systematically undoes the changes introduced by the merge commit, while preserving the integrity and traceability of your comprehensive commit history. By generating fresh commits rather than rewriting historical records, ```
git revert
ensures that your repository maintains consistency and auditability—an essential best practice when orchestrating collaborative development initiatives or managing complex, enterprise-scale codebases.
To execute merge commit reversion, first leverage ``` git log
or ```
git reflog
to identify the specific commit hash of the targeted merge commit requiring reversion. The ``` git reflog
command proves particularly valuable for accessing comprehensive logs of all recent repository activity, including merges, resets, and other transformative changes that shape your development workflow. Once you've obtained the commit hash, you can execute the following sophisticated command:
git revert -m 1 <merge_commit_hash>
The ```
-m 1
flag instructs Git which parent to maintain as the mainline foundation, typically representing the main branch, ensuring the reversion action correctly undoes the feature branch modifications while preserving core functionality.
While it's technically possible to leverage ``` git reset
for reverting to previous commits, this approach represents a significantly more aggressive methodology. ```
git reset
can rewrite commit history, potentially generating conflicts and confusion for team members collaborating on the repository—especially when changes have already been distributed to remote branches through advanced CI/CD pipelines. For this reason, industry best practices strongly recommend leveraging ``` git revert
when you need to revert merged pull requests, as it maintains crystal-clear and auditable commit history that supports enterprise-level development standards.

By mastering how merge commits function and leveraging the appropriate git command infrastructure, you can effortlessly revert pull requests, minimize the risk of broken code propagating through your development ecosystem, and maintain your repository's history in a clean and stable state. Whether you're orchestrating workflows on GitHub, GitLab, or any other git-based platform ecosystem, mastering merge commits and their sophisticated management represents the cornerstone of effective pull request workflows and collaborative development excellence.
Understanding how pull requests (PRs) operate on different source code management platforms—such as GitHub, GitLab, Bitbucket, and Azure DevOps—can significantly impact a team’s workflow and efficiency. Each platform offers a unique experience when it comes to handling pull requests, though they all aim to facilitate collaborative coding.
Additionally, some platforms or workflows allow you to cherry pick specific commits from a pull request, providing the flexibility to incorporate only desired changes instead of reverting or merging the entire set of changes.
Reverting a pull request in GitLab requires understanding the platform's nuances. Unlike GitHub, which allows you to easily revert any pull request regardless of how it was merged, GitLab has specific criteria. In GitLab, the Revert option is available primarily for projects using git merge to accept merge requests. This method results in a "merge commit," which GitLab can revert. Most popular Git hosting services provide a simple "Revert" button that automates the git revert process.
By following these steps, you can efficiently manage pull requests in GitLab while recognizing the limitations and capabilities specific to its platform.
The pull request (PR) process significantly influences the timeline of software development, often contributing to unexpected delays. One of the primary reasons for these delays is the idle time during code reviews. On average, code reviews can remain unaddressed for a substantial portion of the development cycle, which elongates the overall process.
This phase is commonly the most time-consuming aspect of development. Companies prioritize metrics like PR merge time because unresolved code reviews can lead to merging conflicts. When a PR is not reviewed promptly, it heightens the risk of conflicts that require additional time to resolve.
Improving the pull request pickup time can markedly enhance efficiency. Early attention to PRs reduces waiting periods, streamlining the process. Moreover, PR size plays a crucial role. Smaller PRs are typically easier and faster to review, which results in quicker merges and fewer issues.
In summary, by optimizing these PR-related metrics, teams can significantly reduce cycle times and improve overall productivity in software development.
While the core workflow of branching, making changes, and merging remains consistent, differences lie in integration capabilities, user interface, and review processes:
In conclusion, while the fundamental concept of pull requests remains consistent, the nuances across platforms can greatly affect how teams collaborate and manage code. Understanding these differences can help organizations choose the best tool for their development needs.
Managing multiple pull requests simultaneously comprises a complex orchestration that can rapidly escalate in active repositories where numerous contributors collaborate. Maintaining comprehensive oversight of which modifications have been successfully merged, which remain pending thorough review, and how diverse branch architectures interact proves crucial for preventing conflicts and preserving an optimal commit history structure.
The git log command serves as an exceptional visualization tool for analyzing the commit graph architecture, facilitating clear understanding of the intricate relationships between branches and enabling precise identification of commits associated with specific pull requests. When circumstances necessitate undoing modifications, leveraging the git revert command represents the most secure approach, as it preserves the fundamental integrity of the commit graph structure and circumvents the risks associated with rewriting historical records. This methodology proves particularly vital when orchestrating several pull requests simultaneously, as rewriting history can significantly disrupt the collaborative workflow of other contributors and generate substantial confusion across development teams. If the web interface button for reverting a PR is unavailable, it can be performed manually using the command line.
Platforms such as GitHub and GitLab offer comprehensive features that streamline the management of multiple pull requests, encompassing visual commit graph representations, sophisticated branch protection mechanisms, and automated validation checks. Harnessing these advanced tools, combined with a disciplined methodology for implementing git revert operations, enables development teams to efficiently orchestrate multiple pull requests while minimizing operational errors and maintaining a transparent, traceable project history that facilitates seamless collaboration.
Merge conflicts comprise a fundamental challenge that frequently emerges within collaborative development environments, particularly in projects characterized by extensive contributor participation and simultaneous code modifications. These conflicts manifest when multiple developers implement modifications to identical code segments within shared files, resulting in Git's inability to automatically reconcile and integrate the divergent changes. This scenario represents a critical juncture in version control workflows that directly impacts development velocity and requires systematic resolution approaches to maintain project integrity and collaborative efficiency.
The resolution of merge conflicts necessitates a comprehensive and methodical approach that leverages Git's diagnostic capabilities to identify and address conflicting modifications systematically. Initially, developers should utilize the git status command to perform a thorough analysis of the repository state and pinpoint files experiencing conflicts, followed by implementing git diff to examine the specific modifications and comprehensively understand the nature and scope of the conflicting changes. The subsequent phase involves meticulous manual editing of affected files to reconcile differences while ensuring the final implementation accurately reflects the intended functionality contributions from all participating developers. Upon successful conflict resolution, the modified files must be staged and committed to update the pull request, thereby maintaining the continuous integration workflow and project progression.
Effective communication strategies and collaborative frameworks constitute essential components for optimizing the merge conflict resolution process and maintaining team productivity. The implementation of sophisticated collaboration platforms such as GitHub or GitLab facilitates comprehensive discussion threads, status tracking mechanisms, and real-time notifications that enable teams to maintain transparency regarding pull request status and emerging merge conflicts. These platforms provide centralized communication channels that streamline stakeholder coordination and ensure all team members remain informed about resolution progress and project developments. Through proactive conflict management and systematic collaborative approaches, development teams can maintain optimal project velocity while preserving code quality and team synchronization across distributed development environments.
Pull requests are an integral part of working collaboratively, and merging them by mistake or without enough review can cause many issues to the codebase. Then reverting this process can have other consequences you want to avoid. Therefore, have an internal process to merge pull requests. Ensure everybody is on board with the code reviews needed for the process and a checklist to denote when a merge is acceptable.
To further avoid the need for reverting pull requests, consider implementing a more structured approach:
Reverting pull requests should be an exception, not the norm. If it becomes common, it may indicate deeper problems within the team. Addressing these core issues can lead to a more stable development cycle.
Improve your engineering metrics, such as the time it takes for a pull request to be picked up and reviewed. Long review times can lead to conflicts and delays, so work on reducing these durations by monitoring your DORA metrics.
By adopting these practices, you can significantly enhance your code review process and minimize the need to undo pull requests, fostering a more efficient and reliable workflow.
Leveraging advanced version control strategies for pull request management has fundamentally transformed how development teams handle code integration workflows. When examining the complexities of pull request reversion, particularly in scenarios where code has already been integrated into the primary development branch and propagated across distributed repository environments, the git revert command emerges as the optimal solution for maintaining repository integrity. This sophisticated approach generates a new commit that systematically reverses the effects of the targeted pull request, ensuring that historical commit data remains intact and preserving the comprehensive audit trail that modern software development practices demand.
However, there are strategic scenarios where development teams might explore utilizing git reset functionality to strategically reposition the repository state to a previous checkpoint in the development timeline. This methodology requires careful consideration, as it fundamentally alters the commit history structure and can introduce significant operational risks, including potential code base disruption, commit data loss, and collaborative workflow interference. The history rewriting capabilities of this approach can severely impact team coordination dynamics, particularly when collaborative team members have established their development work foundation on the commits targeted for removal, creating cascading effects throughout the distributed development ecosystem.
When implementing pull request reversion strategies, it becomes essential to systematically evaluate the comprehensive impact on both your code base architecture and your team’s collaborative development workflows. Utilizing the git revert command represents the optimal approach for maintaining transparent and accurate commit history documentation, while leveraging sophisticated platform tools like GitLab or GitHub provides enhanced process management capabilities and minimizes operational risk exposure. It’s crucial to understand that pull request reversion should represent a carefully analyzed strategic decision rather than a routine maintenance operation, ensuring that each reversion action aligns with broader development objectives and maintains the integrity of your software development life cycle.
In many cases, reverting a pull request provides the answer to restoring stability after a problematic merge, effectively resolving the issue and closing out the discussion.
In comprehensive analysis, leveraging sophisticated pull request management methodologies represents a fundamental cornerstone for achieving unprecedented collaborative development excellence. Mastering the intricate processes of reverting pull requests through advanced git revert command implementations empowers development teams to maintain optimal code quality standards and swiftly address critical issues that emerge within complex software ecosystems. However, executing pull request reversions demands thoughtful strategic consideration, encompassing comprehensive analysis of potential ramifications across your entire codebase architecture and commit history trajectory.
Through implementing robust, structured code review processes, systematically addressing underlying systemic issues that precipitate frequent reversions, and optimizing developmental workflows with comprehensive key performance metrics, organizations can significantly minimize the necessity for pull request reversions. Leveraging sophisticated tools such as GitLab and GitHub platforms further streamlines these intricate processes, facilitating team-wide error prevention and maintaining highly reliable development pipeline architectures. Ultimately, mastering the sophisticated art of pull request reversion ensures your software projects maintain unprecedented stability, foster collaborative excellence, and remain comprehensively prepared for future scalability and growth trajectories.
Strategically orchestrating branch management stands as a cornerstone practice when reverting pull requests becomes essential for preserving pristine commit histories and circumventing unnecessary merge conflicts. Following the successful reversion of a pull request—whether necessitated by unintended modifications or issues that compromised the main branch integrity—ensuring the main branch accurately reflects your repository's updated state becomes paramount for maintaining development workflow efficiency.
Upon completing the revert operation, synchronizing the remote branch emerges as a critical step, guaranteeing that all collaborators operate within the most current commit history framework. This synchronization typically involves force pushing the updated branch to the remote repository utilizing the git command:
git push origin main --force
Nevertheless, deploying force push requires judicious consideration, as this operation possesses the capability to overwrite modifications on the remote branch. Establishing clear communication channels with your development team prior to executing a force push ensures universal awareness and enables seamless local repository updates across all stakeholders.
To substantially minimize conflict risks and reduce future revert necessities, implementing feature branch strategies for testing and validating modifications before merging into the main branch represents an optimal approach. By compartmentalizing new development initiatives within isolated branches, teams can comprehensively review, validate, and approve code contributions before they influence the main branch or broader repository chronology. This methodology effectively prevents unintended modifications from reaching production environments while streamlining pull request management and potential revert operations.
In essence, meticulous branch management—coupled with transparent communication protocols and disciplined git command utilization—ensures repository stability and maintains immaculate commit histories, even when navigating pull request reversions with precision and confidence.
When the necessity arises to revert a pull request while simultaneously maintaining local modifications that represent valuable developmental progress, Git provides a sophisticated and highly effective solution: git stash. Prior to executing a git revert command or implementing a git reset operation, developers can leverage git stash to temporarily preserve and safeguard their local modifications. This strategic approach enables teams to confidently revert pull requests without compromising the integrity of current developmental work or risking the loss of critical code changes.
To effectively stash your modifications and ensure comprehensive preservation of your current developmental state, simply execute the following command:
git stash
Following the successful completion of the revert process—whether accomplished through creating a new commit via git revert or resetting to a specific commit utilizing git reset—developers can seamlessly reapply their previously stashed changes by implementing the following command:
git stash apply
This comprehensive workflow methodology ensures that local modifications are meticulously preserved and can be strategically reapplied to the updated branch architecture, enabling development teams to continue their work with optimal efficiency and minimal disruption to established development patterns.
It's particularly crucial to understand that while git reset can be strategically utilized to move your branch pointer to a specific commit state, this operation fundamentally rewrites commit history and should be implemented with significant caution, especially within shared repository environments where multiple developers collaborate. In contrast, the git revert command represents a generally safer and more transparent approach, as it creates a new commit that systematically reverses the changes from the target pull request, thereby preserving the original commit history and making the entire process more transparent and traceable for collaborative development teams.
By strategically leveraging git stash capabilities and selecting the most appropriate revert strategy for your specific development scenario, development teams can confidently manage pull requests and local changes without disrupting established workflows or compromising the structural integrity and historical accuracy of their repository architecture.
Following the reversion of a pull request, organizations must strategically orchestrate main branch management protocols to ensure repository stability and guarantee comprehensive change reversal. The optimal methodology leverages the git revert command, which generates a new commit that systematically undoes modifications introduced by the original pull request. This newly created commit requires immediate propagation to the remote repository, thereby updating the main branch while preserving commit history integrity and maintaining comprehensive traceability.
Upon revert completion, teams must validate outcomes through systematic commit history analysis. Organizations can leverage git log functionality or examine the pull requests interface within GitHub to verify that the new commit has been successfully integrated and that the original pull request modifications have been effectively neutralized. This validation step proves critical for maintaining operational transparency and ensuring that the main branch accurately represents the intended codebase state across all development environments.
Furthermore, comprehensive analysis of the GitHub pull request interface enables teams to monitor revert status and validate process success metrics. By implementing these systematic approaches, development teams maintain clean and reliable main branch architecture, minimize future conflict risks, and ensure repository history remains transparent and auditable across all stakeholder touchpoints.
Effectively leveraging pull request reversion capabilities requires strategically referencing the optimal previous commit to ensure comprehensive change rollback operations. The git reflog command serves as a sophisticated diagnostic tool for identifying precise commit hashes of target commits, particularly when organizations need to revert specific merges or undo recent modifications that impact production workflows.
To initiate this process, utilize git reflog to analyze your comprehensive commit history and strategically identify the commit hash associated with the original pull request or the critical checkpoint preceding its integration. Once you've isolated the optimal commit hash, you can leverage the git revert command to generate a new commit that systematically reverses the implemented changes. For example:
git revert -m 1 <commit_hash>
The -m 1 flag strategically specifies the parent branch (typically the main branch) to preserve, ensuring the revert operation precisely targets the designated modifications while maintaining repository integrity.
It's also essential to optimize the commit message to comprehensively indicate that this represents a reversion of a specific pull request, providing valuable contextual documentation for future development workflows. On GitHub, organizations can leverage the integrated revert functionality on the pull request interface to automatically generate a new pull request that systematically reverts the changes, streamlining operational processes and maintaining transparent commit history tracking.
By strategically identifying the target commit and implementing appropriate git methodologies, development teams can ensure that reversion operations are both precise and effective, preserving the comprehensive integrity of repository history while minimizing potential risks and unintended operational side effects.

Counting lines of code can be used as one of the metrics to assess your developers’ productivity and the efficiency of code bases. A code base refers to the entire set of source code files within a project. Therefore, in this blog, we dive into the different methods to count lines of code and what we think about this metric.Let’s dive in!
There are several ways to count LOC, some more efficient than others with different objectives. Some methods allow you to count lines across all the files in your code base for a comprehensive analysis. For instance, Tokei shows the number of files, total lines within those files, and code, comments, and blanks grouped by language. So we have a list for you to use the best method that suits your needs.
Counting lines of code manually involves going through each line of code and tallying the lines while excluding comments, blank spaces, and non-executable lines. To do this, open the source code file and count the lines with a paper or text editor. This process is typically done on text files and may require checking the file extension to ensure you're counting the right type of source files. Go through it line by line and check for executable code, as identifying executable code is important to avoid counting non-executable lines. Once you are done, note the total count. However, this method might sound simple, yet it is tedious and prone to errors. Automated tools are more accurate and efficient, and we will discuss them in the following methods. For example, the command 'find . -name "*.php" | xargs wc -l' is used for counting lines of PHP code recursively in directory structures.
The Count Lines of Code (CLOC) command is a tool that automates counting lines of code. CLOC is available on Linux, Mac, and Windows. Here’s how to use the CLOC command:
Here is an example of the tool and its results.

The automated categorization of lines into different types and comprehensive statistics using CLOC makes it superior to manual counting. You can trust the reliability and efficiency of this tool to save you a lot of time and effort. CLOC can also count files and code across multiple file extensions, and it processes various text files to provide comprehensive statistics. Additionally, CLOC counts blank lines, comment lines, and physical lines of source code in many programming languages.
Here is an example of the tool and its results. CLOC offers outputs in various formats, ensuring you can extract data in nearly any text format you need. This flexibility makes it an excellent choice for teams needing detailed insights across diverse file types. CLOC can analyze code in different file extensions and text files, making it suitable for projects with diverse source files.
For those using integrated development environments, consider VS Code’s extension that offers a user-friendly approach. The VS Code Counter extension can be installed directly into your IDE. It provides real-time tracking of lines of code in your current file and across entire workspaces. It can also count code and files across the entire workspace, including all relevant file extensions. Moreover, it allows teams to customize how it interprets each tracked language using a file, without requiring complex terminal commands. Pygount is another tool mentioned for counting lines of code. Additionally, Tokei is available on Mac, Linux, and Windows, making it a versatile option for developers across platforms.
By leveraging these tools, teams can efficiently monitor their codebases, making these solutions invaluable for developers aiming to maintain clean and well-documented projects.
While the above methods show the lines of code, if your code increases in more blanks, comments, and statements, then the number gets inflated without any value added to the functionality. It's important to consider how many lines are actually executable code, as opposed to non-executable lines, since counting only executable code gives a more accurate measure of software functionality. Therefore, statements count is much more helpful in understanding the executability and functional efficiency of the code. In languages like C, C++, C#, or Java, a statement ends with a semicolon (;). And in languages like basic and VB, several statements can be added with a colon (:). Thus, the way it is done differs, but the logic remains the same. The executability (XQT) is calculated by dividing the number of executable statements (STMTX) by all the statements (SMT). Here are some specifics of this method:
While this does provide code complexity information, it still needs to be a fool-proof method. Factors such as data dependency and error handling can hamper the executability of the code.
When measuring developer productivity, it's crucial to select the appropriate metrics. Simply counting lines of code may not be dependable. Instead, experts advise measuring the number of executable statements within the runtime environment, which is a more comprehensive and precise comprehension of progress.Here are the steps:
Following these simplified steps, you can easily count the lines of IL code in your program.
When evaluating your codebase, understanding the difference between various lines of code metrics is crucial. Depending on the programming languages in use and the team’s goals, understanding and applying the right metric can improve code management and development efficiency. It is also important to distinguish between original and generated code, as including generated code or files copied during the build process can skew metrics and lead to inaccurate assessments. Let’s explore the distinctions between raw lines of code, source lines of code (SLOC), and logical lines of code.
By understanding these metrics, organizations can better assess the size and complexity of their code base, enabling development teams to make informed decisions about code maintenance, refactoring, and optimizing code review processes. Comparing metrics across the same team's code or within a team's code base ensures that analysis remains fair and meaningful, as productivity and quality measurements are most accurate when applied consistently within the context of the team's code and coding practices.
Raw lines of code are the simplest form of counting. This metric includes every single line in your code file—comments, empty lines, and all. While it may not offer the finest granularity, it serves as a quick snapshot showing the size or scale of a given code segment. For instance, if a branch in your repository suddenly swells to thousands of lines, it might be a signal to review and possibly refactor to maintain code quality. Physical LOC counts every line in the source file, including comments and blank lines. For Windows users, LocMetrics is an easy-and-quick tool to achieve this.
Source lines of code take a more refined approach by filtering out non-essential lines such as comments and blank spaces. This metric aims to capture the "active" lines in a codebase—those that are truly part of the executable logic. SLOC counts only the lines that contribute directly to the functionality, offering insights into the real complexity of a project. For example, consider a loop in JavaScript:
for(let i=0; i<10; i++) { console.log(i); }
Here, the curly braces and other syntactic elements take up space but offer no added functionality, which SLOC doesn't account for, giving a clearer picture of functional length.
Logical lines of code delve even deeper by counting statements instead of relying on physical line breaks. This measure accounts for the number of logical endpoints in code, often identified by semicolons in languages like Java or C++. Logical lines adapt to languages that lack rigid syntax for line endings, like Python, where line breaks are not necessarily indicative of new logic. Thus, it's a more universal and accurate reflection of code complexity across different programming paradigms.
Each type of code line metric offers unique insights into a codebase's complexity and productivity. Depending on the programming languages in use and the team's goals, understanding and applying the right metric can improve code management and development efficiency.
In summary, knowing the distinctions between these metrics allows development teams to make informed decisions about code maintenance, refactoring, and optimizing code review processes.
Code analysis tools have fundamentally reshaped modern software development ecosystems, becoming indispensable assets for teams dedicated to maintaining exceptional standards of code quality and productivity. These sophisticated instruments transcend the simplistic task of counting lines of code—they deliver comprehensive insights into your codebase by meticulously analyzing blank lines, comment lines, logical lines, and numerous other metrics. By automating the intricate process of counting lines and evaluating code complexity, these AI-enhanced tools empower teams to make data-driven decisions regarding code length, maintainability, and overall architectural health.
One of the most transformative advantages these advanced analysis platforms offer lies in their remarkable ability to adapt seamlessly across diverse programming languages. Since each programming language possesses unique syntax patterns and verbosity characteristics, a computational task requiring 100 lines in one language might achieve identical functionality with merely 50 lines in another. Code analysis tools intelligently account for these fundamental differences, delivering language-specific metrics that provide fair and precise assessments of your codebase. This sophisticated approach ensures that when you analyze code complexity or count lines of code, you're obtaining meaningful data meticulously tailored to your project's distinctive requirements.
Crafting concise code represents a hallmark of exceptional software development practices, and code analysis tools are strategically designed to help you achieve this ambitious goal. They automatically detect redundant or duplicated code segments, highlight unnecessary blank lines or superfluous comment lines, and suggest compelling opportunities for architectural refactoring. Whether you're analyzing code manually or leveraging automated analytical engines, these powerful insights empower developers to streamline their codebases, dramatically reduce potential errors, and enhance long-term maintainability.
It's crucial to recognize that measuring developer productivity exclusively through counting lines of code represents an insufficient methodology. While line count can provide a valuable snapshot of code length or development activity, it fails to capture the comprehensive picture—such as algorithmic complexity, code quality standards, or the collaborative efforts involved in peer-to-peer reviews. That's precisely why the most advanced code analysis platforms offer comprehensive suites of metrics, including cyclomatic complexity measurements, code churn analysis, and logical line assessments, to deliver nuanced understanding of your team's productivity patterns and your codebase's architectural health.
Beyond merely counting lines, these sophisticated analysis tools can identify critical sections of your codebase that demand additional attention—such as areas exhibiting high complexity or insufficient test coverage. By strategically focusing on these hotspots, development teams can proactively address potential vulnerabilities, significantly reduce bug risks, and streamline future code extensions or modifications.
Popular code analysis platforms such as Typoapp, SonarQube, CodeCoverage, and CodePro AnalytiX support extensive ranges of programming languages, including Java, Python, and C++. These comprehensive tools not only count lines of code but also provide advanced capabilities like intelligent code formatting, automated code completion, and robust support for peer-to-peer reviews. Their seamless ability to integrate with existing development environments and efficiently handle large-scale codebases transforms them into invaluable assets for any development team.
When selecting an optimal code analysis tool, consider critical factors such as ease of implementation, customization capabilities, and compatibility with your current workflow architecture. The ideal platform should deliver rapid, accurate analytical results, support multiple programming languages simultaneously, and offer advanced features that help maintain exceptional standards of code quality and team collaboration.
In summary, code analysis tools serve as essential foundations for any development team seeking to optimize their workflows and elevate software quality standards. By providing detailed metrics on lines of code, algorithmic complexity, and maintainability patterns, these transformative tools enable developers to craft more concise code, dramatically reduce errors, and ensure their applications achieve robust and scalable architectures. Whether you're managing a compact project or orchestrating an enterprise-level codebase, leveraging advanced code analysis tools represents a strategic approach to enhancing your development processes and achieving ambitious technological goals.
Counting lines of code has been a long-time metric; however, every tool and method gives different answers. Using it as a tool for productivity can be problematic because it is not comparable or fair unless you compare the same team’s code within the same team for the same code, language, and style. Using the same tool and settings for all measurements is important for consistency when tracking progress over time. Here are some more points for you to consider:
Therefore, we believe you can count the lines of code all you want, but don’t use it as a metric to determine which code is better or which developer is more productive. Use it as intended – as a metric to help you along the way. Focusing on executable code, rather than just total lines, can provide a more meaningful assessment of software functionality and efficiency.
While it's tempting to use LOC as a straightforward measure of productivity, this approach is riddled with misconceptions:
In summary, while LOC can provide some insight into the coding process, it should not be the sole metric for evaluating developer performance. Emphasizing quality, collaboration, and the broader context of work is crucial to fostering a productive and positive development environment.
Relying solely on lines of code as a productivity metric can be misleading. While it may offer some insight into a software development process, it fails to capture the full picture of what your organization is achieving. Here's how you can balance this metric with other key measures to get an accurate view of your team's performance.
Counting lines of code offers a quantitative look at productivity, but it doesn't account for the quality of the output, problem-solving efficiency, or impact on the organization. Overemphasizing this metric could steer your focus away from meaningful achievements and place undue pressure on your team, possibly sinking the entire operation.
For a more thorough assessment, integrate lines of code with other engineering metrics. Consider incorporating:
By assembling data from various metrics, you can pinpoint areas that need improvement and develop actionable goals. This approach encourages the team to focus on enhancing both the speed and quality of their deliverables. Tools like Trello or Asana can aid in visualizing task progress and identifying obstacles.
Shift the focus from sheer volume to strategic impact. Metrics like user engagement and customer satisfaction levels can better reflect the success of your product, aligning technical achievements with business objectives.
In summary, while lines of code can be a useful starting point, it's critical to balance it with a range of other productivity and quality measures. Doing so ensures that your organization remains agile, efficient, and focused on its broader goals.
LOC can give you glimpses into code complexity, code length, and executability, but that's where its importance should stop. Typo's CEO and Founder, Kshitij Mohan, says, “Measuring developer productivity solely by lines of code is like assessing a painting by its brushstrokes. It focuses on solution complexity rather than the complexity of the problem at hand. And like most metrics, it means very little without context.” Therefore, we believe you can count the lines of code all you want, but don't use it as a metric to determine which code is better or which developer is more productive. Use it as intended – as a metric to help you along the way.

Moving to a different role in your career is always exciting, but that doesn’t mean you can’t also have some self-doubt and anxiety. This guide is for programmers considering or preparing for a management role. Understanding this transition is crucial for career growth and team success. Transitioning from programmer to manager also requires a focus on mentoring and developing soft skills such as communication and empathy. Transitioning from a programmer to a manager often involves a significant shift in responsibilities and mindset. As you move from a technical role to management, you’ll find that your day-to-day work, priorities, and the way you contribute to your team and organization will change dramatically.
Before making the transition, it’s important to have a clear understanding of the differences between being a programmer and a manager, including the shift in responsibilities and expectations. As a programmer, your responsibilities are more focused on your deliverables and some amount of collaboration with your team member. However, as a manager, your duties will look different.
The responsibilities of a programmer focus on coding, problem-solving, and delivering solutions. Programmers are typically responsible for writing clean, efficient code, debugging issues, and collaborating with team members to build and maintain software products.
As a manager, the primary responsibilities shift towards guiding teams, developing talent, and ensuring alignment with company objectives. Managers are expected to provide leadership, mentor team members, allocate resources, and drive the team towards achieving both project and organizational goals.
Therefore, in this blog, we break down some tips to help you with the developer to manager transition and ensure you transition smoothly into your new role.
Transitioning from a technical role to management involves a significant shift in responsibilities and mindset. While programmers focus on technical problem-solving and individual contributions, managers must prioritize people management, strategic planning, and fostering a positive team environment. This change requires not only new skills but also a new way of thinking about your role within the organization.
Moving from being a programmer to a manager can seem daunting, especially since it means stepping outside your comfort zone. But it’s not necessarily a one-way street. With the right approach, you can transition safely using a trial period, and this allows you and your manager to assess if the new role suits you.
It’s also beneficial to develop your soft skills during this time by mentoring a junior employee. This is an excellent opportunity to experience management and take responsibility for someone’s career growth.
Working closely with your mentee enables you to evaluate your suitability for a management role without formal commitment. If your mentee responds positively to your mentorship style, it can be a strong sign that management is a good fit for you. Remember, this is a journey, and it’s okay to take your time to determine if this is the right path for you.
As someone who understands the ins and outs of software development, you know that producing quality code and delivering outstanding products requires the collective efforts of your team. Transitioning from a technical position to a leadership role means taking on new managerial responsibilities, shifting your focus from individual contributions to guiding and supporting others.
As a manager, your role is pivotal in ensuring that your team has all the resources needed to succeed. Leadership is at the core of any manager's role. While hands-on work may still be necessary, a significant part of your job involves managing people and projects. Managing a team also involves recognizing and leveraging individual strengths to maximize team performance. This could mean supporting team members who may be going through a tough time or encouraging someone contemplating leaving to stay.
It’s a challenging experience that requires emotional investment, but it’s crucial to remember that your efforts play a significant role in keeping your team happy and productive. Remember, as part of the managerial role, you will spend more time on people management and less on technical tasks. As a manager, you’re not just overseeing a team but also responsible for their well-being and success.
In today’s hybrid or remote work environment, your communication skills are more essential than ever, especially when it comes to writing. As a manager, you spend a significant amount of time typing away on your keyboard, exchanging and managing information. For new managers, giving feedback is a key communication skill that fosters growth, builds trust, and maintains open communication during one-on-one meetings. To sharpen your communication skills, it’s essential to set clear, measurable goals around how you respond to emails and messages. Regular feedback loops help in refining leadership styles and addressing shortcomings.
As a new manager, you’ll quickly learn that a timely response is often more valuable than a delayed one that’s been meticulously crafted. Finding the right balance between timely and thoughtful communication is critical to effective management. Effective managers provide specific feedback, set expectations, and frame work around individual strengths to drive engagement.
Additionally, as a manager, you must be more empathetic in your communication. This skill isn’t merely about language; it’s also about the tone you use and the words you choose while communicating. Regular feedback helps to improve your team's efficiency. Empathy and active listening are essential for understanding team members' needs and fostering psychological safety. It will allow your team to be more transparent with you and aid in a more cooperative team spirit.
As a manager, it can be a real challenge to balance your time between overseeing your team’s work and getting your hands dirty with coding. For those transitioning from a senior engineer role, one of the main challenges faced during the transition to management is letting go of hands-on technical work. While you have a range of important tasks to manage, such as setting project goals and managing resources, these duties can often limit the time you have available for coding, which can be frustrating.
In addition to these managerial tasks, you may also find yourself supporting and mentoring your team members, engaging in strategic planning activities, communicating and collaborating with stakeholders, and managing administrative tasks. New managers often feel pulled between technical tasks and managerial responsibilities, making balance essential. All of these activities require your presence and engagement, which can further limit your time for coding.
It’s important to remember that the amount of coding you do as a manager can vary depending on the size of your team, the nature of your projects, and the structure of your organization. In some cases, you may still have opportunities to contribute code on a limited basis, particularly in smaller teams or more hands-on managerial roles. Participating in code reviews is a great way for managers to stay technically involved and support team development, even as they code less.
Even though you may code less as a manager, your technical expertise and understanding of the development process remain incredibly valuable in decision-making, architectural discussions, and providing technical guidance to your team. So, don’t worry, you may not be coding as much as you used to, but your contributions are still significant and appreciated by your team.
Establishing trust within your team is crucial as a manager. It’s essential to provide your team members with clear instructions and expectations while assigning tasks based on their skills and expertise. Aligning team goals with both project outcomes and individual growth helps ensure everyone is working toward shared success, and recognizing the team's work fosters a positive environment and builds trust.
Ensuring open communication is key, and creating a safe space where team members can speak freely without fear of judgment or backlash is essential. Because remember when you were a developer and maybe someone didn’t trust you enough or when you felt micromanaged? Yeah, you don’t want your team members to feel that way. Managers need to focus on empowering their team members rather than micromanaging them.
Giving them the freedom to make decisions and solve problems within their areas of responsibility is essential too. To facilitate team growth, managers should empower others by delegating tasks that provide growth opportunities. Also, don’t forget to celebrate their accomplishments, support professional development, and practice transparency are all vital components to building trust. Providing ongoing support and development opportunities is essential for managing a team effectively.
Remember that trust takes time to develop, so lead by example and show your team members that you trust their abilities and support their professional growth. The focus of a manager's role is to empower and enable their team to succeed rather than to exert authority and control. With these efforts, you can create a positive and productive work environment for your team to thrive.
As a manager, managing your time effectively can be a challenging task. Unlike an individual contributor, whose schedule often allows for longer periods of focused work, a manager must balance frequent context-switching and interruptions. Unlike individual contributors, you may have limited time to focus on creative problem-solving. This means you must protect your team members’ time by minimizing unnecessary meetings or interruptions.
To ensure maximum productivity, many managers schedule all internal meetings on a specific day of the week. Documenting everything aids in managing context-switching effectively, which is especially important for many developers transitioning to management roles. As a great manager, you can get into the “flow” state quickly. By working in shorter blocks of time, usually around 20 minutes, and focusing on one task at a time, you can achieve this. By switching between tasks without losing productivity, your team can benefit from a positive and productive work environment.
Beyond these foundational tips, one of the most nuanced challenges is managing relationships with former peers.
Transitioning from a software engineer to an engineering manager is a significant step in your career, and one of the most delicate aspects is learning how to work with former peers in your new management role. Suddenly, the colleagues you used to collaborate with as equals are now looking to you for leadership, guidance, and decision making. Navigating this shift requires a blend of technical expertise, leadership skills, and strong communication skills.
As a programming manager, your primary responsibilities expand beyond your own work to include the well-being and professional growth of your entire team. This means you’ll need to establish clear boundaries and expectations with your former peers, while still maintaining the trust and camaraderie that made your team effective in the first place. Open, honest communication is key—be transparent about your new role, and invite feedback to ensure everyone feels heard and valued.
People management becomes a central focus as you move away from hands-on technical work. While your technical skills and knowledge remain invaluable for providing guidance and making informed decisions, your success as a manager will depend on your ability to foster a safe environment where team members feel comfortable sharing new ideas and concerns. Practicing active listening and demonstrating emotional intelligence will help you understand team dynamics and address any challenges that arise.
Managing former peers also means adapting your management style to fit the needs of the team. Some team members may need more support as they adjust to the new dynamic, while others may thrive with increased autonomy. Flexibility and self-awareness are essential—be willing to adjust your approach as you learn what works best for your team.
Resource allocation and strategic planning become more prominent in your day-to-day work. You’ll need to balance the needs of individual team members with the goals of cross-functional projects and the broader objectives of your software company. This shift from focusing on technical details to seeing the bigger picture is a hallmark of a successful manager.
Remember, many developers find this transition challenging, but it’s also a tremendous opportunity for career growth and professional development. By prioritizing people management, building strong relationships, and leveraging your technical expertise to provide guidance, you can help your team grow and achieve their goals. With patience, empathy, and a commitment to continuous learning, you’ll not only navigate the complexities of managing former peers—you’ll become the kind of great manager who inspires and empowers your entire team.
A new role can be daunting, but if that’s what you want, then it can also be an exhilarating experience. As you move from a software developer or tech lead to a manager position or line manager, focus on developing your management skills and strive to become an effective manager, rather than aiming to be the best manager. Maintaining your technical knowledge is important, even as your responsibilities shift.
Key skills for managers include:
Building strong relationships with other developers and other managers is crucial for success in your new role. Gaining the respect and trust of former peers can be challenging, but it is a vital part of the transition.
Embrace continuous learning, self-reflection, and seek feedback as you progress along the manager's path. Modern managers must adapt to rapidly changing technologies, integrate AI-assisted tools, and prioritize system reliability and incident management.
Recommended readings:
Ultimately, management involves navigating human complexity, empathy, conflict resolution, and personal development.
While thinking about how to be a better manager, you can also include tools that can help you and your team. A platform that allows engineering teams to maximize productivity and reduce stress will be a game changer for your new team. Typo can be your friend in this process; you can schedule a demo to learn how!

‘Product Hunt’— a popular destination for startups, early adopters, and investors. It is considered to be a go-to platform that turns your product into a business if done right.
Considering that, we launched ‘Typo’ on 22nd February 2023 on Product Hunt.
To our surprise, it exceeded our expectations and we became product #1 on launch day with ~2000 upvotes. But, that’s not all! We also became the #1 product of the week and #2 product of the month.
It not only gave us 300+ signups globally but our website traffic was also boosted by 8x.

In this article, we have shared our extensive learning that made our product a success. Hope it helps everyone who is planning to launch their product soon on a product hunt.
We are proud of how ‘Typo’ launch became a huge success. But, it wouldn’t have been possible without the Product Hunt platform. We prepared everything for our launch, the Product hunt gave us much-needed attention and visibility.
Before you start with the pre-launch preparation, know what your goal for your product is. I.e. Get clear on what outcome you want to achieve!
Our main aim was to find early adopters who can give us product feedback.
Following are the few objectives that you can choose from:
P.S: Choose the goal that will be beneficial for your product in the long run.
Now, as you are clear about your goal, you can start with pre-launch preparation.
We set aside 3-4 months for pre-launch time. We jot down the entire plan and created visuals and content. Everything was done during this time.
Ensure that the product is ready: Who would like to give the new users hard time while they test our product? Nobody, right?
The first thing we checked was that all the features in our product are working fine. We tested it constantly. Also, if there are any bugs, we ensure to fix them on a priority basis.
We also ensure that the website is appealing and has a smooth user interface. Our CTA needs to be visible. Also, everything about the software should already be on the website.
Makers need to be active in the product hunt: Makers = The ones who create the product and launch them on the product hunt.
Ensure that the makers are active and responsive prior 3 months before the launch. By this, we didn’t mean to keep promoting your product. But, you need to try out new products shared on the platform, share feedback and ask questions to the creators.
In short, you need to take part organically in the platform. Ensure that you are not active only for the sole purpose of launching your product. Be deeply involved in this platform.
For us, it has been the most important aspect of our launch time. Our makers were constantly engaging with other creators and sharing their feedback. And in the end, it was all worth it!
Decide the time and date beforehand: The product hunt homepage is set to 24 hours cycle. Hence, deciding the time and date is the crucial aspect of the launch day.
We decided to launch our product on 22nd February, Wednesday at 12:00 AM PST. Let us break it down for you to understand why we choose this particular day and timing.
As mentioned above, we aimed to acquire early adopters to get honest feedback. Tuesday, Wednesday, and Thursday are considered to be the perfect days for the same. Hence, Wednesday it was.
The product hunt homepage refreshes at 12 AM PST every day. So, we decided to make it live at this time. It will ensure that users will get enough time to review and experiment with our product.
Note that, posting after 9 AM PST is a big no-no.
Get your team on the same page: Product hunt launch is a team effort. Ask your team members to be actively engaging on this platform. Let them know how their efforts can contribute to the success of our product.
Make them understand what you are doing and assign the roles accordingly.
Example: Who will be in charge of content planning?
Who will be posting on social media channels?
(This particular part we will be covering in the next section)
We created a slack channel where we discussed everything regarding our product hunt launch. It allowed us to be aligned with everyone on our team. If there are any suggestions from their side, they can discuss them openly in that slack channel.
Have content strategy planned for the next few days: The content strategy plan is the most overlooked yet important part of the launch. Since, the next few days will be quite busy, prepare a content strategy 2 weeks before the launch. We did the same and then assigned roles to the different members of our team.
You need to prepare and post individual content on social media channels. It includes Reddit communities, Discord channels, Facebook and Telegram groups, and many more. Also, make sure that you are not spamming on any of these platforms. As it could harm the product even before its launch.
Create a coming soon page for your product: Schedule your launch on Product Hunt at least 10 days before. It further allows you to create a coming soon page for your product. After this, you can see the CTA of ‘Notify me’ on the page.
Anyone clicking on this will get a notification via email about the launch of your product. Try getting as many followers as you can get before the launch day. So, you are assured about the early upvotes on your product when launched.
Identify hunters of your product: Hunter: The early adopters of the product who can ‘hunt’ the product and show it to the rest of the community.
Having a hunter is not a necessity, but it can bring a lot to your table. Their followers also learn about your product, increasing engagement and visibility.
Kudos to Kevin William David, a well-known hunter who agreed to hunt us on a product hunt. This was another major factor in the success of our product.
If you are looking out for the hunter, check out their previous hunts and pitch your idea to them. You can reach out to them via email or Twitter. Try identifying your hunter at least 10 days before the launch. You can find the hunter for your upcoming launch here.
Besides this, self-hunted products can also be considered.
While major work is already done, here are a few other checklists that also need to be kept in mind.
Set the right positioning of the product: The description is the most important part of your Product Hunt launch. It should be specific and have a clear message about your product.

For the Typo page, we wrote a description that is to the point and short. We answered the two major questions:
Ensuring that it is well-optimized and connected to our unique value proposition. As it resulted in driving organic traffic to our product.
Decide visuals for the profile: Visuals attract a lot of attention. Create appealing images, GIFs, and launch videos to add to your product hunt profile. Make sure they are of high quality and clarity in messaging.

The visuals we created for our page have a minimal design yet clearly describe our product’s features. Our launch video includes all the important information about our product that helps users understand our product in-depth which further, assists their experience.
You can also add image/video screenshots to your page. Also note that, if you are using a GIF image as a thumbnail, it shouldn’t be flashy.
Add PH widget to your website: This will act as an indicator who still haven’t heard of the launch yet. And even for those, who want to learn more about the product.
Keep a check on website traffic: While you have already created a website, it’s important to keep a check on how much traffic it can bear. (Just in case your product goes viral!)
You can keep this day flexible. As the launch day could be your no-sleep day. (Since 24 hours are crucial for your product)
On this day, you can re-check if everything is on track for tomorrow. Don’t keep anything for the last moment.
This is like a 24-hour battle. Here, you are competing with various products that are launching on the same day. Make it worthwhile and for that, you need to be active throughout your day.
Involve every member of your team: Your team is your biggest supporter and cheerleader. Make them your brand evangelists so they promote the product in every way possible. But, also make sure they have explored the platform in advance. So, they know what and how it needs to be done.
You can also assign duties to them in advance so they don’t get lost at the last moment.
Also, don’t forget to let them know that they need to ask for support, not for upvotes. Since product hunt is strict about its guidelines and can report them as spam. (You don’t want to see any of your team members’ efforts go in vain.)
We are a team of 15 members and with our combined efforts, we became the #1 product of the day. If we as a small team, can do so, we assure you can give it a shot too. Trust us, size doesn’t matter. All it matters is your dedication and efforts.
Don’t reach out to your contacts all at once: This is a 24-hour activity. Don’t reach out to everyone altogether. You can divide your outreach into various parts.
For example:
And so on…
You can also ask a few of the team members to upvote early and some of them later. But, make sure that they are members for a decent period before the launch. Since creating new accounts for upvoting on the same day of the launch can again be considered spam.
No fake accounts as well! Since it can lower your upvotes or even avoid your product from being visible on the homepage.
To know your product and competitors’ performance on the product hunt, check out this link: https://pw2.akkio.com/ .
Create buzz on social media platforms: Just like how active you are on the product hunt, the same goes for social media platforms too. You need to let the people know that your product is now live.
A few of the social media channels that we used are:
We posted hourly updates on LinkedIn about how many upvotes we are getting. Either from our product’s page or a team member’s account.

We also posted BTS on our social channels. So that the audience can connect with us.
In Reddit and discord communities, we shared that our product is live. So, that they can support us and give us honest feedback.
In short, you need to make a lot of noise about your product on D-day. But, again make sure that you are not becoming spammy.
Be responsive on product hunt: Makers’ work doesn’t end with releasing their product. You need to respond to every comment and feedback on your product.
Keep interacting with them to learn how you can deliver them an even better experience. As engagement helps to bring visibility and recognition to your product.
Ensure that your answer are insightful & helpful for the users. Also, don’t forget to thank early adopters and hunters for trying out the products.

These responses and feedback can help in prioritizing your product roadmap. And can create a smooth user experience in the upcoming future.
Seek support from other tech startups: We work in a co-working space. Hence, we leveraged it to gain support from other tech startups working there where they shared their honest feedback and opinions about our product.

So if you are too working in a co-working space, it’s the sign.
Create a pre-launch and launch plan on google sheets: It’s not possible to remember everything regarding your product launch. Hence, it is advisable to prepare a detailed plan in advance on google sheets. (Or any other application that suits you well).
We created an in-depth plan that was shared with every team member. It made our product launch easier since everything was in one place.

Your product is now live. But, this is not over yet. You now need to ensure how much users are liking your product and what are the improvements to be done.
In other words, the Post-launch period is all about analyzing your product and making changes accordingly.
Thank everyone who support your launch: We became the #1 product of the day and our happiness seemed no bound. But, it wouldn’t have been possible without people who supported Typo.
The first thing we did after launch day was to express our gratitude to them. We let them know how much we appreciate their support.
And this isn’t about being the top product on the platform. Even if we haven’t been one of them, we still would thank them for their support. Since they took out their time to help us out.
Also, make sure that you personalized your message accordingly. You can also use social media channels to thank your supporters.
Analyze your launch: No matter how well we did on the launch day, the real game begins after it. We checked what really worked for us and what did not. We tracked our Product hunt statistics that includes upvotes, comments, and referrals. How many signups did we get and what do users usually expect from us? We did detailed analyses of our product on the platform.
Not to forget, we also keep a check on our website through google analytics too. We tracked website traffic during and after the product hunt launch, time on site, and bounce rate.

Since you are creating a product for the long run, analyzing every aspect of your product is crucial.
Track user usage: We prepared a questionnaire for tracking the beta users’ feedback. A few of the questions we include were:
We kept the questionnaire short and crisp. And so should you. We also tracked what features are users using, what they are finding difficult, and many more.
Ensure that you are transparent with the users about the tracking process. And also, you act on the insights as early as possible.
Keep promoting your product subtly: Social media channels are a great way to reach out to a wider audience. But, you don’t have to keep promoting your product directly always.
After the product went live, we shared the BTS of launch day – How fun yet challenging it was. We also posted a video thanking our supporters, creating memes around it, and so on.

We just make sure that we aren’t only asking people to try out our product. Rather, educating them, informing them about features, and so on.
We also started our blog section where we inform our target audience regarding engineering metrics, developers’ burnout, engineer managers, and so on.
Ask for support, not upvotes: Although, we have already mentioned it before. But, this is an important reminder for everyone launching on product hunt. Asking for upvotes can lead to more spamming that can trigger your algorithm. As a result, it can drop your product rank or remove it from the homepage entirely.
Ask for feedback, comments, and opinions, and help to spread the word. PH believes people should upvote and comment because they authentically like a product, not because they’re peer pressured into doing so.
New users shouldn’t sign in on launch day: New relevant users in your network should avoid signing in on the same day and upvote only on one product. Ensure that they are already active and engaging with other creators and communities.
Don’t spam on social media: Ensure that you are not spamming on your social media pages as well. This can come across as spammy or manipulation and hurt your product’s credibility.
Get everything planned: Don’t keep everything for the last moment. Jot down important tasks before launch. Also, even if you want to experiment, plan it before d-day.
Avoid bots for upvotes: Never use bots for upvotes. The product hunt platform will automatically remove them which can lower your upvotes.
Create an FAQ section to answer common questions: You can include common questions in the FAQ section. It includes features, pricing, availability, and many more. This will save the time of both makers and users.
If you didn’t become a product of the day, it doesn’t mean your product will not succeed.
Sharing the tips mentioned above may not guarantee you become #1 on the product hunt. It’s about how well you understand your product, audience, and insights.
Also, keep in mind that in the long run, your aim is to reach the target audience.
You can still share your product on social media channels and engage with the community.
Note that what worked out for us may not work for you. So, be flexible about the tips mentioned above and see what is right for you.
It may take a lot of time and effort, but it will be all worth it.
All the best! :)
Sign up now and you’ll be up and running on Typo in just minutes

We're on a mission to build engaged, productive tech teams. Try it out for free!


Follow us on:
We're on a mission to build engaged, productive tech teams. Try it out for free!
Follow us on:


